
Are you tired of the annoying Low Disk Space errors your Windows 10 keeps displaying? The usual methods of freeing up storage space in your C drive not working? Well, you’re not the only one, and that is exactly why we have decided to write this guide to help you deal with this issue once and for all. First, we provide a short overview of the problem, which you can skip if you’re in a hurry. We’ll then go over several ways to extend system partition in Windows 10 before suggesting a magic shortcut that can help you bypass the problem altogether.
Problem Overview
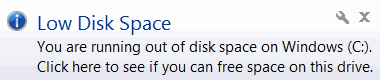
If you’re reading this then chances are high you have already seen the dread Windows 10 error known as Low Disk Space. In the unlikely case, you have forgotten what it looks like, this is it:
So, what exactly is happening that causes this error message to pop up? Well, you may already know this, but Windows uses one of the disk partitions as the primary one, and that is the one you select when first installing the OS. It’s called the “system partition” and it is usually the C drive, which is the letter designating the first partition on the hard drive. Why would the drives start from C and not from A, you ask? It’s actually because of how early PCs were assembled — before HDD hard drives, floppy drives ruled all, and the letters A and B were used to map the floppy drives. Decades have passed, and you’d be hard-pressed to find floppy drives today, but the tradition lives on.
Let’s get back to the problem. When you partition the hard drive, you set a fixed amount of space aside for your system partition. As you install new software and use your Windows, the C drive fills faster than the other drives. All the settings, the cached files, and system configurations amount to a considerable amount when added together. So, sooner or later, you will see the Low Disk Space error. In the following sections, we will look at ways to fix the issue, sorted from easy to complex. Finally, we leave you with an alternative that lets you bypass the problem entirely, a sort of magic shortcut.
Low Disk Space Solutions
How to increase disk space in Windows 10 using Disk Management?
The Windows native software Disk Management is an easy way to handle the low disk space issue, though its success is not guaranteed. Disk Management essentially functions by adding free, unallocated space to different partitions. There is a catch, however. Unallocated spaces can only be added to partitions adjoining them, that is, the ones next to them on the hard drive. This method is also ineffective if the partition you want to extend is not NTFS, but since we’re discussing the system partition, it is unlikely to have any other file system type.
Get yourself an efficient Windows 10 VPS for remote desktop, at the cheapest price out there. FREE Windows 10 running on NVMe SSD storage and high-speed internet. Windows 10 VPS Hosting
So, the only way to see if you can use this method to extend the system partition in Windows 10 is simply to start the program. With any luck, you’ll find a nice chunk of unallocated space right next to the C drive. Let’s get to it.
Step 1: Launch the Extend Volume Wizard
First, open the Start Menu and search for Disk Management. You can also find it under Administrative Tools in the list of programs or by right-clicking the Windows Start button and selecting it from the menu. Run Disk Management, and in the window that pops open, right-click on the C drive. Choose the Extend Volume option to call up the Extend Volume Wizard. If the option is grayed out, that means this method is unavailable to you, probably because no adjacent unallocated space could be found. The wizard will then take you through the following steps.
Step 2: Add unallocated disk spaces
Click Next on the first wizard screen. On the next screen, you’ll be able to select the disks that you want to operate on. You can find the unallocated disk spaces available on the list to the left. If there are none available, it means you won’t be able to extend your system partition using this method.
Click on a space and click the Add > button to add it to the list on the right, titled Selected. Add as many free spaces as you can to extend the final disk space of the C drive as much as possible. After you’re done, click on Next to go to the next stage of the wizard.
Step 3: Finalize the changes
Review the changes you’re about to make to ensure there is no mistake, and then click on the Finish button to finalize the extension process. After a while, you should be back to the main screen of Disk Management, with the C drive space now increased.
Also Read: How to install IIS on Windows 10?
How to increase disk space in windows 10 using the Command Line?
You can do the same thing with the Windows command line and the diskpart utility. It may look complex, with a lot of typing involved, but it is very straightforward actually, and it can also be used in case you’re working on a headless remote server without a GUI.
Step 1: Start PowerShell
Open the Windows PowerShell using the Start Menu. Also, remember to launch it as Administrator. If you are using an SSH connection, then you will already have access to the command line. If you’re using an RDP connection to your Windows 10 VPS, you have to perform the same steps.
Step 2: Launch the diskpart utility
Enter the following command into Windows PowerShell and press Enter:
diskpart
Now, you will be seeing the minimal text-based UI of diskpart, which should look something like this:
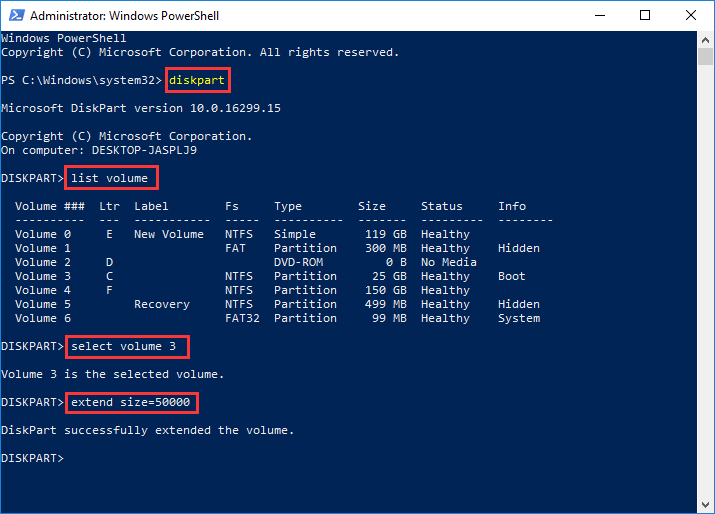
Now, following the DISKPART> prompt, enter the following command:
list volume
Step 3: Select the correct drive
You’ll see a list of all partitions with their name, file system, and other info. It’s essential to find your system partition (the C drive by default) and note its volume number, which will be listed under the first column. With the number in mind, enter the following command.
select volume ##
(where ## is the volume number of the system partition)
Step 4: Enter the <extend> command
Now, all that remains is to command diskpart to extend the partition size by entering the following command.
extend size=###
(where ### equals the number of megabytes (MB) by which you want to extend C drive.
Make sure to pay attention to the number of zeros you’re putting down since the number is supposed to be in megabytes.
Just like the previous method, using diskpart is only possible if there is an unallocated space adjacent to your system partition. If that is not the case, you need to use the third and final method, which may be a little more complicated, or you can simply jump to the end of the article for a shortcut.
How to increase disk space in windows 10 using Partitioning Software?
If using Disk Management was not possible, you can always just transfer your files from the D drive to another one or to the cloud, delete the D drive, and then use Disk Management to add the space freed to extend the C drive. Of course, that is not a very attractive option, seeing how it would take a lot of time and effort. The good news is, you’re not out of options. The next one down the list is using a 3-rd party software. There are numerous partitioning applications, both free and paid, but for the purposes of this tutorial, we are going to use DiskGenius Free Edition.
Get yourself an efficient Windows 10 VPS for remote desktop, at the cheapest price out there. FREE Windows 10 running on NVMe SSD storage and high-speed internet.
Windows 10 VPS Hosting
Before diving in, however, we need to make something clear. Even though the process itself does not remove any data, there are still things that can go wrong. To minimize risks, please complete the following checklist before using DiskGenius.
✔ If you’re using a laptop, make sure to plug it in so you won’t lose power midway through.
✔ Use the Windows Disk Scanner to scan the disk for bad sectors and remove them. Bad sectors encountered during the extension procedure can make the program crash and damage your data.
✔ Close all other running programs, especially if they may access the hard drive.
✔ Check if your Windows is configured for hibernation or sleep mode in case it is inactive for some time. Disable it if that is the case because the process is likely to take up quite some time.
Step 1: Download and run DiskGenius
First, you need to download the accessible version of DiskGenius from their official website. Once you’ve downloaded and installed DiskGenius Free Edition, launch it and move to the next step.
Step 2: Go to the Extend Partition screen
On the left, you will find a list of all the partitions on your disk drive. Find the system partition (the C drive by default) and right-click on it. From the menu, choose Extend Partition.
Step 3: Choose the correct partition
Now, on the Extend Partition screen, you will see a breakdown of the disk, with partitions and their volume being clearly shown. Look for a partition with a lot of free space, because DiskGenius will transfer that space to your C drive. Once you’ve decided on the partition you want to downsize to increase disk space Windows 10, click on OK and continue to the next step.
Step 4: Resize the partition
In the Resize Partition window, you can decide just how much of the new partition you want to move over to your C drive. You can either drag the separator bar or use the text box to type in an exact amount. You can also decide to leave some more unallocated space left (in case you need to try this again).
When you have made all the necessary configurations, click on the Start button. You will then be shown a list of the changes about to take place. After going through them to make sure they are correct, click Yes.
Now, settle in with a nice cup of coffee or your beverage of choice because it will take some time, and your computer may reboot once.
A Simpler Solution
Well done! If you have followed the steps above, you have probably managed to solve the Low Disk Space error on your Windows 10. But they are not easy and don’t always work. What if you don’t have any free space left on your entire disk? What if something were to happen during the extension procedure and your hard drive is fried? Well, we know of a great way you can prevent these problems and all the hassle that comes with troubleshooting Windows by using the Cloudzy Windows 10 VPS. A VPS is a type of virtual computer that you can use remotely and securely (you can learn more about VPS here). You can easily increase disk space in Windows 10 VPS by simply asking for it! We also keep regular backups of your data so you won’t have to worry about losing your files. So, if you’re tired of Windows taking up too much of your time (and who isn’t!), check out our affordable plans here. enough storage, upgrading to a better plan if necessary.


0 Comment