50% 할인 모든 플랜, 기간 한정. 시작 가격 $2.48/mo
읽는 데 9분
서버 및 OS

Ubuntu에서 사용자를 전환하는 방법 - 단계별 가이드

Ada Lovegood By Ada Lovegood 9분 분량 Updated Jun 19, 2024
Ubuntu에서 사용자 전환

Navigating user management in Ubuntu is a crucial skill for its users. Understanding user roles and permissions is highly important, as they dictate access rights and system control. We’ll explore both the Command Line Interface (CLI) and Graphical User Interface (GUI) methods on how to switch user in Ubuntu to provide clear, step-by-step instructions. Whether you’re a seasoned system administrator or new to Ubuntu, this guide offers valuable insights into efficiently managing user accounts. From the power of the root user to the flexibility of standard accounts, mastering user switching enhances both system functionality and security.

Understanding User Permissions in Ubuntu

Managing user permissions is a cornerstone of system security and functionality in Ubuntu. In Ubuntu, users are typically categorized into three types: the root user, standard users, and guest accounts. Each carries varying levels of access and control over the system.

Root vs. Standard vs. Guest Users: An Ububntu Comparison

  • Root User: Often referred to as the superuser, the root account possesses unrestricted access to all commands and files. It’s the most powerful user in Ubuntu, capable of making system-wide changes, including those affecting security and hardware settings.
  • Standard Users: These users have limited access rights. They are primarily confined to their own files and directories. They can install software and access system files only when granted explicit permissions, usually through the sudo command.
  • Guest Users: Guest accounts are temporary and have the least privileges. They are ideal for users who need short-term access without the ability to alter system settings or access other users’ data.

The Role of Permissions in User Switching 

Understanding the importance of permissions is crucial when you want to learn how to switch user in Ubuntu. Only users with the appropriate privileges can execute certain commands and actions. For example, switching to the root user or another standard user requires different levels of access.

The sudo command plays a pivotal role here. It allows a permitted user to run commands with the security privileges of another user, by default the superuser. This foundational knowledge of user roles and permissions is essential for effectively managing user accounts.

Changing User via Command Line Interface (CLI) 

In Ubuntu, one of the most efficient ways to switch user accounts is through the Command Line Interface (CLI). Many users prefer this method for its speed and direct control. In this section, we’ll explore how to change user in Ubuntu using CLI commands, specifically focusing on the susudo commands. These commands are integral to Linux and offer a straightforward approach to switch user in Ubuntu accounts.

Basic CLI Commands for User Switching 

The su (substitute user) command is used to switch to another user account. By default, without specifying a username, it switches to the root user. The sudo command allows a permitted user to execute a command as the superuser or another user, as specified by the security policy.

Switching to Another User 

To switch to a different user, type su – [username]. Replace [username] with the desired username.

You’ll be prompted to enter the password of the user you’re switching to.

Switching to the Root User

Simply type su and press Enter. Enter the root password when prompted. This gives you access to the root account, allowing you to perform administrative tasks.

Returning to Your Original User

To return to your original account, type exit or press Ctrl+D. This will log you out of the current user session.

By following these steps, you can easily switch user in Ubuntu using the CLI, a method that is fast, efficient, and widely used by system administrators and power users. Next, we’ll look at how to switch user in Ubuntu using the Graphical User Interface (GUI).

Switching Users through Graphical User Interface (GUI)

For users who prefer a more visual approach, Ubuntu offers the ability to switch user accounts via its Graphical User Interface (GUI). This method is user-friendly and ideal for those who are less familiar with command-line operations. In this section, we’ll guide you through the steps to change user Ubuntu using the GUI.

Accessing User Accounts 

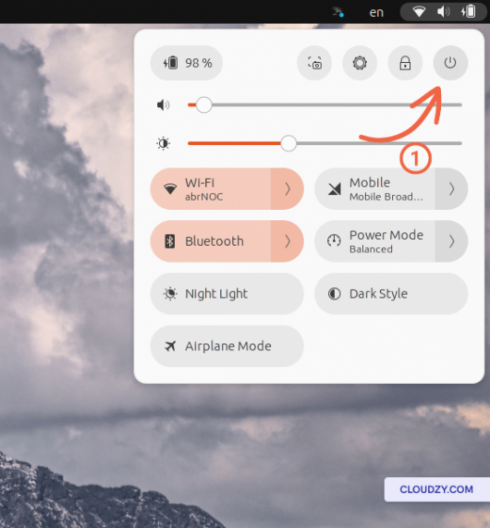
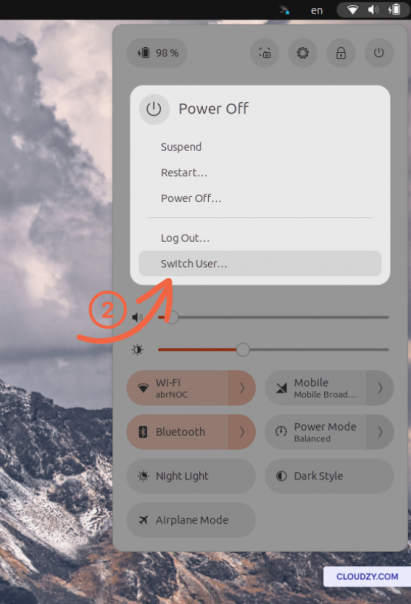
Click on the system menu at the top-right corner of your screen. Here, you will find the Power off option. To switch user Ubuntu, click on the Power off option. And in the Power off menu, click on the Switch user option. You can also select the Log Out option. This will take you back to the login screen.

Switch user in Ubuntu with GUI, step 1


Switch user in Ubuntu using GUI, step 2

Using Fast User Switching Feature

Ubuntu also offers a fast user-switching feature. This allows you to switch between users without logging out. From the system menu, select the user you want to switch to directly. This bypasses the need to enter a password, assuming you’ve logged in previously.

This GUI method to switch user in Ubuntu provides a simple and efficient way to manage multiple user accounts, especially for those who prefer a graphical interface over command-line tools. It’s important to note that while the GUI method is convenient, it might not offer the same level of control as the CLI method, particularly for advanced tasks.

Creating a New User in Ubuntu

There may be instances where you need to add a new user to your Ubuntu system. Whether it’s for a new team member, a separate account for different tasks, or for testing purposes, knowing how to create a new user is a valuable skill. In this section, we’ll cover both CLI and GUI methods for creating a new user in Ubuntu, providing clear instructions for each approach.

CLI Method: Adding a New User in Ubuntu

The command-line interface offers a quick way to add new users in Ubuntu. To create a new user, open the Terminal and use the adduser command followed by the desired username.

sudo adduser [newusername]

The system will prompt you to enter and confirm a password for the new user and fill out additional information, which is optional. After completing these steps, you’ll have a new user account.

GUI Method: Creating a User through System Settings

For those who prefer a graphical interface, Ubuntu allows user creation through the system settings.

Go to the system menu and select ‘Settings’. Navigate to the ‘Users’ tab. Click on the ‘Add User’ or ‘Unlock’ button (you may need to enter your password). Fill in the necessary details for the new user, including username and password, and set the account type (Standard or Administrator). Confirm the creation of the new user account.

Setting Up Permissions for New Users 

It’s important to consider the permissions and access level of the new user. For a standard user, permissions are limited to personal files and settings. You can set the account type to ‘Administrator’ if the new user requires administrative privileges. This allows them to perform system-wide changes and access restricted system areas. By following these steps, you can efficiently create a new user in Ubuntu, either through the CLI or GUI.

Linux VPS 호스팅

저렴한 가격으로 웹사이트 호스팅이나 원격 데스크톱에 사용할 수 있는 일반 또는 프리미엄 Linux VPS를 지금 바로 이용해 보세요. Linux KVM 기반으로 효율성을 높이고, NVMe SSD 스토리지가 탑재된 고성능 하드웨어로 빠른 속도를 제공합니다.

더 보기

결론

In conclusion, mastering the skill of how to switch user in Ubuntu, whether through the Command Line Interface or the Graphical User Interface, is a valuable asset for any Linux user. Understanding user permissions and knowing how to create new users enhances your system’s security and flexibility.

For those who are looking to take their Ubuntu experience to the next level, Cloudzy의 Linux VPS offers a seamless, high-performance solution. With plans featuring various preinstalled distros, Cloudzy makes sure that you have the perfect environment for your projects, whether personal or professional. Benefit from 24/7 support, a 30-day money-back policy, and competitive pricing to make the most out of your Linux experience. Cloudzy’s Linux VPS is not just a service; it’s a gateway to exploring the full potential of Ubuntu with reliability and ease.

자주 묻는 질문

How do I switch users on Linux?

Switching users in a Linux environment is a straightforward process. If you’re aiming to change the current user to another one, you can utilize the su command. Open your terminal and type the su command: Enter su followed by the username of the account you wish to switch to. You’ll be logged in as that user by entering the password. To return to your original user, simply type exit in the terminal.

How do I run as a different user in Ubuntu?

Running commands as a different user in Ubuntu is a simple task. Open your terminal. Type su -c ‘command’ [username], replacing command with the command you want to run and [username] with the name of the user. For example, su -c ‘apt update’ john. You’ll need to enter the password for the user account under which the command is to be executed.

How do I switch from root to user in Ubuntu?

Switching from the root user to a standard user in Ubuntu is a common practice to avoid the risks associated with operating as root. Open your terminal as root. Type su – [username], replacing [username] with the name of the user account you wish to switch to. For example, su – john. Enter the user’s password. This action logs you out from the root account and logs you in as the specified user, enhancing your system’s security.

공유

블로그 더 보기

계속 읽기.

Cosmos Cloud로 실행할 수 있는 최고의 셀프 호스팅 앱 - Cosmos 대시보드와 앱 패널 커버 이미지.
서버 및 OS

Cosmos Cloud로 실행할 수 있는 셀프 호스팅 앱 모음: 파일, 미디어, 비밀번호, 자동화 등!

Maybe Cosmos Cloud를 이미 설정했고 어떤 앱이 잘 맞는지 알고 싶거나, 아직 Cosmos를 도입할지 결정하지 못해 실제 워크플로에 얼마나 잘 맞는지 확인하고 싶다면

Nick SilverNick Silver 16분 분량
Portainer vs Cosmos Cloud로 Docker 앱 관리하기 — 하이브리드 설정 다이어그램과 운영/접근 블록이 담긴 커버 이미지.
서버 및 OS

Portainer vs Cosmos Cloud: Docker 앱 관리에 적합한 선택은?

Docker를 이미 알고 있고 늘어나는 앱 스택을 더 깔끔하게 운영할 방법을 찾고 있다면, 답은 간단합니다. Portainer vs Cosmos Cloud 중 직접적인 제어 측면에서는 Portainer가 더 나은 선택입니다.

Nick SilverNick Silver 14분 분량
Cosmos Cloud vs CasaOS vs Umbrel — 셀프 호스팅의 세 가지 경로를 추상적인 클라우드 네트워크 배경으로 표현한 피처 이미지.
서버 및 OS

Cosmos Cloud vs CasaOS vs Umbrel: 내 환경에 맞는 셀프 호스팅 플랫폼은?

간단히 말하면, CasaOS는 여전히 시작하기 가장 쉬운 선택이고, Umbrel은 큐레이션된 경험이 가장 깔끔하며, 도메인과 설정을 더 세밀하게 제어하고 싶을 때는 Cosmos Cloud가 더 적합합니다.

Nick SilverNick Silver 11분 분량

배포할 준비가 됐나요? 월 $2.48부터.

2008년부터 운영해온 독립 클라우드. AMD EPYC, NVMe, 40 Gbps. 14일 환불 보장.