50% 할인 모든 플랜, 기간 한정. 시작 가격 $2.48/mo
읽는 데 6분
보안 및 네트워킹

CentOS 7에서 SELinux를 활성화하는 방법 | CentOS 서버 보안 강화

Alex Robbins By Alex Robbins 6분 분량 Updated May 30, 2023
Enable-SELinux-on-CentO

   With exploits and vulnerabilities revealed almost daily and reports of cyber-crimes increasing, security is on everyone’s minds. There are different ways you can go about improving your system security. If you use (or plan to use) a CentOS or Fedora server, SELinux is an ideal starting point. SELinux is a fast and robust security protocol and application that helps you check and control the users and their access level to the files and applications on the system. In this article, I’ll provide a brief intro to SELinux before showing you how to enable SELinux on CentOS 7.

What is SELinux?

The Security-Enhanced Linux (SELinux) is a security structure designed to provide Linux system administrators with more control over users accessing the system. It was originally developed by the U.S. National Security Agency (NSA) as a series of patches and upgrades to the Linux kernel using the Linux Security Modules (LSM).  SELinux was released as an open-source tool in 2000 and then synced with the whole Linux Kernel in 2003.

How Does SELinux Work?

SELinux controls access to all the files, processes, and applications on your system. Using a set of predefined rules as the security policies, SELinux can define a secure and valuable access policy. SELinux, will protect the system and prevent unauthorized attempts to access a resource. In this approach, the so-called principle of least privilege means that the user of a program needs to be granted permission to access files, directories, sockets, and other services.

When an application or process (called a “subject”) requests to access a file as an object, SELinux uses the Access Vector Cache (AVC) to evaluate the access. This cache stores all the permission caches for subjects and objects, which means the processes and what they’re trying to access. Without any permission caches stored, SELinux wouldn’t be able to make any decisions. In such cases, SELinux simply contacts the security server and asks for information to evaluate the access request. The security server applies the SELinux policy for evaluating the access, then grants or denies the request based on that. You can always check out the message logs (at “/var/log.messages”) to see which requests have been accepted or denied.

What Are The SELinux Modes?

SELinux allows admins to set its functionality to one of the three following modes. Each mode has different security restrictions and its uses:

Enforcing mode: This is the default mode, which blocks and logs the actions that don’t meet the policy standards.

Permissive mode: This mode provides you with the ability to work on logs and events in detail. This mode especially helps test the SELinux feature. Here, changing modes of operation between the forced and the permissive will not require a system reboot. 

Disabled mode: This allows you to perform all actions and do not log the action. Switching to this mode requires a system reboot.


How to Enable SElinux in CentOS 7 

  • Check The SELinux Status :

Step 1: Check your SELinux On/Off Status

Before trying to enable SELinux, you should check if it’s already disabled. 

Enter the following command check the settings in your terminal:

sestatus

The output shows that SELinux is now disabled on your system.

Disable SELinux

Step 2: Check your Requirements for Enabling SELinux

  • A user account with the sudo privileges
  • Access to a terminal/console
  • A system based RHEL like CentOS 7
  • A text editor tool nano

linux-vps Linux 호스팅, 간편하게

웹사이트나 웹 앱을 더 좋은 환경에서 호스팅하고 싶으신가요? 새로운 것을 개발 중이신가요? 아니면 단순히 Windows가 마음에 들지 않으신가요? 바로 그래서 저희가 Linux VPS를 제공합니다.

Linux VPS 시작하기

  • Starting SELinux :

Step 3: Use nano editor to open the Config file

Set the SELinux status of the service. So go to  /etc/selinux/config file and use a text editor like Nano.

sudo nano /etc/selinux/config


Step 4: Change SELinux Mode

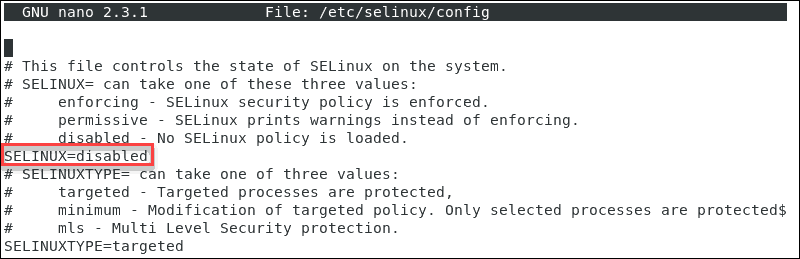
Now, you can change the SELinux mode to either permissive or enforcing.

Here you can change the marked line to the mode you need.

SELinux Status


Step 5: Save the Changes

Then press CTRL + X to apply and save. After that, press ‘y’, then Enter to confirm the whole process


Step 6: Reboot your Server

Now you should reboot the system. To do so, enter the command below and press <Enter>:

sudo reboot

Step 7: Re-Check SELinux Status

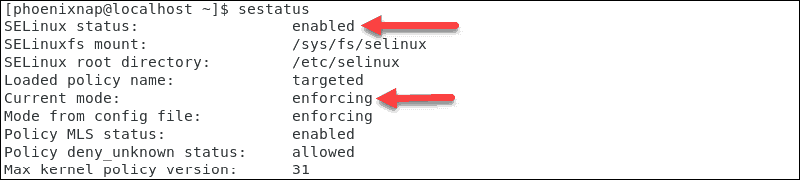
If you want to check the status of SELinux, enter “sestatus”  in the command line again.

Now, the result confirms that you’ve already enabled the enforcing mode in the system.

Enable SELinux

How to Disable SELinux on CentOS 7 

Follow the command below to switch the SELinux mode temporarily from targeted to permissive::

sudo setenforce 

But notice that this change only applies to the current runtime session.

To disable SELinux on your CentOS 7 system permanently, follow these steps:


Step 1: Set SELinux mode to “disabled”

Open the /etc/selinux/config file, then you should set the SELINUX mode to “disabled”

Step 2: Save Changes and Reboot

Now save the file and after that, reboot your CentOS system with the command:

 sudo shutdown -r now

Step 3: Re-check SELinux Status

When the system boots up, confirm the change by giving a sestatus command:

 sestatus

How To Change Change SELinux Mode 


Instead of disabling SELinux entirely, you change its mode to permissive. The actions that have been carried out leave a trace in the log file. 

Now follow the steps below to switch the SELinux mode from enforcing to permissive type:

sudo setenforce 0

Now you should turn the enforcing mode on,  so enter the command below:

sudo setenforce 1

These changes are only valid for the current session. They will return to their default values after a system reboot. To make those changes permanent, you should edit the configuration file using a text editor (like nano, for example). 

linux-vps Linux 호스팅, 간편하게

웹사이트나 웹 앱을 더 좋은 환경에서 호스팅하고 싶으신가요? 새로운 것을 개발 중이신가요? 아니면 단순히 Windows가 마음에 들지 않으신가요? 바로 그래서 저희가 Linux VPS를 제공합니다.

Linux VPS 시작하기

Securing your CentOS 7 Server Beyond SELinux

Now that you have installed SELinux on your CentOS 7, you can rest knowing your system is more secure than before. Of course, there is no way to ensure that any system is entirely secure. There is always more to be done, look, for example, at the items in this guide to securing your Linux VPS. In fact, even with SELinux, we have only used the most basic security measures it has to offer. More than that, whatever safeguards you establish will count for nothing if the hosting provider for your server isn’t secure enough. That is why, at Cloudzy, we maintain the highest levels of security, with hardware and AI-based firewalls, smart DDoS protection, and other proprietary measures. Enjoy our CentOS VPS solutions and run a truly secure server.


공유

블로그 더 보기

계속 읽기.

노트북이 빛나는 파란색과 금색 디지털 터널과 방패 아이콘을 통해 서버 랙에 연결되는 모습을 보여주는 MikroTik L2TP VPN 가이드의 Cloudzy 타이틀 이미지.
보안 및 네트워킹

MikroTik L2TP VPN 설정 (IPsec 포함): RouterOS 가이드 (2026)

이 MikroTik L2TP VPN 설정에서 L2TP는 터널링을 담당하고 IPsec은 암호화와 무결성을 담당합니다. 두 가지를 함께 사용하면 서드파티 없이도 네이티브 클라이언트 호환성을 확보할 수 있습니다.

Rexa CyrusRexa Cyrus 9분 분량
어두운 청록색 배경에 원격 호스트 식별 변경 경고 메시지와 수정 가이드 제목, Cloudzy 브랜딩이 표시된 SSH 터미널 화면.
보안 및 네트워킹

경고: 원격 호스트 식별이 변경되었습니다 - 수정 방법

SSH는 시스템 간에 암호화된 터널을 생성하는 보안 네트워크 프로토콜입니다. GUI 없이도 컴퓨터에 원격으로 접속해야 하는 개발자들 사이에서 꾸준히 사용되고 있습니다.

Rexa CyrusRexa Cyrus 읽는 데 10분
어두운 배경에 경고 기호와 파란색 서버가 있는 Linux 이름 확인 오류 관련 DNS 서버 문제 해결 가이드 일러스트
보안 및 네트워킹

이름 확인 임시 실패: 원인과 해결 방법

Linux를 사용하다 보면 웹사이트 접속, 패키지 업데이트, 인터넷 연결이 필요한 작업 실행 시 이름 확인 임시 실패 오류가 발생할 수 있습니다.

Rexa CyrusRexa Cyrus 읽는 데 12분

배포할 준비가 됐나요? 월 $2.48부터.

2008년부터 운영해온 독립 클라우드. AMD EPYC, NVMe, 40 Gbps. 14일 환불 보장.