ウェブホスティングの複雑さをナビゲートすることは、しばしば以下につながる可能性があります
サーバーリソースの過小利用。特に複数の
ウェブサイトを管理する場合に該当します。本記事では、以下の方法を示すことでこの課題に対応しています。
単一のサーバーで複数のウェブサイトをホストしています。
Apache の Linux システム (Ubuntu および CentOS) 上での機能とインターネット
インターネット インフォメーション サービス (IIS) on Windows、ユーザーはサーバーを最大限に活用できます
潜在力、ウェブサイト管理の合理化、および大幅な削減
オーバーヘッドコストを削減できます。本ガイドはサーバー管理者に
ホスティング環境を最適化するためのステップバイステップの手順を提供しています。
各ウェブサイトが統合されたサーバー下でシームレスに動作することを保証する
セットアップ
Apache
Ubuntu と CentOS の構成
このセクションでは、Apache を設定するプロセスを段階を追って説明します。
単一のサーバーで複数のウェブサイトをホストします。特に
UbuntuおよびCentOSシステム。
前提条件
システムのパッケージデータベースを更新してください:
Ubuntu/Debian:
sudo apt update
sudo apt upgrade -y
CentOS/RHEL:
sudo yum update -y確認してください sudo 実行する権限
管理タスク。
ステップ1: インストール
Apache
Ubuntu/Debian:
sudo apt install apache2 -yCentOS/RHEL (パッケージ名は httpd です):
sudo yum install httpd -yステップ 2: 作成
ディレクトリ
各ウェブサイト用のルートディレクトリを作成します。
sudo mkdir -p /var/www/domain.com/public_html
sudo mkdir -p /var/www/domain2.com/public_html
置き換える domain.com と domain2.com と共に
あなたの実際のドメイン名。

ステップ3: 割り当て
権限
ウェブサーバーがアクセスできるように権限を設定してください
コンテンツ:
sudo chown -R $USER:$USER /var/www/domain.com/public_html
sudo chown -R $USER:$USER /var/www/domain2.com/public_html
sudo chmod -R 755 /var/www
ステップ 4: インデックスを作成
ページ
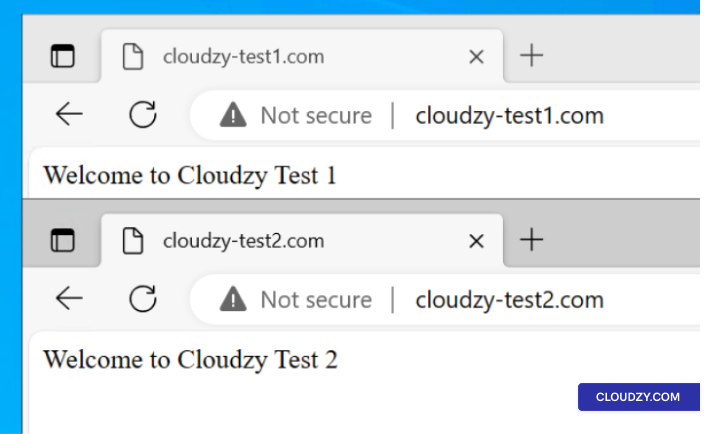
シンプルに作成 index.html ドメインごとのファイル:
echo "Welcome to domain.com" | sudo tee /var/www/domain.com/public_html/index.html
echo "Welcome to domain2.com" | sudo tee /var/www/domain2.com/public_html/index.html
ステップ 5: 構成
仮想ホスト
デフォルト設定ファイルをコピーし、各ドメイン用に編集します。
sudo cp /etc/apache2/sites-available/000-default.conf /etc/apache2/sites-available/domain.com.conf
sudo cp /etc/apache2/sites-available/000-default.conf /etc/apache2/sites-available/domain2.com.conf
仮想ホストファイルを編集する domain.com:
sudo nano /etc/apache2/sites-available/domain.com.confファイル内で必要な変更を加えてください:
<VirtualHost *:80>
    ServerAdmin [email protected]
    ServerName domain.com
    ServerAlias www.domain.com
    DocumentRoot /var/www/domain.com/public_html
    ErrorLog ${APACHE_LOG_DIR}/error.log
    CustomLog ${APACHE_LOG_DIR}/access.log combined
</VirtualHost>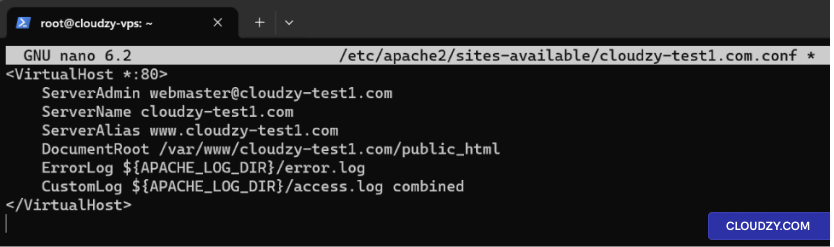
プロセスを繰り返す domain2.com.
ステップ 6: サイトを有効にする
新しいサイトを有効にし、デフォルトサイトを無効にします。
sudo a2ensite domain.com.conf
sudo a2ensite domain2.com.conf
sudo a2dissite 000-default.conf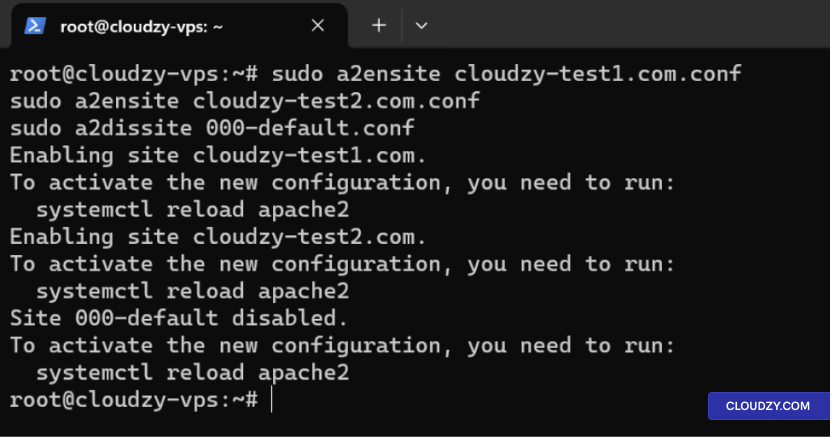
ステップ 7: 再起動
Apache
Apache を再起動して変更を適用します。
Ubuntu/Debian:
sudo systemctl restart apache2CentOS/RHEL:
sudo systemctl restart httpdステップ 8: 編集
Hostsファイルとテストウェブサイト
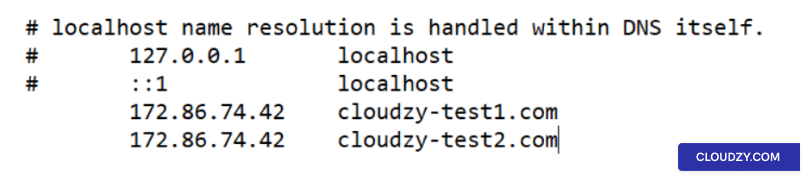
ホストファイルを編集:
- hosts ファイルをテキストエディタで開きます。
sudo nano /etc/hosts- サーバーのIPアドレスを指す、ドメイン用のエントリを追加します。
例えば:
192.168.1.10 domain.com
192.168.1.10 domain2.com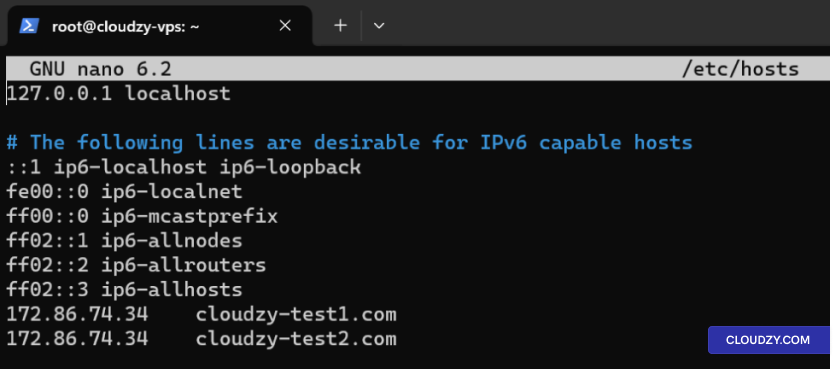
- ファイルを保存して閉じます。
または DNS の A レコードを更新してください:
登録済みのドメインがある場合は、DNS で A レコードを更新してください
サーバーの IP アドレスを指すように設定してください。
Curlを使用してウェブサイトをテストする:
ウェブサイトがアクセス可能な状態か確認してください。
curl http://domain.com
curl http://domain2.com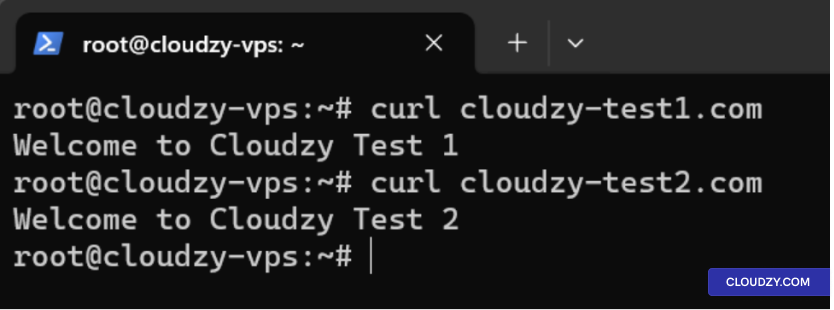
IIS設定
Windows Serverの場合
このセクションは、設定するための包括的なウォークスルーを提供します
複数のウェブサイトを Internet Information Services を使用して単一のサーバー上でホストする
(IIS) Windows Server 上
ステップ
1: Add Roles and Features ウィザードを使用してIISをインストールします
-
サーバーマネージャーを開く: サーバーマネージャーをクリック
タスクバーのアイコンをクリックするか、スタートメニューから開きます。 -
ロールと機能の追加ウィザードを起動: に
サーバー マネージャー ダッシュボードで、クリック 管理 そして
選択 ロールと機能を追加. -
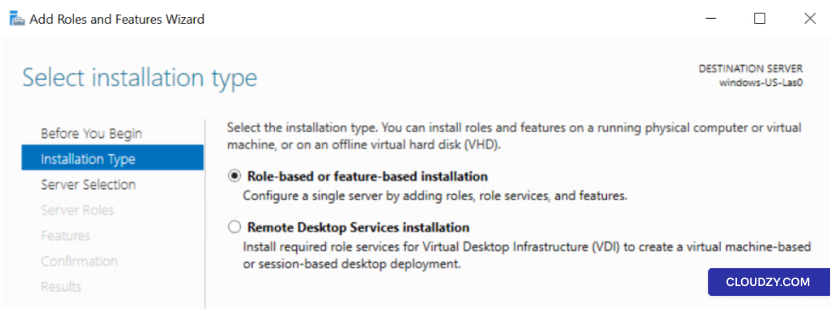
ロールベースまたはフィーチャーベースのインストール: チームドキュメントには
ロールベースまたは機能ベースのインストール をクリックして
次へ.
-
サーバーを選択: サーバーを選択してください
IISをインストールしたい場合はクリック 次へ. -
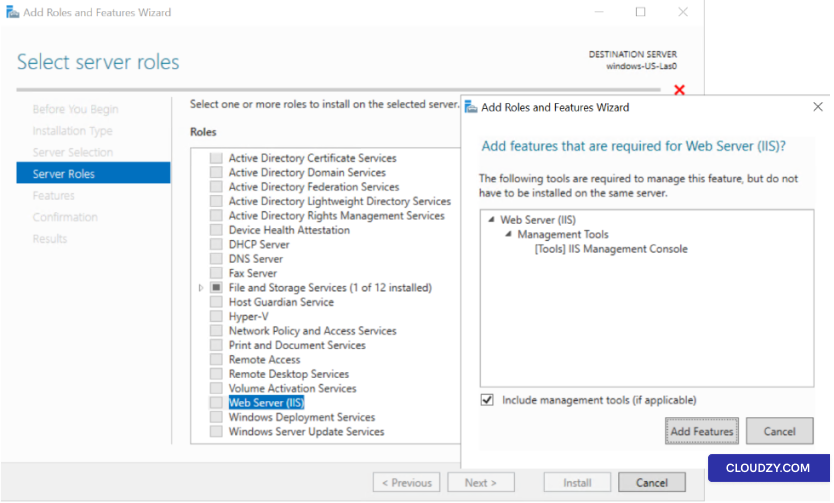
ロールを追加: ロールセクションでチェックボックスをオンにしてください
には、Web Server (IIS)。機能追加を求められた際に
はWeb Server (IIS)に必要です。こちらをクリックしてください 追加
機能.
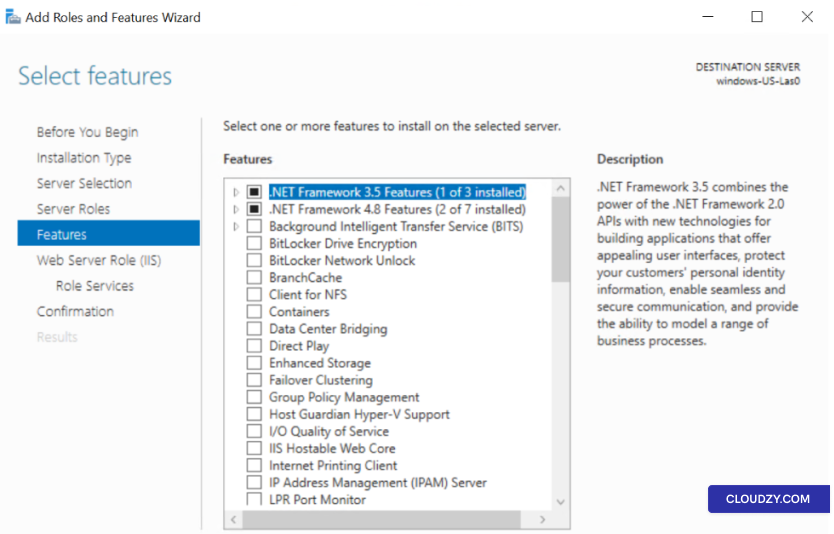
- 機能: 追加機能は不要です
特別な要件がない限り。クリック 次へ.
-
Webサーバーの役割 (IIS): 情報を確認する
をクリックして 次へ. -
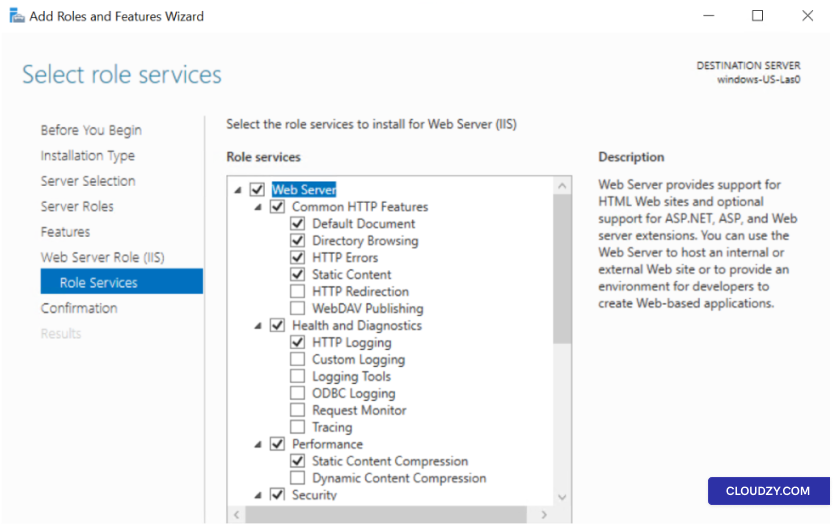
ロールサービス IISロールサービスを選択してください
インストールします。基本的なウェブサーバーの場合、デフォルト設定で問題ありません。
十分です。クリック 次へ.
-
確認: 選択内容を確認してクリック
on インストールインストールプロセスは
開始。 -
完了: インストールが完了したら、
クリックする 閉じる.
ステップ2: ウェブサイトを追加
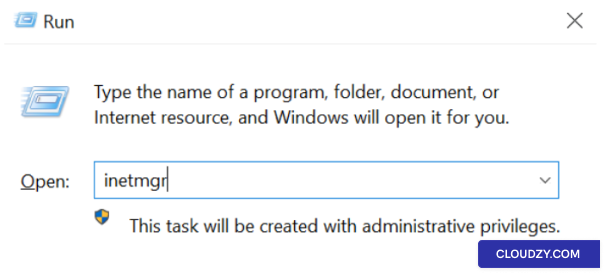
- IIS マネージャーを開く: 押す Windows キー +
R、入力 inetmgr、そして押す
Enter.
-
新しいウェブサイトを作成: 右クリックしてください
Sites IIS Manager のフォルダを選択して 追加
Website. -
ウェブサイトの詳細
-
サイト名: 説明的な名前を入力してください。
-
物理パス: フォルダを選択
ウェブサイトのファイル。 -
入力: 通常 http.
-
IPアドレス: IPを選択するか、そのままにする すべて
未割り当て. -
ポート: 通常 80 には、
HTTP. -
ホスト名: ドメイン名を入力してください。
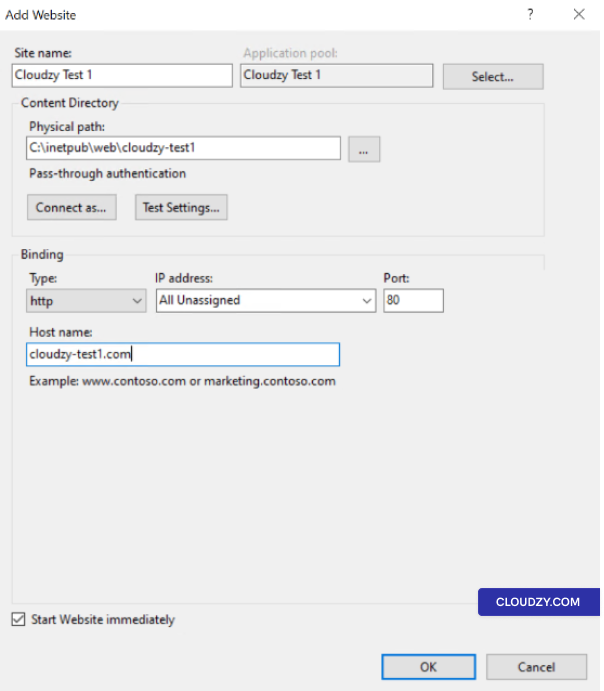
- 複数のウェブサイトで繰り返す: 同じように進める
各ウェブサイトのステップ
ステップ 3: ホストを設定
ヘッダー
-
ウェブサイトを選択: IIS内のウェブサイトをクリック
マネージャー -
Open Bindings: バインディングを開く: に アクション
パネルをクリックして Bindings.
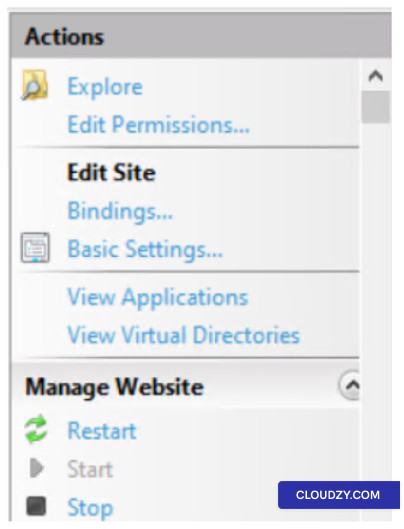
-
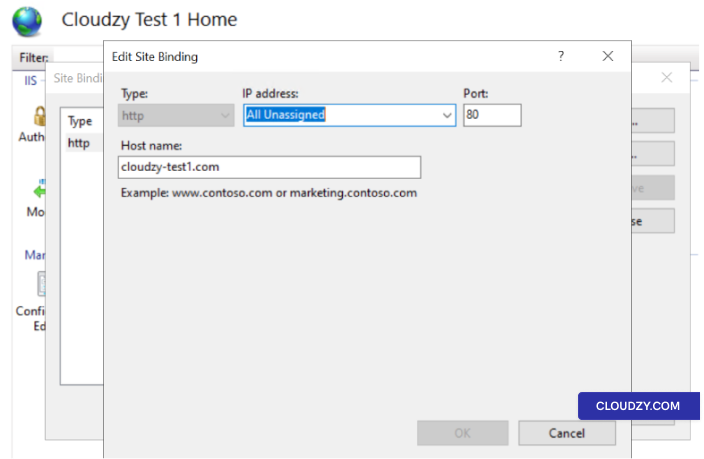
バインディングを編集または追加: In サイト
Bindings、既存のバインディングを編集するか、
追加. -
ホスト名を指定: ホスト名を入力してください
ホスト名 フィールド
- 複数のウェブサイトで繰り返す: 同じように進める
各ウェブサイトのステップ
ステップ4: 管理
DNSとHostsファイルの編集
-
DNS レコードを更新: あなたのドメイン名が
IIS サーバーに解決されるため、DNS の A レコードを次のアドレスにポイントするよう更新してください
サーバーのパブリックIPアドレス。以下を使用している場合に必要です
登録済みドメイン名 -
ホストファイルを編集する(オプション): もし〜しない場合
ドメインを持っていてローカルでテストしたい場合は、以下のホストファイルを編集できます
ローカルマシン上に保存されます(サーバーではなく)。このファイルは通常、以下の場所にあります
**C:*** 各ウェブサイトのエントリを追加して、IPアドレスを指定します
IIS サーバーの。例:
192.168.1.10 domain.com
192.168.1.10 domain2.com
置き換える 192.168.1.10 あなたのIPアドレスで
Windows Server。変更はこのウェブサイトのみに適用されます
ホストファイルを編集するマシンからアクセスできます。
ステップ 5: 確認
ウェブサイト
ウェブブラウザを開き、各ドメインに移動して確認してください。
ウェブサイトが正しく配信されています。hostsファイルを編集した場合は、
編集したマシンでこれを実行してください。コンテンツが表示されるはずです。
すべてが正しく設定されている場合、ウェブサイトが正常に機能します。
ステップ6:
追加設定(オプション)
-
SSL証明書: HTTPS を使用する予定の場合、
各SSL証明書をインストールして構成する必要があります
サイト -
アプリケーション プール: 別々に作成することを検討してください
各ウェブサイトのアプリケーション プールを使用して管理を改善し
セキュリティ -
セキュリティ設定 セキュリティの確認と設定
ご要件に合わせた設定
各ウェブサイトは独自のドメイン名を通じてアクセス可能になり、共有する
同じサーバーリソース。
結論として、単一のサーバーで複数のウェブサイトをホストする場合
Apache または IIS は効率的でコスト効果に優れています。詳細な手順に従うことで
Ubuntu、CentOS、Windows サーバーの手順に従うことで、
ウェブ管理を簡潔にし、サーバーリソースを最適化して
オンラインでの確かな存在感を持つことができます。ご不明な点がございましたら、いつでもお気軽にお問い合わせください
私たちへ 提出
サポートチケット.
同じカテゴリー 手動インストール