ローカルシステムとの間でファイルを効率的に転送する
Windows VPS はリモートサーバーを効果的に管理するために不可欠です。
ガイドは、手間のかからないファイル転送のための3つの実用的な方法を説明します
リモートデスクトップを使用したファイル転送により、作業を効率化できます
ワークフローとCloudzy Windows VPSをローカル環境と同期させた状態に保つ
環境
メソッド
1: ローカルPCから Cloudzy Windows VPS へのドライブ共有
この方法により、ドライブとフォルダをシームレスに共有できます
あなたのローカルPCとCloudzy Windows VPSを使用して リモートデスクトップ
接続 (RDP)。特に以下のような場合に役立ちます。
VPSで作業中にローカルシステムに保存されたファイルにアクセスするか、または
2つの環境間でファイルを効率的に転送します。
ステップ1:
リモートデスクトップ接続を構成する
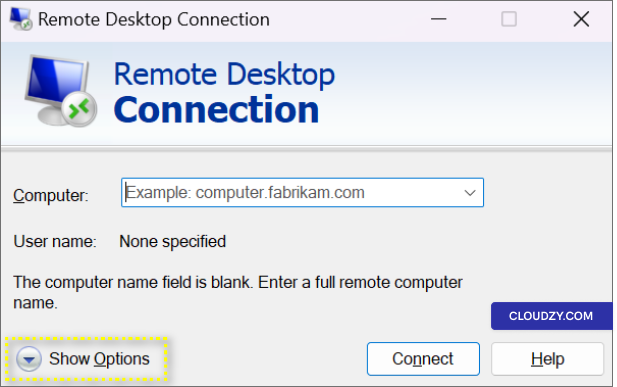
- ローカルコンピューターでリモートデスクトップ接続を開きます。
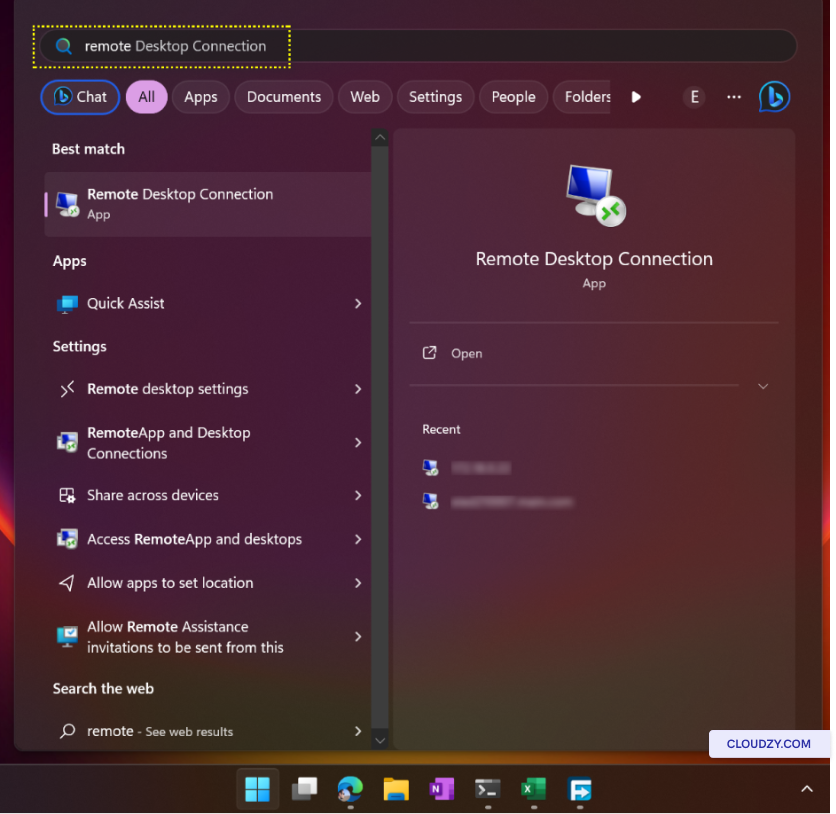
- 次をクリック: オプションを表示.
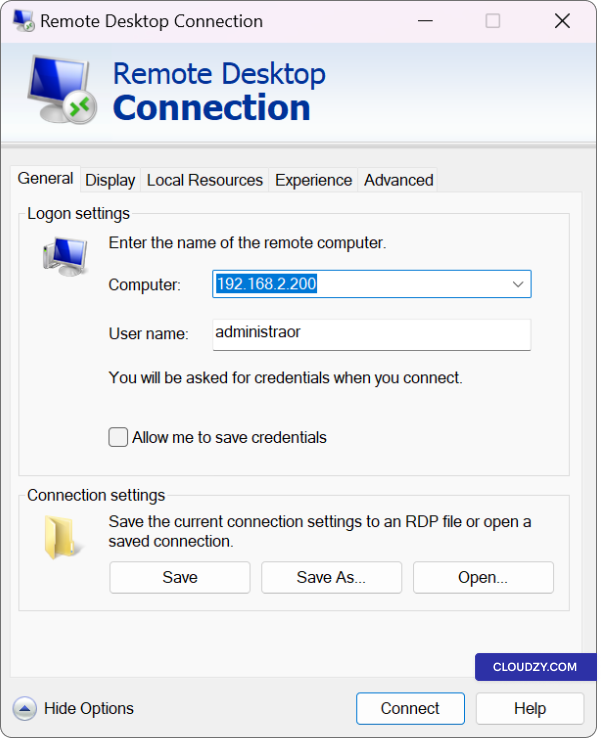
-
に コンピューター セクションにIPアドレスを入力するか
Cloudzy Windows VPSの完全なドメイン名。 -
ユーザー名を入力してください(デフォルトは
Administrator).
ステップ2:
ローカルワークステーションのドライブをリダイレクト
接続が確立されたら、次のように共有を設定できます
ローカルドライブとフォルダ。この機能により、以下を選択できます
VPS内でアクセスできるようにしたい特定のドライブまたはフォルダ
セッション。必要なリソースを選択することで、ファイルの処理を効率化します
転送とアクセス
-
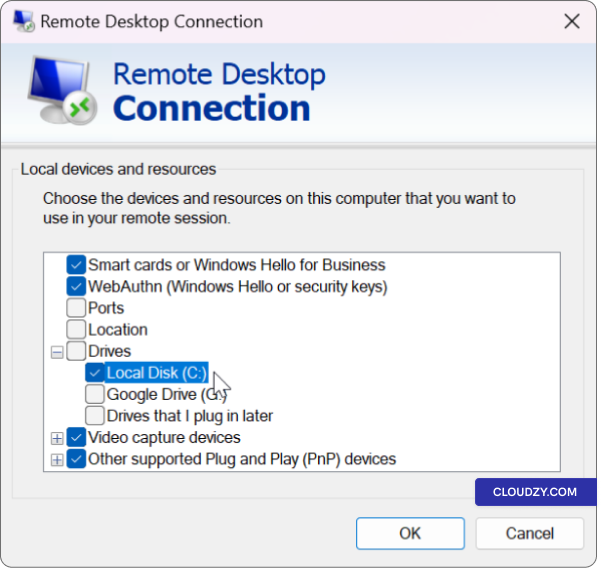
リモートデスクトップ接続ウィンドウで、以下をクリックします 表示
オプション. -
に移動 ローカルリソース タブ。
-
以下 ローカルデバイスとリソース、クリックしてください
もっと.
- 共有したいドライブまたはフォルダをチェックして選択してください
ボックス
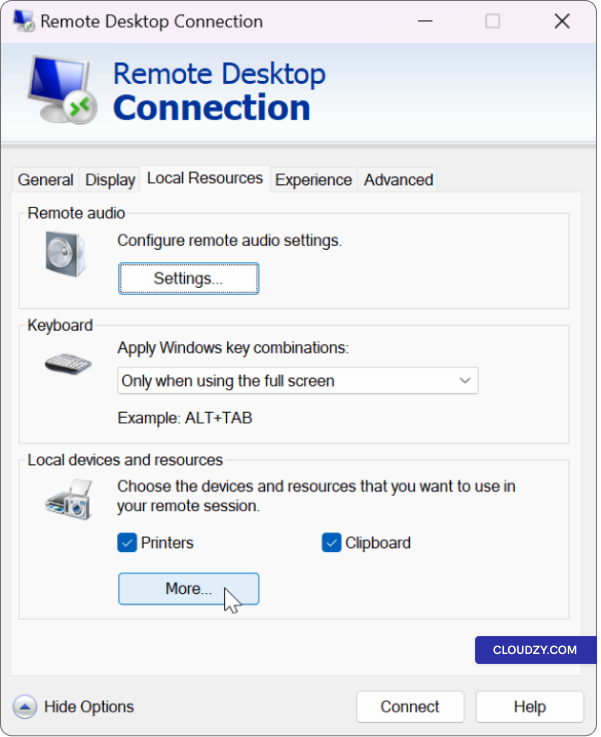
- クリック OK 選択内容を確認するには。
ステップ3:
Cloudzy Windows VPS に接続する
-
クリック 接続 リモートデスクトップのオプション
接続ウィンドウ -
接続後、スタートメニューを右クリックして
ファイルエクスプローラー.
ステップ4:
ファイルのアクセスと転送をシームレスに
最後のステップでは、VPS の「ファイル エクスプローラー」を使用して
ローカルシステムから共有ドライブとフォルダにアクセスできます。これにより
ファイル管理が簡単になります。ローカル PC とサーバー間でファイルをドラッグ&ドロップして移動できます
ローカル PC と Cloudzy Windows VPS の間で、タスクの簡略化が可能です
重要なファイルのアップロード、ダウンロード、または同期。
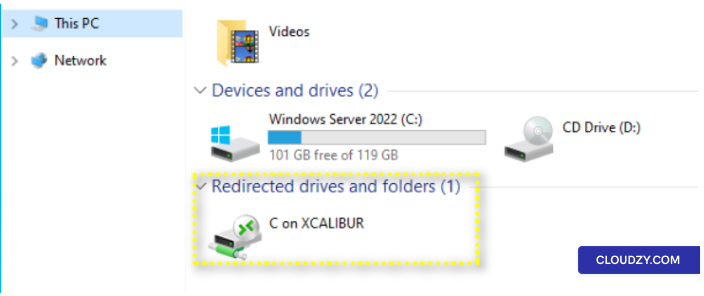
- に ファイルエクスプローラー 下 このPC
or コンピューター接続すると、利用可能なドライブが表示されます
共有用に設定されています。
- ローカルコンピュータ間でファイルとフォルダにアクセスして転送できます
システムと Cloudzy Windows VPS を簡単に。
トラブルシューティング
「宛先フォルダへのアクセスが拒否されました」エラー
宛先フォルダへのアクセスが拒否されました」というエラーが表示された場合
Remote Desktop Connectionを使用してファイルを転送しようとしている場合は、しないでください
心配しないでください。この問題は解決できます。対処方法をご紹介します
それ:
リモートを再起動
デスクトップ接続
まず、リモートデスクトップ接続セッションを再起動してみてください。閉じます
既存セッションを切断してから、Cloudzy Windows VPS に再接続してください
時々、単純な再接続でアクセスの問題を解決できます。
としてに接続
管理者:
Cloudzy Windows VPS に接続していることを確認してください。
管理者。管理者アカウントは通常、ファイルへのアクセス権限がより広い
アクセス権限があります。管理者権限でログインしていない場合は
アカウント、ログアウトして別のアカウントを使用して再度接続してください。
確認
ローカルドライブの権限設定
リモートデスクトップ接続で使用するローカル PC のドライブに
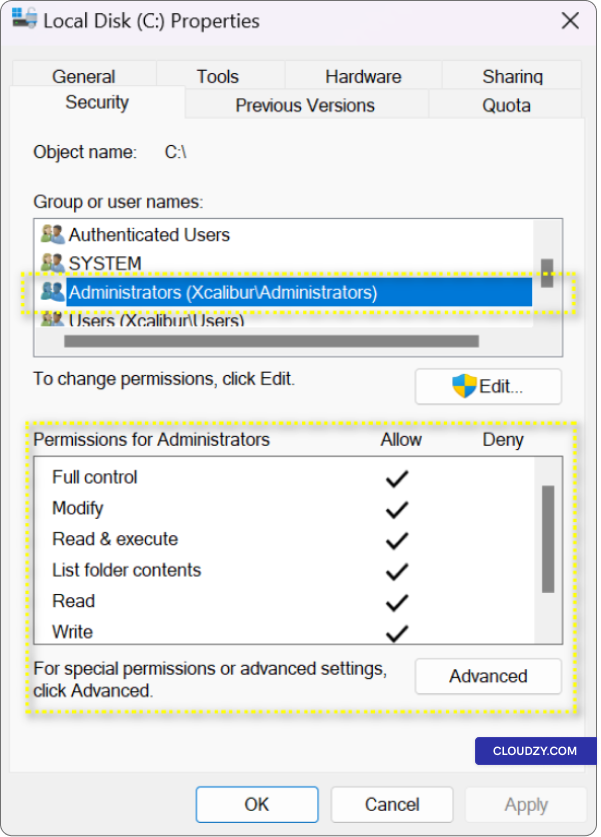
適切な読み取りと書き込み権限があることを確認してください。ドライブを右クリックして
プロパティを選択します
プロパティセキュリティタブに移動してください
セキュリティ ユーザーアカウントが
必要な権限
「宛先フォルダへのアクセスが拒否されました」エラーを解決するには、ローカルシステムのフォルダ権限を確認してください。権限を確認するには
ローカルシステムとサーバーの両方のフォルダ権限を確認します。権限を確認する手順
Windows でドライブを右クリックして、プロパティを選択します
プロパティセキュリティタブに移動してください
セキュリティ セキュリティタブで必要な権限を確認してください
読み取りと書き込みのアクセス権が与えられていることを確認します
別のものを使用する
転送先ドライブ:
エラーが続く場合は、ファイルを別のドライブに移動してみてください。新しいドライブにも
必要な権限があることを確認してください
権限
メソッド
方法 2: Cloudzy Windows VPS とローカル PC 間でファイルをコピー&ペースト
システム
Cloudzy Windows VPSとの間でファイルを簡単に転送できます
ローカルシステムを使用してコピー&ペースト方式でファイルを転送します。この方法なら
双方向でファイルを簡単に移動でき、柔軟なファイル転送に最適です
タスク(ダウンロードレポート、データをバックアップ、または単に整理など)のような
あなたのファイル
ステップ
方法 1: Cloudzy Windows VPS からローカル PC へファイルをコピー
システム)
-
ファイルを探す Cloudzy Windows VPS で
転送するファイルの場所に移動します -
ファイルを選択: 希望のものをワンクリック
ファイルを選択します。複数のファイルを転送する場合は、
下に CTRL キーボードの キーをクリックしながら押す
各ファイル -
ファイルをコピー 選択したものを右クリック
ファイルを選択して コピー コンテキストメニューから選択できます。
別の方法として、キーボードショートカットを使用することもできます CTRL +
C ファイルをコピーします。
ステップ2:
ファイルをローカルシステムに貼り付ける
-
ローカルシステムに移動: 最小化する
Cloudzy Windows VPS デスクトップまたはローカルシステムに切り替えます。 -
送信先を選択してください: 右クリックで
ローカルシステムのデスクトップ、または移動先フォルダに移動してください
ファイルを保存する場所を選択します。コピーされたファイルはここに配置されます。
貼り付けられた -
ファイルを貼り付ける: 右クリック
宛先フォルダを選択して ペースト 文脈から
メニューから選択できます。キーボードショートカットも使用できます CTRL + V
ファイルを貼り付けます。 -
ファイル転送 ファイルが開始されます
Cloudzy Windows VPS からローカルシステムへの転送を行います。転送時間は
転送に必要な時間はファイルサイズとインターネット速度によって異なります
接続速度 -
確認: 転送が完了すると、
ローカルコンピュータの指定された宛先フォルダにファイルが保存されます
システム
ステップ
3: 逆方向の処理 (ローカルシステムから Cloudzy Windows
VPS)
同じ方法を使用してローカルからファイルを転送することもできます
システムから Cloudzy Windows VPS への転送:
-
ローカルシステムで転送するファイルを探します。
転送 -
同じ方法を使用してファイル(複数)をコピーしてください
上記。 -
Cloudzy Windows VPSにリモートデスクトップでアクセスする
接続 -
VPS 上の目的の場所に移動します。
-
ファイルをVPS ロケーションに貼り付けて完了させてください
転送
コピーと貼り付けの方法を使用すると、ファイルを効率的に転送できます
あなたのCloudzy Windows VPSとあなたのローカルシステムの間で両方の
双方向での転送が可能なため、データの管理と操作が簡単になります
両方の環境で
メソッド
3: Windows VPS とローカルシステム間でのファイル転送
ファイルエクスプローラー
ファイルエクスプローラー ユーザーフレンドリーで直感的な提供
Windows VPSとローカルコンピュータ間でファイルを転送する方法
システム間。重要なドキュメント、バックアップファイル、または
データを整理する場合、ファイルエクスプローラーはプロセスを簡単にします。
ステップ1:
Windows VPSでFile Explorerにアクセスする
-
Windows VPS に接続: 接続を開始してください
リモートデスクトップ接続経由で Windows VPS に接続します。手順に従ってください。
通常の手順。 -
ファイルエクスプローラーを開く: 接続後、開く
ファイルエクスプローラー スタートメニューを右クリックして
タスクバーをクリックしてメニューからファイルエクスプローラーを選択します。別の方法として、
Windowsのキーボードショートカットを使用できます キー + E を起動する
ファイルエクスプローラー
ステップ
2: ファイルまたはフォルダを探して選択 (Windows VPS からローカルへ)
システム)
-
ファイルまたはフォルダに移動: ファイル内
Windows VPS のエクスプローラーを開き、ファイルの場所に移動してください。
ローカルシステムに転送する予定のフォルダ。 -
ファイルまたはフォルダを選択してください: 左クリックして
ファイルまたはフォルダをクリックしてハイライトします。
ステップ 3: ファイルをコピーするか
フォルダ
-
ホームタブにアクセス: ファイルの上部バーで
エクスプローラーウィンドウで、次の項目を探して選択します ホーム
タブ。 -
「移動」または「コピー」を選択してください: ホームタブ内で、
以下のオプションが見つかります に移動 or コピー
to のサブカテゴリーで、以下から希望するオプションをクリックしてください
あなたの特定のファイル転送ニーズに合わせて。

- 宛先を指定してください: ドロップダウンメニューから
選ぶ ロケーションを選択 目的地を指定して
ファイルやフォルダを転送したいローカルシステム上で実行します。
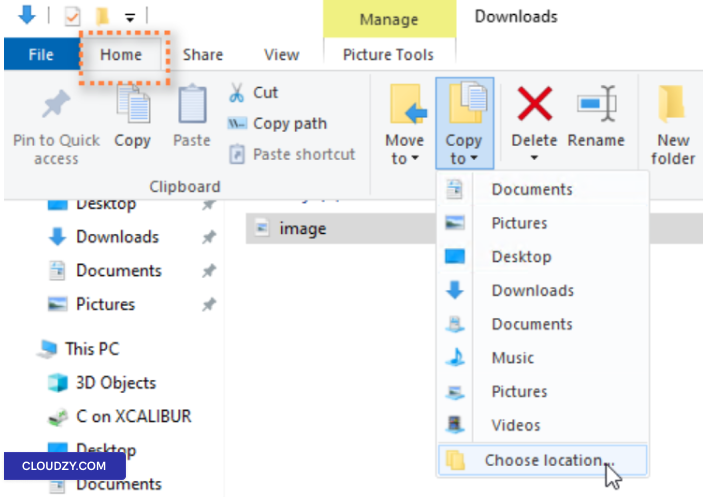
- コピーを開始 望みの設定を指定した後
destination をクリックしてください コピー ボタン
注意: 逆プロセスを実行して転送するには
ローカルシステムからWindowsのVPSにファイルを転送する場合は、同じ手順に従ってください
しかし、ローカルシステムのファイルエクスプローラーから転送を開始してください
リモートデスクトップ接続で共有したドライブ
つまり、これらの方法によって、あなたの
Windows VPS とローカルシステムを連携させ、データ管理を強化して次のようなタスクに対応
ウェブサイトホスティングおよびアプリケーション管理として。ご不明な点がございましたら
ご質問がある場合は、以下の方法でお気軽にお問い合わせください 送信する
チケット.
<BlogFAQSection data={[ { title: 'サイズの制限はありますか
RDP を使用したファイル転送?答え:コピー・アンド・ペースト方式では、ファイル
ローカルシステムと間で最大 2 GB のサイズまで転送できます
Windows VPS。より大きなファイルの場合は、ドライブ同期の使用を検討するか、
共有ドライブ機能。', }, ]} />
同じカテゴリー Windows / RDP