Több weboldal futtatása egy VPS-en
A webtárhely bonyolultságainak navigálása gyakran vezethet a
szerverrások kihasználatlanul maradnak, különösen több szerver kezelésekor
weboldalak. Ez a cikk erre a kihívásra válaszol azzal, hogy bemutatja, hogyan lehet
több weboldalt is üzemeltethetsz egy szerveren. A
Az Apache képességei Linux rendszereken (Ubuntu és CentOS) és az Interneten
Az Internet Information Services (IIS) szolgáltatás Windows alatt, a felhasználók maximalizálhatják a szerverük
lehetőség, egyszerűsítse a webhely-kezelést, és jelentősen csökkentse
overhead costs. This guide gives server administrators everything they need to
lépésről lépésre szóló útmutató a tárhelyezési környezet optimalizálásához,
minden weboldalnak zökkenőmentesen működnie a konszolidált szerver alatt
beállítás.
Apache
Ubuntu és CentOS konfigurálása
Ez a szakasz lépésről lépésre végigvezeti a Apache konfigurálásának folyamatán
több webhely üzemeltetése egyetlen szerveren, kifejezetten arra tervezve, hogy
Ubuntu és CentOS rendszerek.
Előfeltételek
Frissítse a rendszer csomagadatbázisát:
Ubuntu/Debian:
sudo apt update
sudo apt upgrade -y
CentOS/RHEL:
sudo yum update -yBiztos, hogy van-e sudo jogosultságok a végrehajtáshoz
adminisztratív feladatok.
1. lépés: Telepítés
Apache
Ubuntu/Debian:
sudo apt install apache2 -yCentOS/RHEL (A csomag neve httpd):
sudo yum install httpd -y2. lépés: Létrehozás
Könyvtárak
Hozz létre egy gyökérkönyvtárat minden webhelyhez:
sudo mkdir -p /var/www/domain.com/public_html
sudo mkdir -p /var/www/domain2.com/public_html
Cserélje ki domain.com és domain2.com vele
az Ön tényleges tartomány nevei.

3. lépés: Hozzárendelés
Engedélyek
Állítsa be az engedélyeket, hogy a webkiszolgáló hozzáférhessen a
tartalom:
sudo chown -R $USER:$USER /var/www/domain.com/public_html
sudo chown -R $USER:$USER /var/www/domain2.com/public_html
sudo chmod -R 755 /var/www
4. lépés: Index létrehozása
Oldalak
Hozzon létre egy egyszerűt index.html fájl minden tartományhoz:
echo "Welcome to domain.com" | sudo tee /var/www/domain.com/public_html/index.html
echo "Welcome to domain2.com" | sudo tee /var/www/domain2.com/public_html/index.html
5. lépés: Konfigurálás
Virtuális Hosztok
Másolja a alapértelmezett konfigurációs fájlt, majd szerkessze meg az egyes domainek számára:
sudo cp /etc/apache2/sites-available/000-default.conf /etc/apache2/sites-available/domain.com.conf
sudo cp /etc/apache2/sites-available/000-default.conf /etc/apache2/sites-available/domain2.com.conf
Szerkessze a virtuális host fájlt a domain.com:
sudo nano /etc/apache2/sites-available/domain.com.confA fájlban végezze el a szükséges módosításokat:
<VirtualHost *:80>
    ServerAdmin [email protected]
    ServerName domain.com
    ServerAlias www.domain.com
    DocumentRoot /var/www/domain.com/public_html
    ErrorLog ${APACHE_LOG_DIR}/error.log
    CustomLog ${APACHE_LOG_DIR}/access.log combined
</VirtualHost>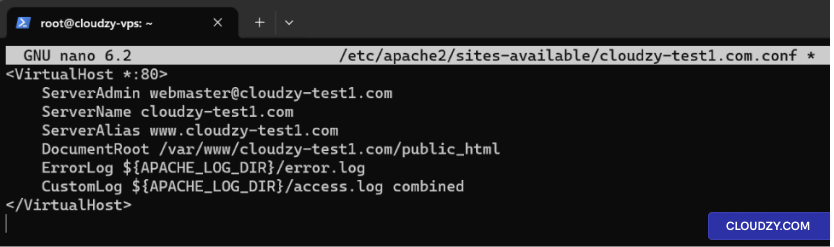
Ismételje meg a folyamatot domain2.com.
6. lépés: Webhelyek engedélyezése
Engedélyezze az új webhelyeket, és tiltsa le az alapértelmezett webhelyet:
sudo a2ensite domain.com.conf
sudo a2ensite domain2.com.conf
sudo a2dissite 000-default.conf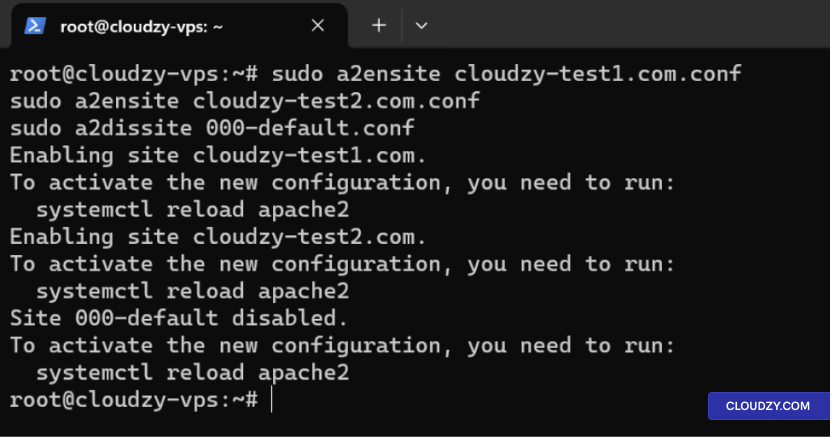
7. lépés: Újraindítás
Apache
Indítsa újra az Apache szervert a módosítások alkalmazásához:
Ubuntu/Debian:
sudo systemctl restart apache2CentOS/RHEL:
sudo systemctl restart httpd8. lépés: Szerkesztés
Hosts Fájl és Teszt Webhelyek
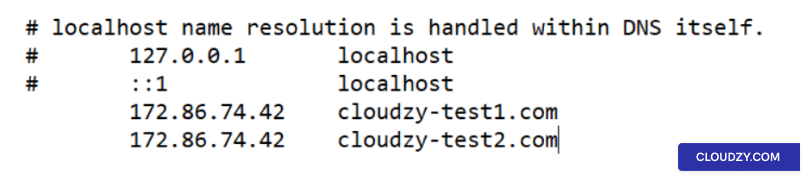
Hosts fájl szerkesztése:
- Nyissa meg a hosts fájlt egy szövegszerkesztővel:
sudo nano /etc/hosts- Adjon hozzá DNS-bejegyzéseket a domainjeihez, amelyek a szerver IP-címére mutatnak,
például:
192.168.1.10 domain.com
192.168.1.10 domain2.com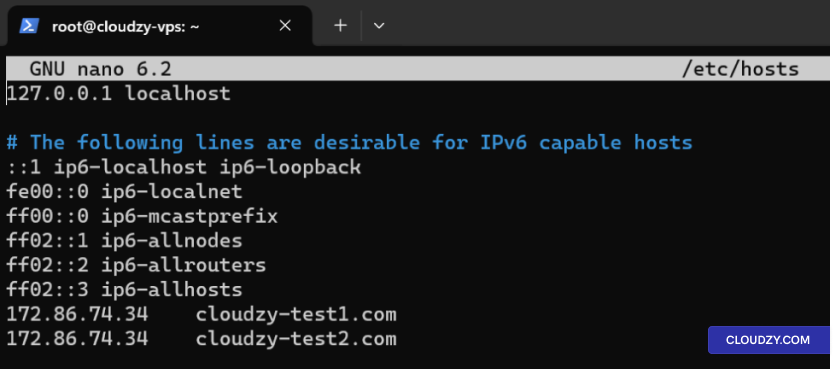
- Mentsd el és zárd be a fájlt.
Alternatívan frissítse az A típusú DNS-rekordokat:
Ha regisztrált domainjeid vannak, frissítsd az A rekordokat az DNS-ben
beállítások a szerver IP-címére mutatnak.
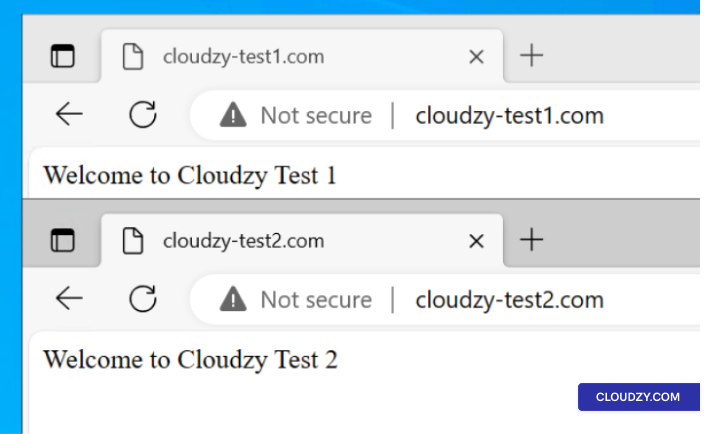
Tesztelje a webhelyeket Curl-lel:
Tesztelje webhelyeit, hogy biztosan elérhetők:
curl http://domain.com
curl http://domain2.com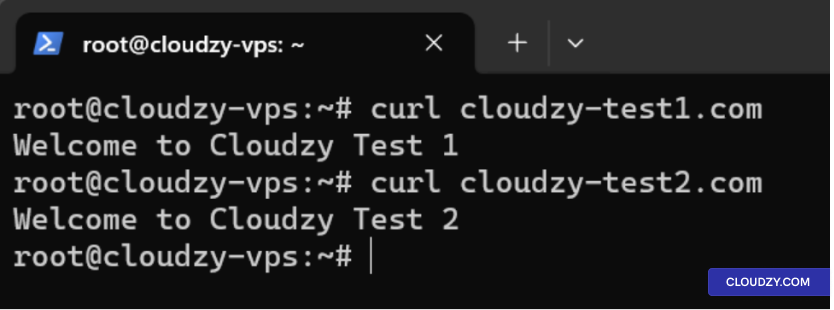
IIS Konfigurálás
Windows Server számára
Ez a szakasz átfogó útmutatót nyújt a beállításhoz
több weboldal egy kiszolgálón az Internet Information Services használatával
(IIS) Windows Server rendszeren.
Lépés
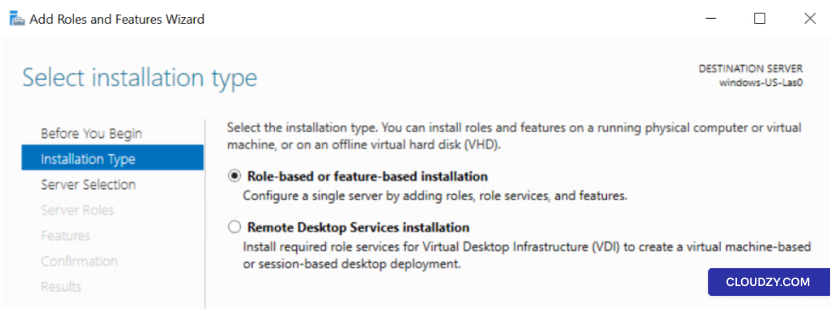
1: Az IIS telepítése az Szerepkörök és szolgáltatások hozzáadása varázslóval
-
Server Manager megnyitása: Kattintson a Server Manager-re
az ikon a tálcán, vagy nyisd meg a Start menüből. -
Indítsa el a Szerepkörök és funkciók hozzáadása varázslót: A
Server Manager irányítópult, kattintson az Kezelés és majd
válassz Szerepkörök és funkciók hozzáadása. -
Szerepalapú vagy funkcióslapú telepítés: Válasszon
Szerepalapú vagy funkcióalapú telepítés és kattintson a
Következő.
-
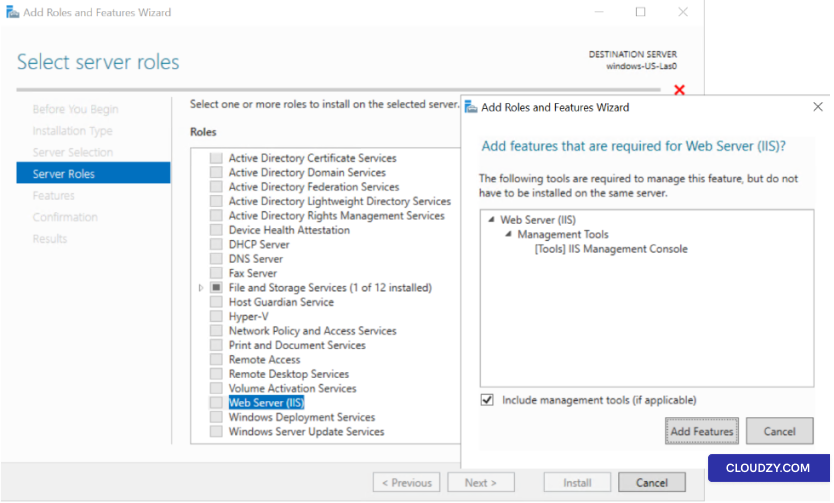
Kiszolgáló kiválasztása: Válassza ki azt a szervert, amelyen
szeretne telepiteni az IIS-t, és kattintson a Következő. -
Szerepkörök hozzáadása: A Szerepek szakaszban jelölje be a jelölőnégyzetet
aWeb Server (IIS). Ha a rendszer azt kéri, hogy adjon hozzá funkciókat,
szükségesek a Web Server (IIS) számára, kattintson a Hozzáadás
Funkciók.
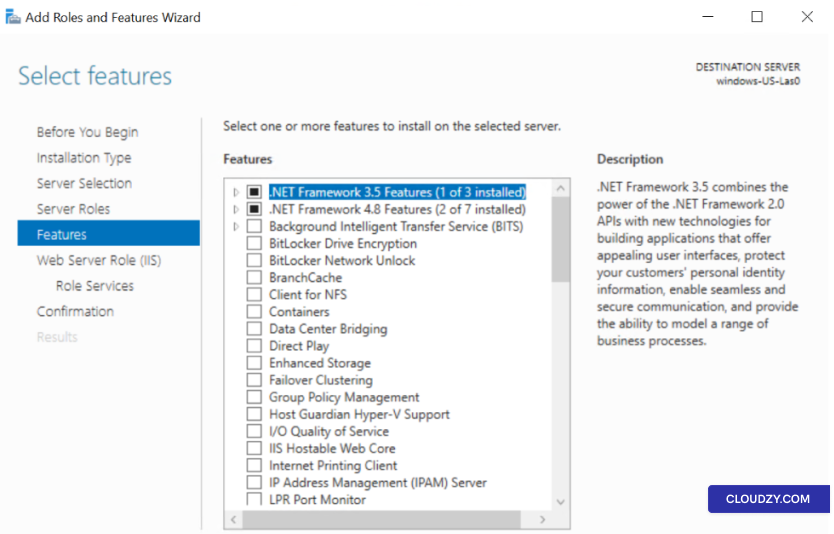
- Funkciók: Nincs szükség további funkciókra
hacsak nincs konkrét szükségleted. Kattints ide Következő.
-
Webkiszolgáló szerepkör (IIS): Tekintse át az információkat
és kattintson a Következő. -
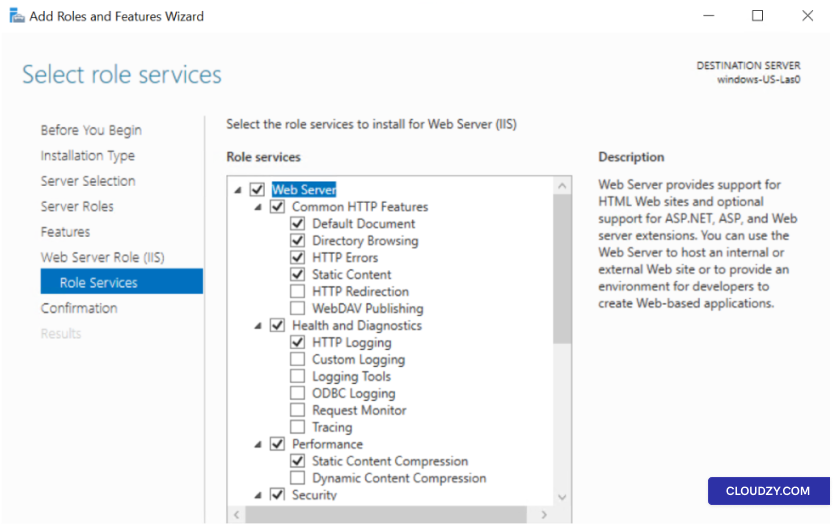
Szerepek Szolgáltatásai: Válassza ki az IIS szerepkörszolgáltatásokat a
telepítés. Egy alapszintű webszerverhez az alapértelmezett beállítások általában megfelelőek
elegendő. Kattintson a Következő.
-
Megerősítés: Ellenőrizze kiválasztásait, és kattintson
on TelepítésA telepítési folyamat
kezd. -
Befejezés: A telepítés befejezése után
kattintson a Bezárás.
2. lépés: Webhelyek hozzáadása
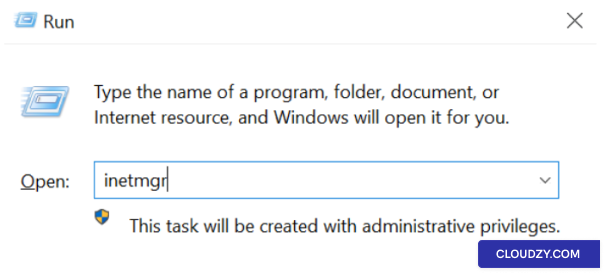
- Nyissa meg az IIS Manager alkalmazást: Nyomj Windows billentyű +
R, írjon inetmgr, és nyomjon meg
Enter.
-
Új webhely létrehozása: Kattintson jobb gombbal a
Sites mappa az IIS Manager-ban, majd válassza ki Hozzáadás
Website. -
Webhely részletei:
-
Webhely neve: Adjon meg egy leíró nevet.
-
Fizikai útvonal: Válassza ki a mappát, amely tartalmazza az Ön
webhely fájljai. -
Írjon: Általában http.
-
IP-cím: Válasszon IP-t vagy hagyja üresen Összes
Nincs hozzárendelve. -
Port: Általában 80 a
HTTP. -
Hostnév: Adja meg a tartomány nevét.
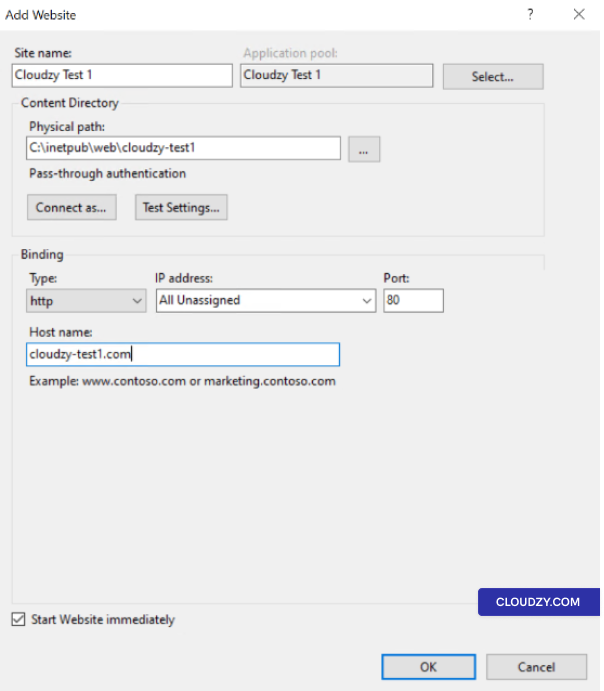
- További webhelyek számára ismételje meg: Kövesse ugyanezt
lépések minden webhelyhez.
3. lépés: Gazdagép konfigurálása
Fejlécek
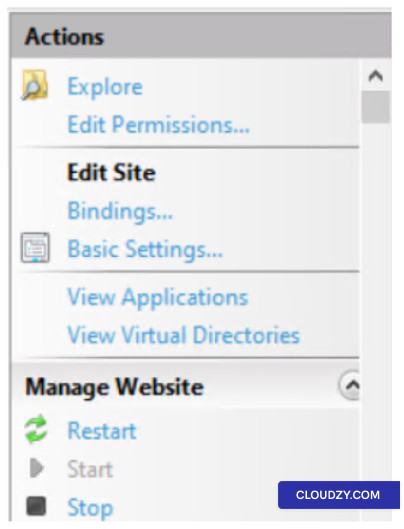
-
Válasszon weboldalt: Kattintson a webhelyre az IIS-ben
Vezető. -
Nyitott Kötések: A Műveletek
panel, kattintson a Bindings.
-
Kötés szerkesztése vagy hozzáadása: In Webhely
Bindings, szerkessz egy meglévő binding-ot, vagy kattints a
Hozzáadás. -
Adja meg az állomásnevet: Adja meg az gazdanevet
Gazdanév mező.
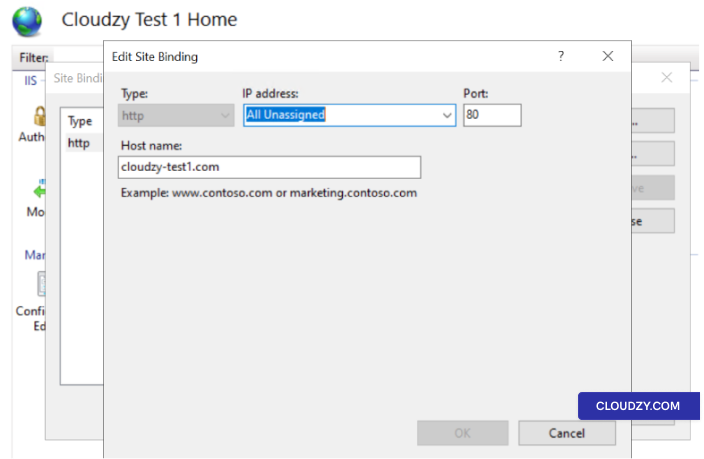
- További webhelyek számára ismételje meg: Kövesse ugyanezt
lépések minden webhelyhez.
4. lépés: Kezelés
DNS és Hosts fájl szerkesztése
-
DNS-rekordok frissítése: Az Ön domainnéveihez
az IIS kiszolgálóra feloldódik, frissítse az DNS A rekordjait az alábbiak szerint:
szerver nyilvános IP-címe. Erre szükséged lesz, ha
regisztrált domain nevek. -
A Hosts fájl szerkesztése (Nem kötelező): Ha nem
ha van egy domain nevem, és helyileg szeretnék tesztelni, szerkeszthetem a hosts fájlt a
a helyi gépeden (nem a szerveren). Ez a fájl általában a következő helyen található
**C:*. Adjon hozzá bejegyzéseket minden webhelyéhez, amely az IP-címre mutat
az IIS szerver részéről. Például:
192.168.1.10 domain.com
192.168.1.10 domain2.com
Cserélje ki 192.168.1.10 az IP-címed használatával
Windows Server. Ne feledje, ez a módosítás csak a webhelyeket érinti
elérhető azon a gépen, ahol a hosts fájlt szerkeszted.
Lépés 5: Ellenőrzés
Webhelyek
Nyisson meg egy webböngészőt, és navigáljon az egyes tartományokhoz annak biztosítása érdekében, hogy
a webhelyek helyesen kiszolgáltatása. Ha szerkesztette a hosts fájlt, akkor
ezen a gépen, ahol szerkesztettél. Látnod kell a tartalmat
a weboldal helyes beállítása esetén.
6. lépés:
További konfigurációk (Opcionális)
-
SSL tanúsítványok: Ha az HTTPS használatát tervezi,
szükséged lesz SSL-tanúsítványok telepítésére és konfigurálására mindegyikhez
webhely. -
Alkalmazáskészletek: Fontolja meg az elkülönített létrehozását
alkalmazáskészletek az egyes webhelyekhez a jobb kezelés és
biztonság -
Biztonsági beállítások: Biztonsági beállítások áttekintése és konfigurálása
az Ön igényei szerint beállított.
Minden webhely elérhető lesz a saját domain nevén keresztül, megosztva a
ugyanazok a szerver erőforrások.
Összefoglalva, több webhely egyetlen szerveren történő üzemeltetése
Az Apache vagy az IIS hatékony és költséghatékony. A részletes
lépések az Ubuntu, CentOS és Windows szerveren, használhatod a
egyszerűsítse a webkezelést és optimalizálja a szerver-erőforrásokat, így
erős online jelenlét. Ha bármilyen kérdésed van, keress meg nyugodtan
nekünk által benyújtás
egy jegy.
Szintén itt: Kézi telepítések
Kapcsolódó útmutatók.
Másban kell segítség?
Medián válaszidő 1 órán belül. Valódi emberek, nem botok.