Telepítse a Nextcloud Hub 6 alkalmazást Ubuntu rendszeren
Ez az útmutató egyszerű lépéseket nyújt a telepítéshez
a Nextcloud legújabb verziójának, egy saját üzemeltetésű produktivitási platformnak a telepítéséhez az
Ubuntu server. A Nextcloud Hub 6 (27.1.3) fájltárolási szolgáltatásokat kínál,
együttműködéshez, és sok egyéb funkcióhoz egy privát szerver rugalmasságával.
Előfeltételek
-
A Ubuntu 20.04 LTS vagy újabb verzióját futtató szerver.
-
Alapvető jártasság a parancssor kezelésében.
Telepítési folyamat
Az alábbi lépéseket követve telepítsd a Nextcloud Hub 6 (27.1.3) verziót a Ubuntu rendszerre.
kiszolgáló:
1. lépés: Az Ön frissítése
Szerver
Győződjön meg arról, hogy a kiszolgáló csomaglistája és maga a rendszer naprakészek
dátum:
sudo apt update && sudo apt upgrade -y2. lépés: Az Apache telepítése
Webszerver
Telepítse az Apache-t, amely az Nextcloud fájljait fogja kiszolgálni:
sudo apt install apache2 -y3. lépés:
PHP telepítése és a szükséges PHP modulok telepítése
A Nextcloud futtatásához PHP szükséges. Telepítsd a PHP-t a szükséges
modulok:
sudo apt install php libapache2-mod-php php-mysql php-dom php-xml php-mbstring php-gd php-curl php-zip -y4. lépés: A MariaDB telepítése
Szerver
Telepítsd a MariaDB adatbázis-kiszolgálót a Nextcloud adatainak tárolásához:
sudo apt install mariadb-server -yLépés 5: Létrehozás
Nextcloud adatbázis
Először jelentkezz be a MariaDB parancssorba:
sudo mariadb -u root -pBejelentkezés után hozzon létre egy adatbázist a Nextcloudhoz és egy felhasználót a
kívánt hitelesítési adatok:
CREATE DATABASE nextcloud;
GRANT ALL PRIVILEGES ON nextcloud.* TO 'your_desired_username'@'localhost' IDENTIFIED BY 'your_desired_password';
FLUSH PRIVILEGES;
EXIT;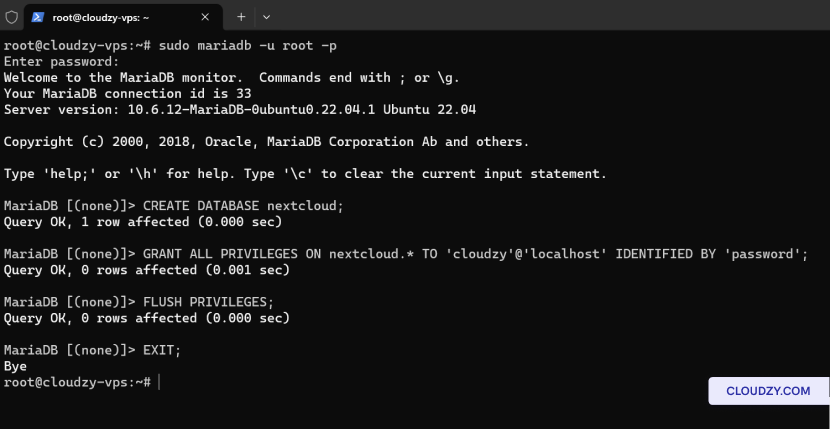
6. lépés:
Telepítse a Unzip programot, és töltse le a Nextcloud-ot
A Nextcloud letöltése előtt győződjön meg arról, hogy az unzip telepítve van a
töltse ki a letöltött fájlt:
sudo apt install unzip -y
wget https://download.nextcloud.com/server/releases/nextcloud-27.1.3.zip
Lépés 7:
Nextcloud kibontása és engedélyek beállítása
Csomagolja ki a Nextcloud csomagot a webkiszolgáló gyökérkönyvtárába, és állítsa be a
helyes engedélyek:
unzip nextcloud-27.1.3.zip -d /var/www/html/
sudo chown -R www-data:www-data /var/www/html/nextcloud/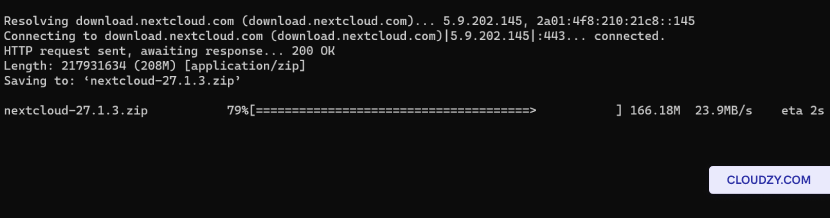
8. lépés: Konfigurálás
Apache a Nextcloud-hoz
Hozzon létre egy Apache konfigurációs fájlt a Nextcloudhoz:
sudo nano /etc/apache2/sites-available/nextcloud.confSzúrja be a következő konfigurációt és mentse el a fájlt:
Alias /nextcloud "/var/www/html/nextcloud/"
<Directory /var/www/html/nextcloud/>
  Require all granted
  AllowOverride All
  Options FollowSymLinks MultiViews

  <IfModule mod_dav.c>
    Dav off
  </IfModule>
</Directory>
Engedélyezze az új oldalt és az átírási modult:
sudo a2ensite nextcloud
sudo a2enmod rewrite
sudo systemctl restart apache2
Lépés
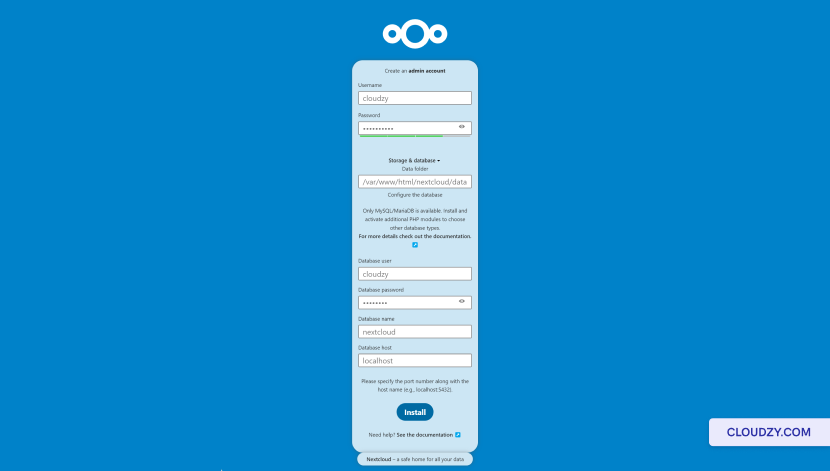
9: Fejezze be a telepítést a webes felületen keresztül
Nyissa meg böngészőjét és navigáljon ide:
http://your_server_ip/nextcloud. A telepítés befejezéséhez
a következő információk megadásával:
-
Rendszergazda fiók adatai: Válassz egy felhasználónevet és
jelszó a Nextcloud rendszergazda CD fiókhoz. -
Adatmappa: Erősítse meg az adatmappa elérési útvonalát
ahol a Nextcloud tárrolni fogja fájljait. -
Adatbázis-konfiguráció: Adja meg a hitelesítési adatokat
az adatbázis felhasználóhoz és nevéhez, amelyet korábban létrehozott. Használjon
localhost az adatbázis-kiszolgálóhoz, hacsak az adatbázisa nem
egy másik szerveren.
Az adatok megadása után kattintson a Beállítás befejezése
a telepítés befejezéséhez kattintson a gombra, majd navigáljon a következő helyre:
http://your_server_ip/nextcloud/index.php/login ha
nem irányított át automatikusan.
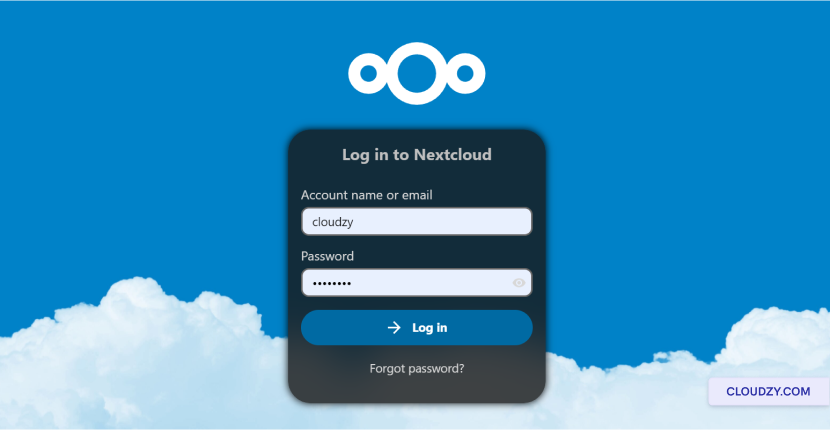
Most egy futó Nextcloud Hub 6 (27.1.3) példánya van az Ön
Ubuntu szerveren. Kezdje az irányítópult megismerésével és a
Nextcloud környezet konfigurálásával a személyes vagy üzleti igényeinek megfelelően. Ha
további információkra vagy támogatásra van szüksége, forduljon bizalommal az
a támogatási csapatunk által elküldve egy
jegy.
Szintén itt: Kézi telepítések
Kapcsolódó útmutatók.
Másban kell segítség?
Medián válaszidő 1 órán belül. Valódi emberek, nem botok.