Windows WSL-re Linux telepítése
Sok felhasználó előnyét élvezheti annak a lehetőségnek a Windows és Linux futtatásához
egy Windows gépen. A Windows alrendszer Linux-hez
(WSL) lehetővé teszi egy Linux disztribúció telepítését (például Ubuntu,
OpenSUSE, Kali, Debian, Arch Linux, stb.) és Linux alkalmazások használata,
segédprogramok és Bash parancssor eszközök közvetlen futtatását Windows-en, módosítás nélkül,
a hagyományos virtuális gép vagy kettős rendszerindítás terhelése nélkül
beállítás.
Előfeltételek:
Mielőtt elkezdenéd, fontos, hogy megbizonyosodjál, a megfelelő verzió fut-e
Windows verziója:
Windows-verzió ellenőrzése:
A Windows verzió meghatározásához kövesd ezeket a lépéseket:
-
Nyomj meg Windows + R billentyűkombinációt a Futtatás párbeszédpanel megnyitásához.
-
Írja be a winver parancsot és nyomja meg az Enter billentyűt.
-
Egy ablak jelenik meg, amely megjeleníti a Windows verzióját és buildszámát
szám. Bizonyosodj meg róla, hogy Windows 10 2004-es vagy újabb verziót futtatsz
(Build 19041 és újabb) vagy Windows 11 a parancsok használatához
alább.

WSL telepítése
Most nyelvezete alapján a mondat a következő lenne:
Most telepíthetsz mindent, amire szükséged van a WSL futtatásához egyetlen paranccsal.
parancs. Így tudod megtenni:
Lépés
1. lépés: Nyiss meg egy parancssor ablakot rendszergazda módban
-
Kattints a jobb gombbal a Windows Start gombra.
-
Válassz Windows Terminal (Rendszergazda) or
Parancssor (rendszergazdaként). Ez elengedhetetlen, mert
rendszergazdai jogosultságok szükségesek a telepítéshez.
2. lépés: Adja meg a
Telepítési parancs
A parancssorban vagy Windows Terminalban rendszergazdai jogosultságokkal
írja be a következő parancsot:
wsl --install --web-download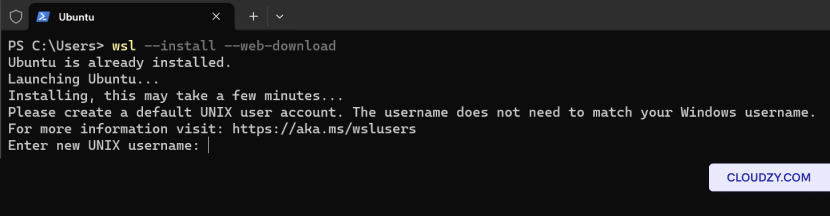
Módosítás
Alapértelmezett Linux disztribúció
Alapértelmezésben a telepített Linux disztribúció Ubuntu lesz. Azonban
ezt az alapértelmezett terjesztést módosíthatja a -d
zászló.
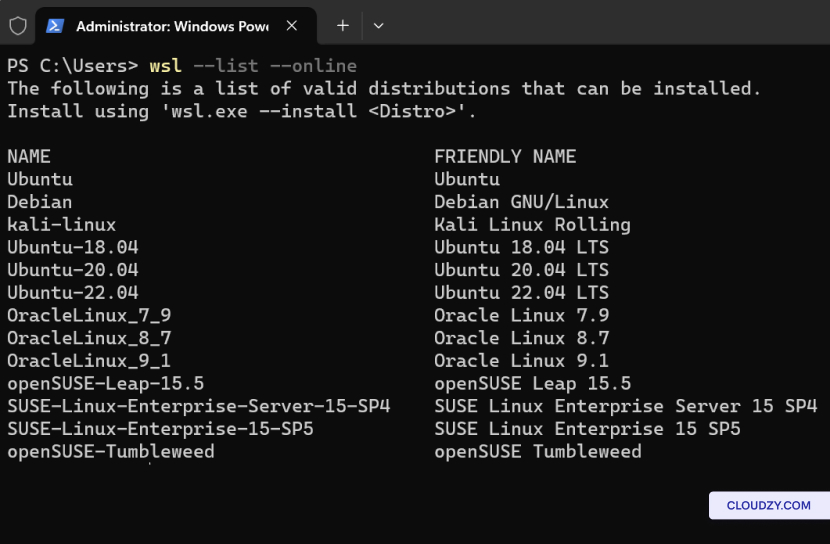
A disztribúció megváltoztatásához kövesd ezeket a lépéseket:
-
Nyiss meg egy parancssor ablakot vagy Windows Terminalt.
-
Enter wsl –list –online a lista megtekintéséhez
az interneten keresztül letölthető elérhető Linux disztribúciók
üzlet
- Cserélje ki Disztribúció neve a neve alapján
disztribúció, amelyet szeretnél, majd futtasd:
wsl --install -d <Distribution Name>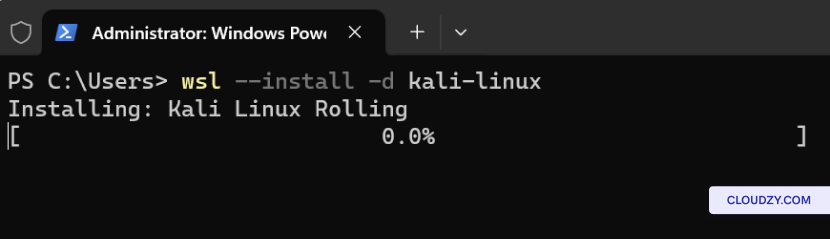
Hogyan futtassunk egy
Linux-disztribúció WSL-lel
Miután telepítettél egy Linux-disztribúciót a Windows Subsystem használatával
Linux-hez (WSL), könnyedén elindíthatod és azonnal nekiláthatsz a munkának. Így csináld:
a Linux disztribúció futtatásához:
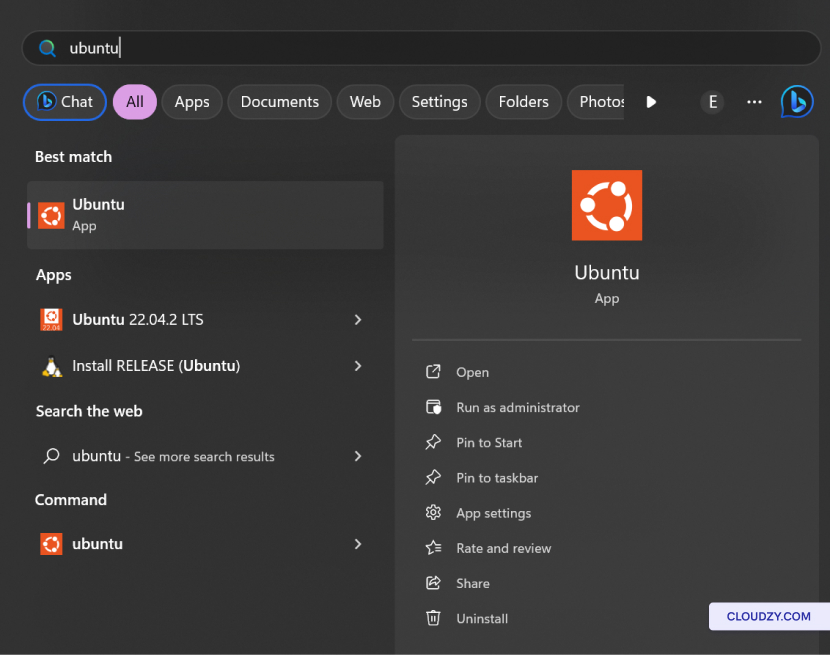
Opció 1: Kezdő menü
Keresés
-
A Windows Start keresősávjában gépeld be a telepített
Linux disztribúció nevét. Például, ha a Ubuntu telepítve van, egyszerűen
írj Ubuntu. -
Windows megjeleníti a Linux disztribúciót a keresési eredményekben
eredmények. Kattints rá a disztribúció indításához.
Lehetőség 2: Parancs
Sor
Futtathatod a Linux disztribúciódat a parancssorból is a
Windows. Így működik:
-
Nyiss meg egy parancssor ablakot vagy Windows Terminalt.
-
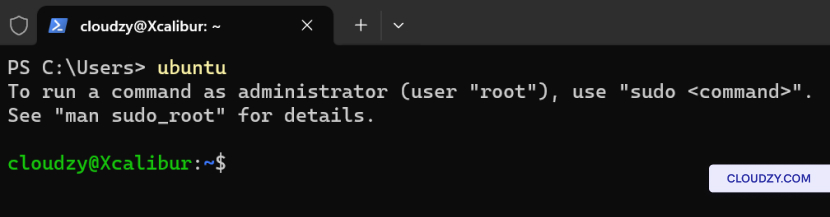
Írd be a telepített disztribúció nevét. Például, ha
Ubuntu-val írjon ubuntu , majd nyomj meg az Enter billentyűt.
Alapvető parancsok a
WSL
Most hogy telepítette a WSL-t és beállította a Linux-ot
disztribúciók esetén fontos, hogy megismerkedj néhány alapvető
paranccsal az Linux környezetben való hatékony munkához. Az alábbiakban találsz
néhány kulcsfontosságú parancs, amelyet a WSL-ben használhatsz.
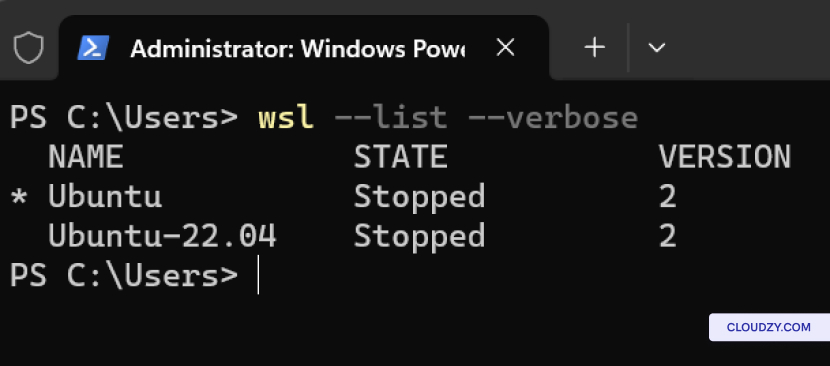
Linux telepített verzióinak listázása
Disztribúciók:
A Windows rendszerre telepített Linux disztribúciók listájának megtekintéséhez
gép, beleértve azok állapotát és WSL verzióját, használjon:
WSL verzió beállítása:
Az Linux disztribúció WSL verziójának (1 vagy 2) beállításához,
használat:
wsl --set-version <distribution name> <versionNumber>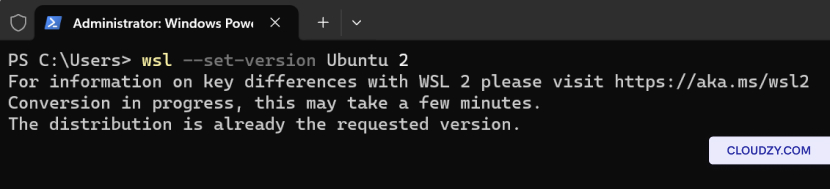
Alapértelmezett WSL beállítása
Verzió:
A WSL alapértelmezett verziójának (1 vagy 2) beállítása az új Linux-disztribúciók számára
telepítések, használat:
wsl --set-default-version <Version>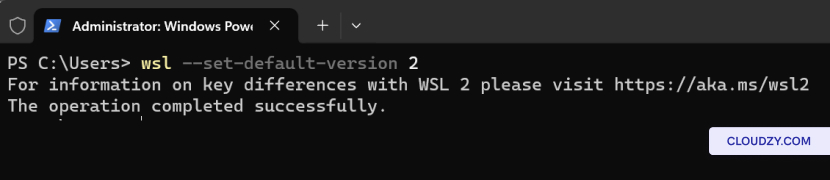
Alapértelmezett Linux beállítása
Terjesztés:
Az alapértelmezett Linux disztribúció beállításához a wsl paranccsal,
használat:
wsl --set-default <Distribution Name>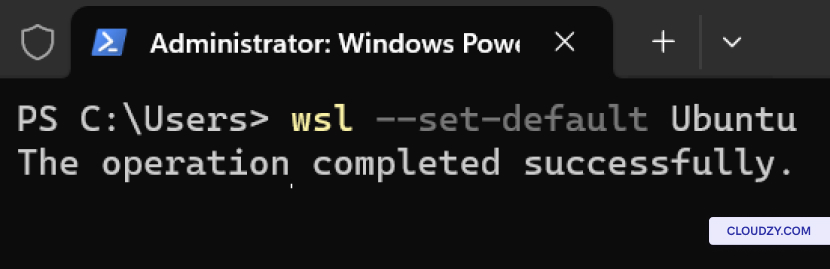
Egy adott Linux futtatása
Terjesztés:
Egy adott Linux disztribúció futtatásához egy adott felhasználóval használd:
wsl --distribution <Distribution Name> --user <User Name>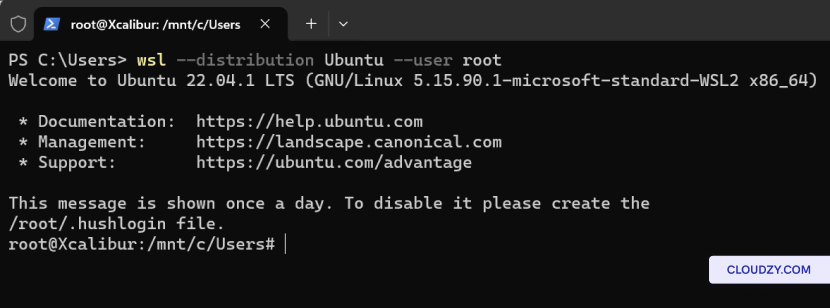
Eltávolítás
Specifikus Linux disztribúció
Ha el szeretne távolítani egy adott Linux-disztribúciót a WSL-ből
beállításhoz kövesse az alábbi lépéseket:
-
Nyiss meg egy parancssor ablakot vagy Windows Terminalt.
-
Futtassa a következő parancsot, és cserélje le distro
name az elnevezésével, amelyet szeretnél
eltávolítás:
wsl --unregister <distro name>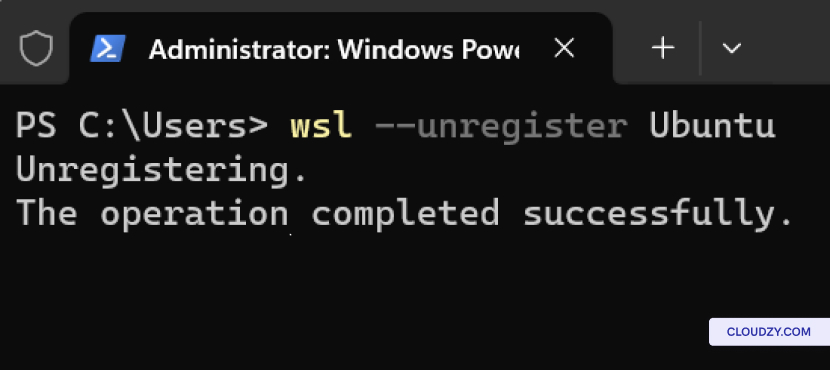
Ez a parancs eltávolítja az adott disztribúciót a WSL-ből,
és törli azt a rendszerről. Fontos megjegyezni, hogy az adott disztribúcióhoz tartozó összes adat, beállítás és
szoftver véglegesen elveszett.
WSL eltávolítása innen
Az Ön számítógépe
Ha teljesen el szeretnéd távolítani a WSL-t a számítógépedről, kövesd
ezek a lépések:
-
Nyiss meg egy parancssor ablakot vagy Windows Terminalt.
-
Az alábbi parancs letiltja a Windows Subsystem for Linux funkciót
funkciót a rendszeredről. Miután letiltod, a WSL eltávolításra kerül az
számítógép.
Disable-WindowsOptionalFeature -Online -FeatureName Microsoft-Windows-Subsystem-Linux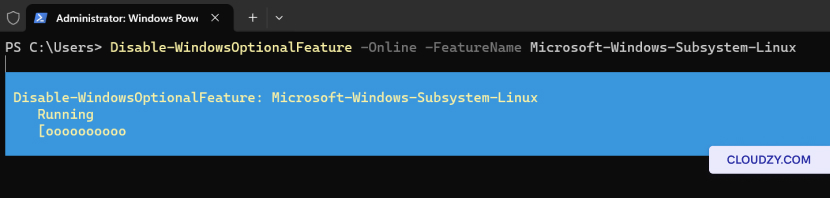
A WSL segítségével az Windows és Linux integrációja gyors és egyszerű. Az
biztosítva, hogy megvan a megfelelő Windows verzió az parancsok végrehajtásához
Linux disztribúciók telepítése és futtatása során az eljárás
egyértelmű. Ráadásul az Linux disztribúcióid egyszerű WSL parancsokkal
kezelhetők. Ha további információra van szükséged,
támogatásra van szükséged, fordulj bizalommal támogatási csapatunkhoz elküldve egy
jegy.
Szintén itt: Kézi telepítések
Kapcsolódó útmutatók.
Másban kell segítség?
Medián válaszidő 1 órán belül. Valódi emberek, nem botok.