The latest revision of internet protocol and its various benefits are encouraging enough to learn how to use them. The fundamental question you may be asking is, where should I start? It is easy; you should understand how to enable Ubuntu IPv6 (Internet Protocol version 6) as a starting point. To achieve this, you can use this guideline to get familiar with each step of enabling IPv6 on the Ubuntu server. Before going any further, we should review what we know about IPv6 and its advantages.
What is IPv6?
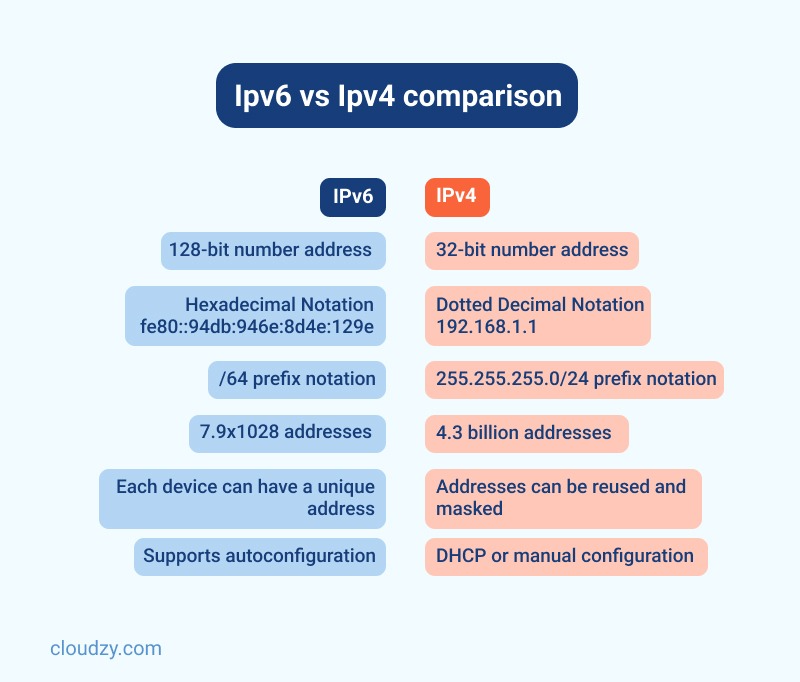
IPv6 (Internet Protocol Version 6) is the successive generation Internet Protocol (IP) address standard designed to advance and eventually replace IPv4. All devices connected to the Internet, such as computers, cellphones, home automation components, and IoT sensors, need multiple IP addresses to communicate between other devices. The original IP address system, called IPv4, is running out of addresses because of its widespread usage from the increase in so many connected devices. To learn more about the differences between IPv4 and IPv6, read: “IPv4 vs. IPv6: How IPv6 Is Set To Replace IPv4“
What are the benefits of IPv6?
IPv6 is the latest Internet Protocol version and functions similarly to IPv4; both provide the unique IP addresses necessary for Internet-enabled devices to communicate. But, it has one significant distinction compared to IPv4: it uses a 128-bit IP address.
Here are the main benefits of IPv6:
- Providing auto-configuration
- No private address collisions
- improved multicast routing
- More straightforward header format
- Simplified and more efficient routing
- Better quality of service (flow labeling)
- Built-in authentication and support
- offering flexible choices and extensions
- More manageable administration (no DHCP)
Why was IPv6 introduced?
IPv6 was explicitly created to solve address space exhaustion. Even in the 1980s, Professionals pointed out their concerns about the exhaustion problem. In addition, shortly after the launch of IPv4 addressing, it showed various limitations like scalability and capability issues.
Also Read: DNS Configuration on MikroTik
How to Set Up IPV6 on Ubuntu
Here is the step-by-step guideline you need to enable Ubuntu IPv6 on your system.
Step 1: Editing sysctl.conf file
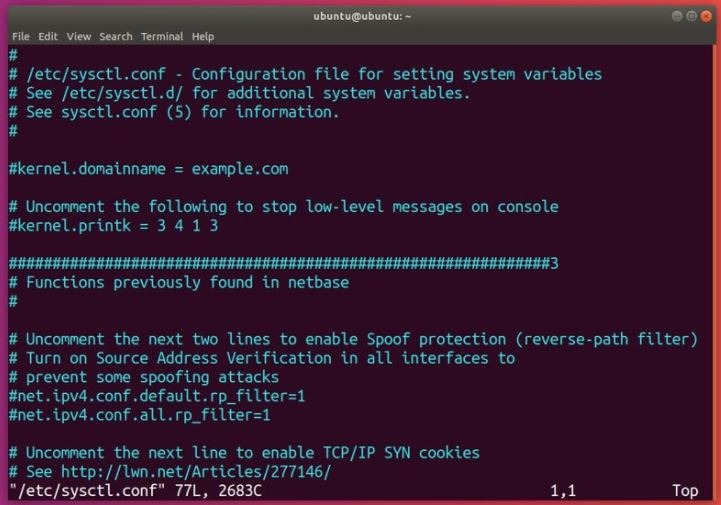
The first step to configuring Ubuntu IPv6 is to Login into the server with root access. After that, you need to change some of the info in sysctl.conf file. To do so, Enter the file in editing mode. In this tutorial, we will use vim editor; Note that You can use any file editor you like.
vim /etc/sysctl.conf
You must add the following at the end of the file:
net.ipv6.conf.default.disable_ipv6 = 0
net.ipv6.conf.all.disable_ipv6 = 0
Now save and then close the file
Step 2: Editing interfaces file
Another file that needs editing is the interfaces file under the path /etc/network/. Before doing any of these steps, please make a backup copy of the /etc/network/interfaces file first.
vim /etc/network/interfaces
You need to add the following line to interfaces file:
iface eth0 inet6 static
pre-up modprobe ipv6
address IPv6-IP-Address
netmask 64
gateway IPv6-IP-Gateway-Address
Then You must save and exit the interfaces file. Note that you need to make sure you replace IPv6-IP-Address and IPv6-IP-Gateway-Address with the Ubuntu IPv6 details that have been given to you.
Step 3: Restarting network service
The third step in enabling the Ubuntu IPv6 address on your server is to restart the networking service so that the changes become effective.
service networking restart
Step 4: verifying the Ubuntu IPv6 installation
You can verify whether the correct IPv6 address has been installed on your Linux Operating system or not using the below command:
ifconfig eth0
Take the following as an example to understand these steps:
eth0 Link encap:Ethernet HWaddr 06:0c:6c:01:12:98
inet addr:103.25.202.165 Bcast:103.25.202.255 Mask:255.255.255.0
inet6 addr: fe80::40c:6cff:fe01:1298/64 Scope:Link
inet6 addr: 2400:c980:0:2::2/64 Scope:Global
UP BROADCAST RUNNING MULTICAST MTU:1500 Metric:1
RX packets:2505260 errors:0 dropped:14 overruns:0 frame:0
TX packets:640650 errors:0 dropped:0 overruns:0 carrier:0
collisions:0 txqueuelen:1000
RX bytes:203319645 (203.3 MB) TX bytes:74852651 (74.8 MB)
Pay attention to this line:
inet6 addr: 2400:c980:0:2::2/64 Scope:Global
This line verifies that the correct IPv6 address is being shown.
Launch an Ubuntu VPS instantly with root access and NVMe storage.
Deploy Ubuntu VPSHow to Disable IPv6 on Ubuntu
This section will explain how to disable the Ubuntu IPv6 protocol on your system. This guideline is a bit advanced, so make sure you pay attention to all details. Now Open up a terminal (CTRL+ALT+T), and let’s go for it! Please note that for most of the commands you will type in the terminal, you will need root privileges (sudo).
First Method: Disable IPv6 using Sysctl
Let’s discuss the first approach for disabling IPv6 on your Ubuntu.
Step 1: Checking Ubuntu IPv6 address
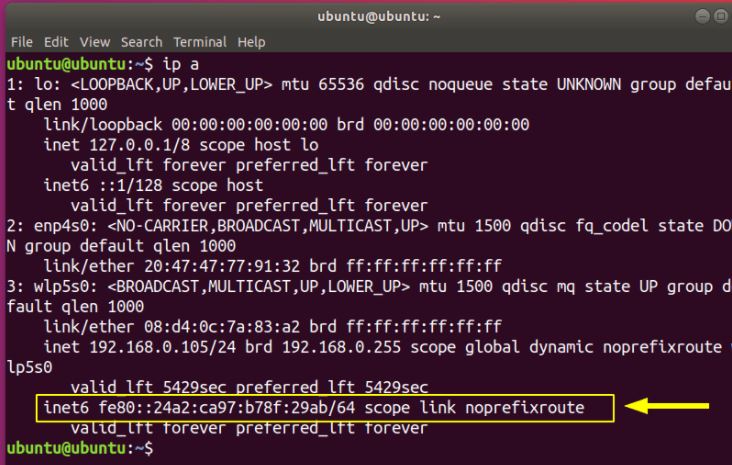
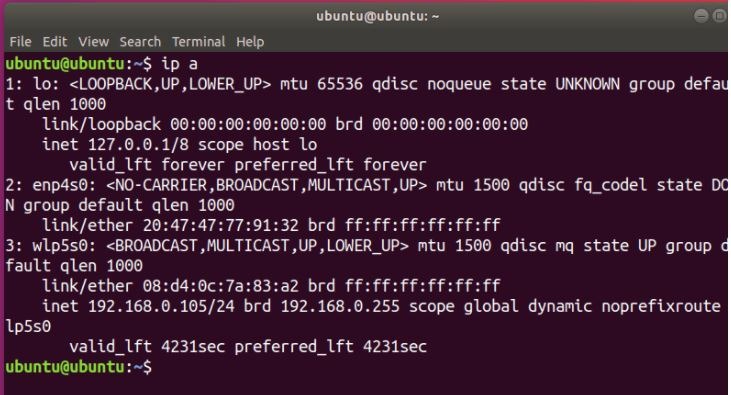
First, you need to ensure that you have IPv6 enabled on your system. You can check your IP address in Ubuntu using this command:
ip a
After running the above command, You will see an IPv6 address if it is enabled, similar to below:
Step 2: Using sysctl command
Now you need to use the sysctl command to disable IPv6 On the Ubuntu Operating system:
sudo sysctl -w net.ipv6.conf.all.disable_ipv6=1
sudo sysctl -w net.ipv6.conf.default.disable_ipv6=1
sudo sysctl -w net.ipv6.conf.lo.disable_ipv6=1
Step 3: verifying the process of disabling Ubuntu IPv6
Like enabling IPv6 on Ubuntu, you should also ensure it is disabled correctly. To do that, type the following command again:
ip a
Just like below, you should not see any IPv6 entry as you have just disabled Iv6 on your system.
But pay attention; these commands temporarily turn off IPv6 on your Ubuntu operating system. In other words, the next time your system boots, you will have your iPv6 enabled again. To make this option persistent, you can modify /etc/sysctl.conf. Like previous sections, we will be using vim to edit the file. Make sure you have administrator rights (use sudo):
You need to add the following lines to the file:
net.ipv6.conf.all.disable_ipv6=1
net.ipv6.conf.default.disable_ipv6=1
net.ipv6.conf.lo.disable_ipv6=1
For the settings to take effect, use this command:
sudo sysctl -p
If the Ubuntu IPv6 is still enabled after rebooting the system, you must create the file /etc/rc.local and fill it with the following. Pay attention that you need to do this with root privileges.
#!/bin/bash
# /etc/rc.local
/etc/sysctl.d
/etc/init.d/procps restart

exit 0
At this point, you must use chmod command to make the file executable:
sudo chmod 755 /etc/rc.local
This command will manually read the kernel parameters from your sysctl configuration file. Note that all this happens during boot time.
Also read: Debian vs Ubuntu
Second Method: Disable IPv6 using GRUB
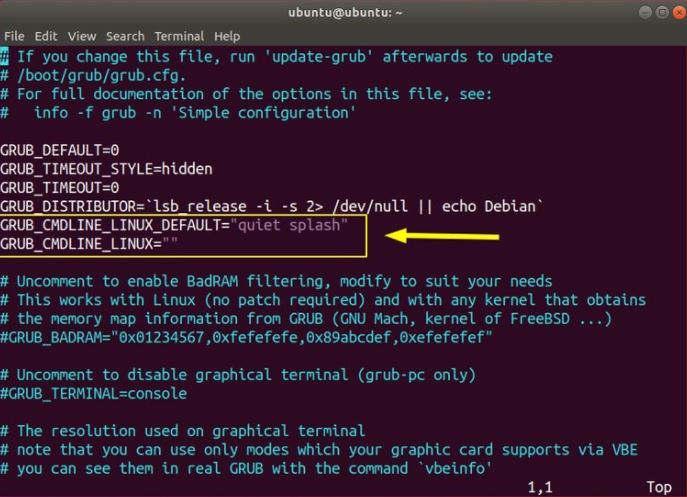
The second approach to disable Ubuntu IPv6 on your system is configuring GRUB and passing kernel parameters at boot time. You have to edit /etc/default/grub to do this. Again, please make sure you have administrator privileges:
Now edit GRUB_CMDLINE_LINUX_DEFAULT and GRUB_CMDLINE_LINUX to disable IPv6 on boot:
GRUB_CMDLINE_LINUX_DEFAULT="quiet splash ipv6.disable=1"
GRUB_CMDLINE_LINUX="ipv6.disable=1"
Save this file and run the update-grub command:
sudo update-grub
Now that you are using this technique, the settings should persist on reboot.
Final thought: Configuring Ubuntu IPv6
Even though IPv6 is introduced to solve the address space issue, it provides you many other advantages, including preventing private address collisions, improving multicast routing, a better quality of service, Built-in authentication, and Simplifying and more efficient routing. So clearly, knowing how to enable IPv6 on Ubuntu is essential. As you have seen in this article, Ubuntu is one of the most user-friendly Linux distributions you can use in many areas. We are also proud to offer you our Ubuntu VPS, which is made up of robust hardware and optimized for you to get the most out of Ubuntu’s functionality.
FAQ
How do I enable IPv6 on Ubuntu?
Generally speaking, setting up IPv6 on Ubuntu takes three steps in which you need to edit sysctl.conf file, interfaces file, and Restarting network service.
What happens if I enable IPv6?
IPv6 can provide you with many benefits, including supporting more devices, better security, and more efficient connections. Even though some older software may not work as hoped, most of your network should work just fine with having IPv6 enabled.
How can I find my IPv6 address in Linux?
Here are two generic Unix instructions for determining your IPv6 address and default route:
- Run ifconfig -a and look for inet6 to see your IPv6 addresses.
- Run netstat -nr and look for inet6 or Internet6 or similar words to find the IPv6 portion; then look for default or :: or ::/0 .
Will IPv6 increase internet speed?
Some Web and cloud services providers measured the speed of IPv6 and IPv4. The results show that websites load 5% faster in the median and 15% faster for the 95% percentile on IPv6 than IPv4, which means those pursuing high speed should better use IPv6