💡 Note: Facing audio issues on remote desktop? Our RDP VPS service is your solution, offering high-quality RDP with full admin access for a seamless experience free from audio and connectivity problems, all at the best market price.
You can be an employee who works remotely at home during the pandemic, or you could just be a tech enthusiast who wants to try out or anyone who does things with remote desktop protocol! Every once in a while, you may face some kind of error, and this time: How do I enable audio over remote desktop?!
Okay, I know your problem might vary from how do I enable a microphone on a remote desktop to no audio devices are installed on the remote desktop. But don’t panic, that’s fine. I will walk you through all of those possible situations in this post.
What is Remote Desktop Connection?

Remote Desktop Protocol (RDP) is a technology to gain access to a desktop across the board virtually, so to speak, you use it nearby without going to any particular location. It was put forward as the terminal service on Windows NT 4.0 by Microsoft in 1998.
As you can guess, RDP has helped many organizations during the time we’re in lockdown in such a way that employees can work from home. This is exactly why remote jobs are getting more popular in 2021.
However, Remote Desktop Access is quite different from cloud computing, as both allow employees to work remotely. Cloud Computing permits users to have access to files and programs that are stored in the cloud, specifically cloud servers.

Get an RDP server with instant setup, full root access, and NVMe storage.
Buy RDPComparing RDP and Cloud Computing
By comparing remote desktop to cloud computing, you will only attain a place where data is installed on that exact remote desktop in Remote Desktop Protocol (RDP), whilst in Cloud-Based Computing, you’re provided with access to data on the cloud server. With an RDP, you’ll experience more security and flexibility than what you’ll get in Cloud Computing.
Remote desktop applications can use various protocols, including RDP, Independent Computing Architecture (ICA), and Virtual Network Computing (VNC), but RDP is the most widely used protocol.
Although RDP was originally released by Microsoft and is used on most Windows operating systems, you can also use it on Mac or Linux. One advantage of RDP is that it doesn’t need a VPN.
It also safely holds data on a user’s desktop rather than storing it on cloud servers or unsecured personal computers. Besides, RDP allows companies with a legacy on-site IT frame to encourage their workers to work from home.
Also Read: How to prevent RDP brute force attacks?
How to Enable Audio over Remote Desktop Connection?
The audio transmission is possible through RDP sound redirection on all Windows versions, including server versions and nonserver ones like Windows 7 and 10. For transmitting the playback sound, open the RDP setting, and tick the sound redirection on the user’s device. This way, if you open a media file on the VPS, the audio goes off through RDP sound redirection without a hitch.
However, transmitting the microphone sound is exclusively accessible for nonserver Windows by default. Likewise, the redirection has to be selected in the RDP settings. Although Windows servers don’t have this feature as the default, they can benefit from the audio over remote desktop by means of server management OS, registry, and the like! It cannot help but note it’s much more challenging to come into it and do as the solution differs from each Windows server version to another.
If you want to enable audio on Windows Server 2016, move on with the steps below. If you’d like to enable the microphone on your remote desktop, skip the beginning and go to the very end of step 2.
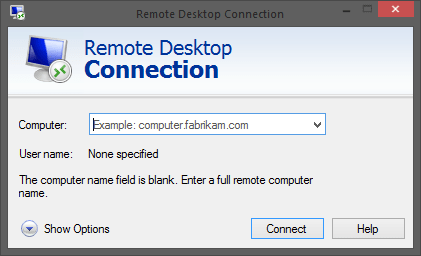
1. Launch your Remote Desktop
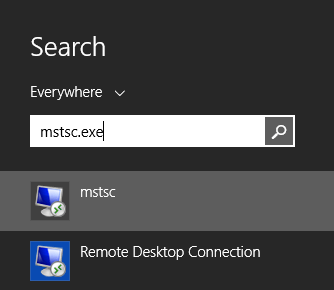
Press the “Start” menu or typical style “Windows” icon:
Enter ”mstsc.exe” in the search or cmd box.
mstsc.exe
It’ll bring the Remote Desktop Connection application up. Then enter your VPS’ IP address, and click on “Connect”. Type the username (administrator) and your password.
Your IP address and password are both found in the setup email sent to you shortly after your VPS has been provided.
2. Test the Windows Audio Service
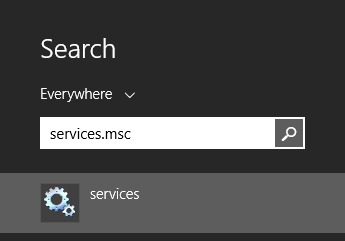
At this point, you need to check if the Windows Audio service is running on your VPS. Type “Services.msc” on the Start menu and click enter.
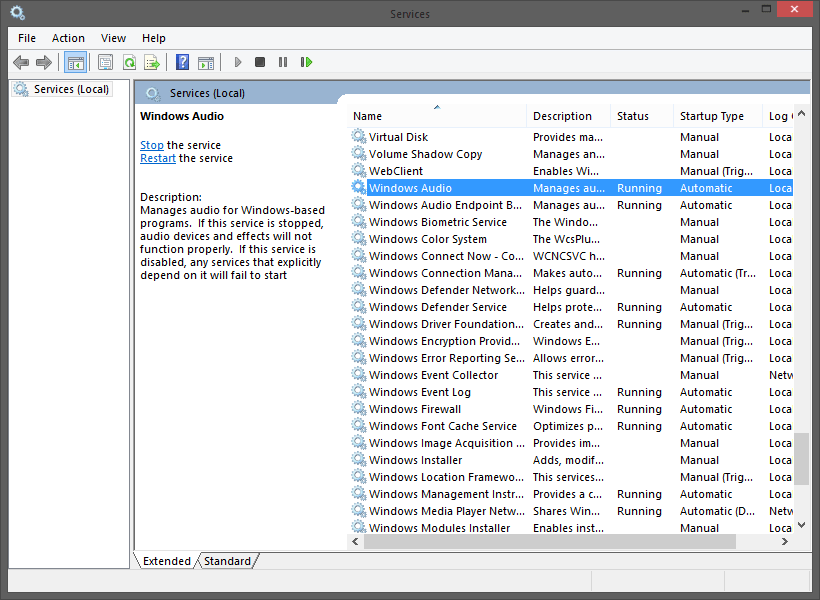
Once done, find the “Windows Audio” service and double-click on it.
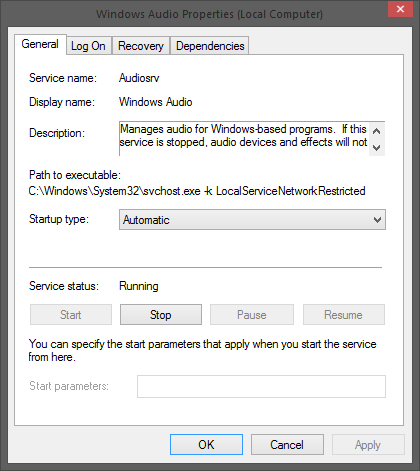
Change the “Startup type” from Manual to Automatic and click OK. Afterward, press the Start button to run the service straight away.
Start to play something with your VPS; it’s probably going to work right now. If it doesn’t, move on to the next step.
3. Enable Audio
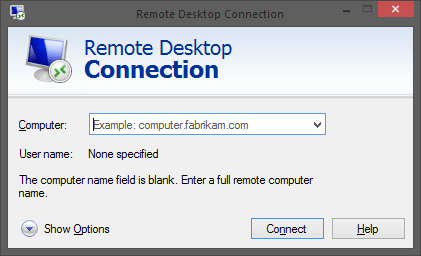
First, open Remote Desktop, then press “Show Options.”
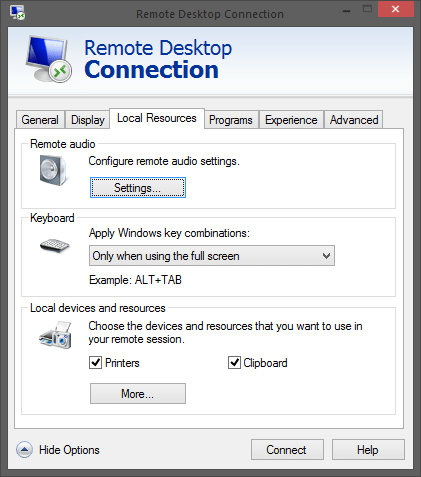
Now click the “Local Resources” button. Under “Remote Audio”, press “Settings.”
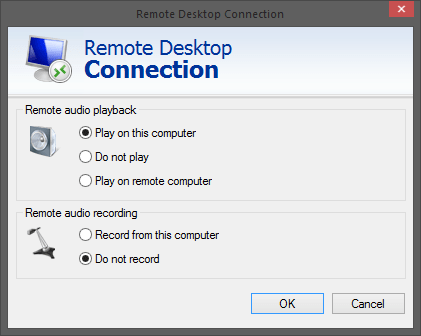
Ensure that Remote Audio Playback is set to “Play on this computer.” To enable the microphone, you’d like to change the “Remote audio recording” options.
If you hear the Windows’ startup sound when you log in to the VPS server, skip to “Make sure that audio is configured correctly for all applications.” Suppose you haven’t heard the Windows’ startup sound, proceed to the next step.
4. Set up RDP Properties
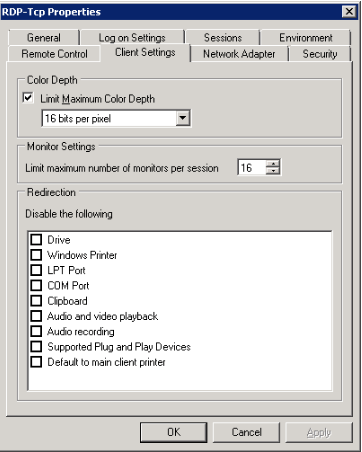
Start tscc.msc on the remote computer. Open the Connections folder on the left panel. Do right-click on RDP-Tcp, choose Properties, then click the “Client Settings” tab.
Check the “Audio Mapping” checkbox. Notice that all checkboxes under this section are below “Disable the following”. So anything checked here is disabled. By default, audio is disabled too.
Select OK, and then close the tsconfig. An alert may be produced that indicates this change will not take effect for any previously connected RDP sessions. Click on that, log out, and log back in.
You should hear the startup sound of the windows at this stage. If still not, proceed to the next step.
Also Read: Enable Remote Access Connection Manager
5. Check the Audio for all Applications
Make sure the Audio is configured correctly for all applications. To do this, take the following steps:
On the VPS, open the sound control panel in “Sounds and Audio Devices.” Click the Audio tab and pick “Microsoft RDP Audio Driver” for the default playback machine, if not already selected.
Check the “Use Default Devices Only” checkbox at the bottom of the dialogue and press the Voice tab. Pick “Microsoft RDP Audio Driver” for the default playback system, if not already selected, and then click OK.
It’s finally done now. All VPS sounds will now be played on your local computer via an RDP connection from this day on.
Get an RDP server with instant setup, full root access, and NVMe storage.
Buy RDPHow to Fix RDP no Audio Devices are Installed?
There are many elements involved in getting no audio devices installed on Remote Desktop Connection. Make certain that you’ve passed the steps above, and if you still get the error, let’s dig into it!
Fixing no audio output device installed on RDP is fairly challenging because the solution varies from someone to one another. It’s recommended to contact your RDP provider, and even at some point that users reinstall their Windows, it, unfortunately, doesn’t do any help.
However, the following steps can generally help you go through this obstacle. If any of these helped you, wrap it up with that, and don’t proceed anymore.
STEP 1. Errors are sometimes temporary, so restarting your computer can be practical. So, give it some seconds to your Windows to see if it can handle the issue itself!
STEP 2. Make sure that the audio devices are properly installed. In addition, update the driver if it’s already installed through:
- Opening the Control Panel,
- Selecting Hardware and Sound
- Choosing Device Manager
- Looking for Sound, video, and game controllers
- Clicking on your audio device and update them
Make sure that you restart the PC after updating the audio driver.
STEP 3. Search “services.msc” in the Start menu, and look for Windows Audio and Windows Audio Endpoint Builder. These two services should be running. If not, right-click on them and click on start to actually execute them.
STEP 4. Checking the group policy is indeed helpful. Try to allow audio redirection in the group policy to see whether it helps.
STEP 5. If none of the steps above could solve your problem, try this step before contacting your RDP provider. Go to the Start menu on your server and search for “tsconfig.msc”. Now, go to “Connection” and click on the tab “Client Settings”. Simply untick “Audio” from the tick box.
Get an RDP server with instant setup, full root access, and NVMe storage.
Buy RDPConclusion
In this article, we went through the step-by-step guide on enabling audio over the remote desktop connection. It’s not actually a problem since it goes back to the RDP configuration, and once that happens, everything will work fine.
With Cloudzy, you’ll get a potent and affordable RDP at the lowest price, $7.95 ever possible out there! Don’t forget to check our buy RDP page even to customize your RDP plan! Who will offer you that?