If you’re a video game enthusiast, you know that nothing can detach you from the real world as well as a wild adventure does. And what wild adventure is better than one with dinosaurs? Ark: Survival Evolved has gifted players with a wondrous video game experience since its early release in 2017; in this blog post, we’ll talk about how to enrich that experience even further by setting up an Ark server. So, keep reading to learn why and how to host an Ark server.
Why Should You Set Up Your Own Ark Server?
Ark is a deep gameplay experience that allows you to play with friends in a vast, open environment full of wild dinosaurs and accept the challenge of taming them. Learning how to host an ark server also gives you the opportunity to play in PvE and PvP gameplay modes and construct shelters to fortify your resources. Another feature of Ark that adds to its popularity is that it’s compatible with almost any device. You can play Ark on PC, Xbox, Playstation, Nintendo Switch, and even your smartphone. The excitement and joy in playing Ark need no further explanation. Yet you may still wonder how an Ark server can enhance your experience with Ark. You may tell yourself I’m a seasoned player, and I’ve managed to play Ark and get to this point without a private server. Or, on the opposite side, you may consider yourself a beginner in the world of Ark, and hosting your own server may sound unnecessary to you. So, in this section of the article, we’ll review three reasons why you need to learn how to host an Ark server today!
1. Getting Full Control
Are you frustrated with all the cumbersome defaults that limit your vision and experience? Well, the first important purpose of hosting your own Ark server is to add an extra sense of freedom to the experience. You can customize various settings on a private server, including difficulty levels, player limits, resource rates, etc. This level of customization allows you to make a gameplay environment that’s tailored to your preferences.
2. Reduced Latency
Public servers are exactly what their name implies, public! They’re occupied with a lot of players resulting in intense usage of server resources. This can cause data lag and latency. And we all know how a laggy connection can kill the buzz of an online video game. An Ark private server is occupied with as many players as you wish, and the server’s resources remain exclusive to you. It provides a smooth game experience, less frustration, and more peace of mind, especially if you choose a server provider that offers the best possible infrastructure and resources.
3. Enhanced Privacy
By learning how to make an Ark server, you can create a closed community of players consisting of friends and family members. This provides a secure and private space where you can enjoy the game without the interference of strangers. You can set passwords, whitelist specific players, and regulate who can access the server.
In general, learning how to host a dedicated Ark server is an empowering decision since it brings you full control and less latency. You can also look at it as an opportunity to play with friends or bond with family members over a shared interest in video games. Hosting an Ark server is the only solution to how to play Ark with friends.
What Are the Requirements for Hosting an Ark Private Server?
Learning how to host an Ark server is not a complicated task and doesn’t require many facilities. The first thing you need to set up an Ark server is a host. This can be provided in two forms. You can either use a personal computer or buy a server. Although using your PC sounds like an easy option, doing so limits your daily activities with the PC. So, for ease of use and access to much better technical resources, it’s highly recommended to buy a server.
Host lag-free game servers with high-speed NVMe VPS hosting.
Whether you decide to use a personal computer or to buy a server, your machine needs to meet some technical system requirements:
RAM: 8 GB
CPU: 2 cores with at least 3.0 GHZ
Disk Space: At least 20 GB of storage
Note that as the number of connected players increases, you need to scale your resources to provide a smooth game experience for everyone on the server.
Ark dedicated server software is another basic requirement for hosting an Ark server.
How to Host an Ark Server? (With Full Details)
In order to learn how to host an Ark server on a VPS, you need to follow a set of easy steps:
1. Connect to Your VPS from Your Local Computer:
If you use Windows, you have two options for this step. You can either use your command line to make a bridge to your VPS or you can use a file transfer application like PuTTY for this purpose. PuTTY is a file transfer application that allows you to connect a virtual machine or a remote desktop. It also provides you with a command line interface. For people who don’t have a technical background, PuTTY is an easier tool to use. So, in this tutorial, we’ll follow the steps using PuTTY and its command line for making changes to the VPS and setting up an Ark server.
To use PuTTY you first need to download it here and finish the installation process.
Here’s how you can connect to a VPS using PuTTY:
First, enter the IP address of your VPS.
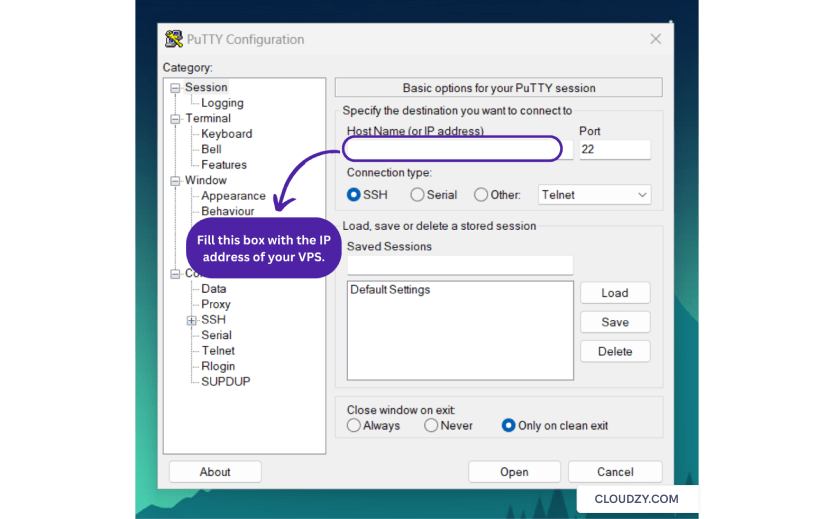
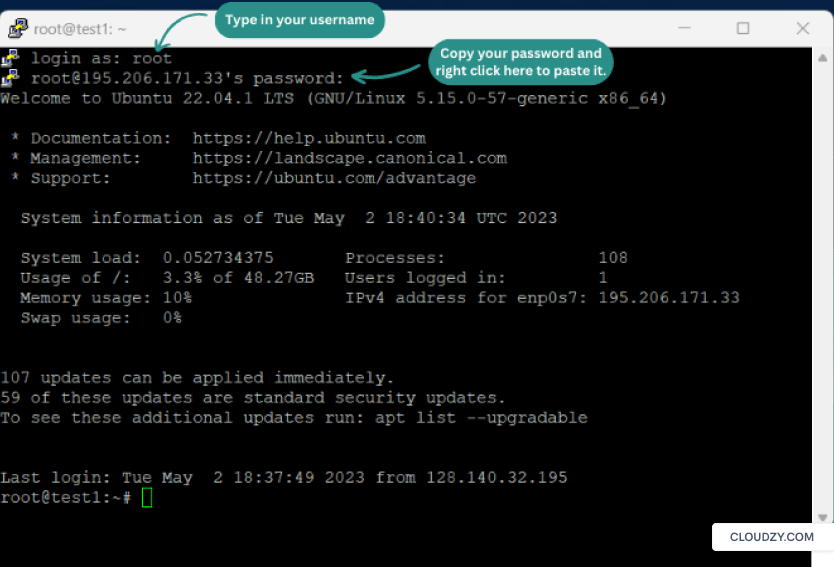
Then you should be able to see PuTTY’s terminal. You need to enter your VPS credentials in the terminal to make a successful connection. So, get your username and your password from your profile on your VPS provider’s website and paste them into PuTTY’s terminal. In order to paste information, you should right-click in the terminal.
To use the command line, you should have Windows Subsystem for Linux installed on your computer, and from there, you can easily make an ssh connection to your server by typing in this command:
ssh username@IPaddress

After you’ve successfully logged into your server, move on to the next steps.
2. Update the Server:
It’s always recommended to update your VPS packages. Type in this command in PuTTY’s terminal to so:
sudo apt update
sudo apt upgrade
3. Download and Install SteamCMD and Its Dependencies:
To download SteamCMD on a 64-bit Linux system, run each of these lines one after another:
sudo add-apt-repository multiverse
sudo apt install software-properties-common -y
sudo dpkg --add-architecture i386
sudo apt update
sudo apt install lib32gcc-s1 steamcmd -y
And now you have all the dependencies.
4. File Modification:
If you want your Ark server to operate properly, you need to first make some changes to your server files.
First, type in this command to open the file:
sudo nano /etc/sysctl.conf
Then use the down arrow button to scroll down the file. Add this line to the end of the file:
fs.file-max=100000
After typing this line, your file should look like this:
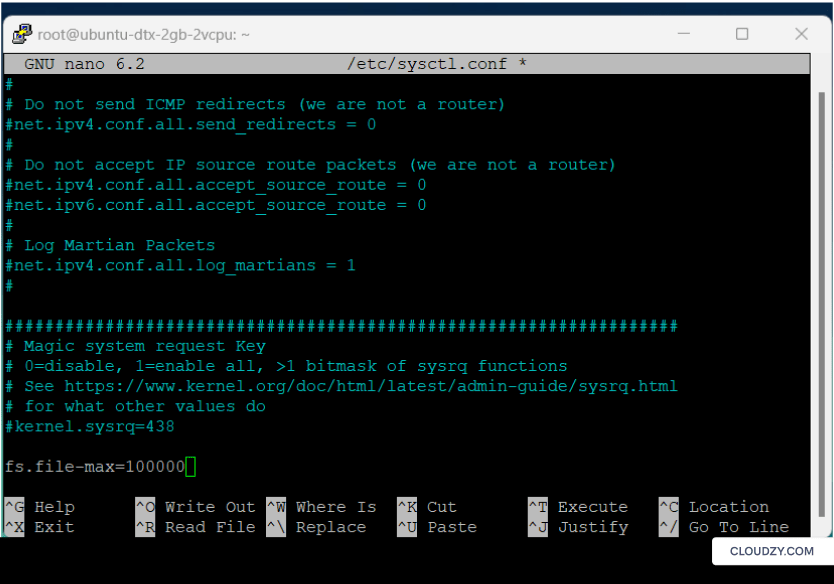
Now, press Ctrl+x, hit Y, and hit Enter to save the changes.
To change the next file, type in this command:
sudo nano /etc/security/limits.conf
Scroll down to the end of the file and add these two lines:
*  soft nofile 100000
*  hard nofile 100000

Now, press Ctrl+x, hit Y, and hit Enter to save the changes.
And for changing the last file type in this command:
sudo nano /etc/pam.d/common-session
Scroll down to the end of the file and type this line:
session required pam_limits.so

Now, press Ctrl+x, hit Y, and hit Enter to save the changes.
And that’s it! You modified all the necessary files. Now, reboot your system and log into again.
5. Opening Ports (Optional):
In this optional step, we’re going to make sure our server allows the ports that are used by Ark. This step is fairly easy; just follow these lines:
sudo ufw enable
sudo ufw allow 27015
sudo ufw allow 7777
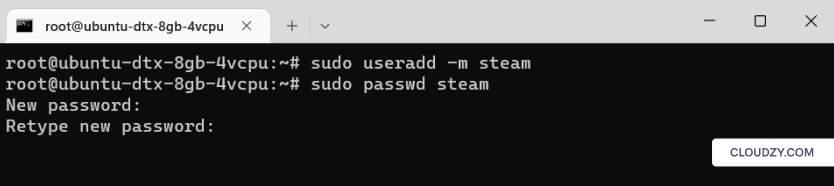
6. Make a New User:
Add a new user to your server and name it Steam:
sudo useradd -s /usr/bin/bash steam
Switch to the new user:
su - steam
7. Make a New Directory:
This line will create a new directory:
mkdir arkserver
Now, change the directory to this new folder:
cd arkserver/
Type pwd to get your working directory. Copy the output of this line because you’ll need it a few steps further.
8. Initialize SteamCMD:
In your current directory, type steamcmd and wait for it to download all the files.
Then type this line followed by the working directory that you’ve copied:
force_install_dir [paste the directory]
Type this line to login to Steam:
login anonymous

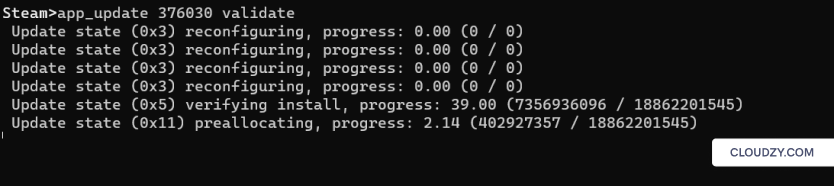
This is the last step that we’ve been waiting for. Type this line of code:
app_update 376030 validate
And be patient until all your Ark server files are downloaded.
Type exit to come out of Steam.
9. Create a Server Setup File:
Change your directory to this location:
cd ShooterGame/Binaries/Linux
In this location, make a new file:
nano startserver.sh
Fill the empty file that opens with this text:
ulimit -n 100000
./ShooterGameServer TheIsland?listen -server -log
Now, press Ctrl+x, hit Y, and hit Enter to save the changes. To make this file executable, type this command:
chmod a+x startserver.sh
Now, type this command to open the Screen:
screen -S server
Then type this command to run the server setup file that you just created:
./startserver.sh

Your Ark server is up and running now. If you want to exit screen, you can hit Ctrl+a+d.
10. Configure Your Ark Server:
To further customize your Ark server, change the directory and go to this destination:
arkserver/ShooterGame/Saved/Config/LinuxServer
If you type ls in this directory, you get a list of all the existing files which you can change to your desire.

For example, you can open the GameUserSettings.ini to change user settings.
11. Running the Server as a Service(Optional):
In this last optional step, we’ll give you an alternative to the Screen app. Screen is a great tool for running and managing an Ark server. It can keep the server running as a background process even if you close the terminal Window. However, running a server as a systemd file provides more control over the server and better management. To use this option, you should create a service unit file that contains all the information for starting, managing, and, if necessary, restarting the server.
Here’s the service unit file you can use to run your Ark server:
Step 1:
nano /etc/systemd/system/shootergameserver.service
Step 2:
Fill the opened file with this information:
[Unit]
Description=ark server steam

[Service]
Type=simple
User=steam
Group=steam
DefaultLimitNOFILE=100000
ExecStart=/home/steam/arkserver/ShooterGame/Binaries/Linux/ShooterGameServer TheIsland?listen -server -log
TimeoutStartSec=0

[Install]
WantedBy=multi-user.target
Step 3:
Run these three lines to make your file executable:
systemctl daemon-reload
systemctl restart shootergameserver.service
systemctl enable shootergameserver.service
Steps 9 and 10 are sequential, but they can both be executed after step 11.
What Does an Ark Server Need Regarding Server Administration and Maintenance?
When it comes to server administration and maintenance for an Ark server, there are several key aspects to consider. Additionally, when choosing an Ark server provider, there are specific features you need to keep in mind. Here are the important points to look for in terms of server administration and selecting a provider:
1. Control Panel:
A user-friendly control panel or server management interface can be a great tool for simplifying administration tasks. Look for a provider that offers an easy to work with control panel with features such as server configuration settings, mod management, player management, and server monitoring.
2. Server Configuration:
The ability to easily modify server settings is highly important. Look for a provider that offers root access to the configuration files, allowing you to customize various aspects of the server, such as rates, game rules, and player limits.
3. Backup Solutions:
Server data backups are essential for protecting your server’s data in case of unexpected issues or data loss. Check if the provider offers automated or manual backup options. This way, you can restore your server to the previous state in case of an unwanted disaster.
4. Security Measures:
Server security is an important aspect of preventing unauthorized access and protecting your Ark server against potential exploits. Look for providers that implement security measures such as DDoS protection, firewalls, and regular security updates to ensure the safety of your server and its data.
On top of all these factors, a good Ark server provider should offer high-performance servers that are reliable and their uptime is guaranteed. Having a large server fleet with various locations is also crucial to your server’s performance. Because in order to reduce latency and data lags, you should choose a server that’s located as close to you as possible.
If you anticipate a growing player base, selecting a provider that allows easy scalability is a wise decision. A good Ark server provider has scalable plans that let you expand your resources as your need grows.
And lastly, you should look for providers with responsive and knowledgeable customer support. This ensures you can quickly resolve any issues or technical difficulties that may arise.
Host lag-free game servers with high-speed NVMe VPS hosting.
Considering all these important features, Cloudzy’s ARK VPS plans have the whole package, offering all of these features in the most functional form. Our ARK VPS comes with 24/7 support, a 99.95% uptime guarantee, and a fast and easy set-up. Most importantly, it’s built on leading-edge technology, ensuring you get the top-tier server infrastructure you deserve. So, don’t hesitate to set up an Ark server on Cloudzy VPS!
Wrapping Up
In this post, we walked you through the basics of Ark servers and talked about how to create Ark server. Hosting your own game server isn’t supposed to be a costly luxurious act. In fact, by choosing the right VPS provider, you can change your gaming experience at a reasonable price.
FAQ
Can you play Ark on your own dedicated server?
Yes, by learning how to host an Ark server, not only can you play Ark with better quality, you can also invite friends and family to your server and create a personalized game environment.
How much does a private Ark server cost?
The cost of a private Ark server depends on the provider and the VPS plan that you get. In general, the price can range anywhere between $4 to $120 per month.
Why should I host a private Ark server?
Consider a list of all the important factors that contribute to an Ark server’s performance, like security, privacy, fast and lag-free connection, control over the server, etc. by learning how to host an Ark server, you can enhance the quality of all these factors plus having a safer and smoother game experience.