Minecraft’s world is weirdly peculiar, liberating, and dissociative. The combination of these characteristics has made it a mesmerizing video game. In fact, Minecraft has attracted an estimated 150 million active players since its early release in 2011. And if you’re here curious to find out about how to make a Minecraft server, you’re probably among those bewitched gamers. In this blog post, we’ll cover everything you need to know about how to create a Minecraft server.

What Is a Minecraft Server?
A Minecraft server is a server that gives you the opportunity to go beyond the limitations of a single-player game and experience Minecraft’s virtual world with your friends, family, or even strangers from all over the world.
When you use a game server to play Minecraft, your server keeps track of the game’s processes, taking a heavy weight off the Minecraft client’s shoulders. A Minecraft client is an app that provides an interface for playing the game.
When you play the game on a server, you allow the client to only worry about rendering the game world and user interface. And the server takes responsibility for processing the game’s data, such as players’ movements, interactions, constructions, etc. This way, the gaming experience becomes smoother and less laggy.
There are several types of Minecraft servers, such as survival, creative, private, anarchy, etc. And each server type has its own set of features and rules. Or maybe no rules at all, as the name of the anarchy server implies. Overall, with Minecraft servers, the virtual world of Minecraft becomes more detailed and vast, making it the creative game it is. For a deeper dive into what is Minecraft server?, check out our comprehensive guide.

Options for Making a Minecraft Server
When it comes to making a Minecraft server, you have a few main options: self-hosting on your PC, which uses your own hardware but may affect performance; using a VPS or dedicated server, which offers more reliability and scalability but comes with a subscription cost; and free Minecraft server hosting, where some services provide limited free plans.
Can I Make a Minecraft Server for Free?
Yes, you can make a Minecraft server for free through a few methods: local hosting on your PC, which costs nothing but limits access to your network; free server hosting services like Aternos or Minehut, which offer limited resources and may show ads; and trial VPS plans from providers like Oracle Cloud, which can handle small setups. However, for better performance and more players, a paid option like Cloudzy’s Game Server VPS is recommended

Hosting Your Own Minecraft Server; Why and How?
Many Minecraft players are totally satisfied playing on their own computers and playing on a server seems unreasonable to them. However, those who have experienced the game on a server strongly believe there’s no going back. And this enhanced experience and satisfaction are why you should consider learning how to set up a Minecraft server.
Here, I’ve summarized three reasons why you should host a Minecraft server:
1. Improving Performance
As mentioned in earlier sections of this blog, a Minecraft server takes care of most of the game’s processes, like generating worlds. This way, your PC doesn’t have to handle all of the game’s pressure on its own. Also, your server will be up and functional when your PC is off, so other players can keep playing. So, using a VPS for hosting a Minecraft server is like teamwork between your server and your computer to enhance the gaming experience. Who doesn’t agree that collaboration always improves performance? If you’re looking for specialized solutions, consider gaming VPS hosting.
2. Making It More of a Social Activity
When you have your own server, you choose who to play with. While on a public server, the process is not selective at all. What is more ideal than inviting your friends to your game world and playing with them?
3. Customizing the Game to Suit Your Fancy
By hosting your Minecraft server, you can control and modify every aspect of the game however you like. For example, you can add mods and plugins and change the game’s difficulty level. What’s more empowering than being the omnipotent god of your own world? Want to make a modded Minecraft server? It’s easier than you think when you have full control!
Overall, it’s fair that to host a Minecraft server, you have to take a few extra steps, but the outcome of hosting a server outweighs the trouble.

Requirements: Whatever You Need to Host Your Minecraft Server
The Minecraft server setup guide process requires a few basics, which we’ll cover in this section:
1. A Good Hosting Service or a Computer
You obviously need something to host your server, and for this purpose, you can buy a server or turn your own computer into one. If your PC has enough storage and processing power, using your personal computer doesn’t sound like a bad idea. But that’s not the case for everyone, as they may need the whole power of their PC for daily tasks. Alternatively, you can host your Minecraft server on a dedicated server or a VPS. Going with a service provider that offers servers specifically designed for Minecraft can be a game changer here because a specialized server offers a smooth gaming experience and supports more players. Cloudzy’s game server VPS is the perfect example of specialized game virtual private servers since it’s highly compatible with the requirements of a game server, such as latency-free connectivity and exceptional performance. For dedicated solutions, explore Minecraft VPS hosting.
Host lag-free game servers with high-speed NVMe VPS hosting.
VPS for Gaming2. Minecraft Server Software
Another essential requirement in the Minecraft server setup is Minecraft server software. For this component, you can use the official Minecraft server software or third-party software like Spigot and Paper. Regardless of the origin, this software is crucial for hosting and running a Minecraft server because it makes a server instance that allows managing the game’s world. For the purpose of this tutorial, we’ll use the original software to make a Minecraft server. The original Minecraft server software is built using Java. So, to run this software on your server, you must also install Java.
3. Optional Software
Connecting to a Minecraft server and managing it doesn’t require extra software and is easily done from the Windows command line. However, it’s recommended to use file transfer applications for better management and easier use. Three of the most commonly used applications for connecting to, managing, and running Minecraft servers are PuTTY, Winscp, and Screen.
- PuTTY is a network file transfer application that provides a console to manage your server’s installations and commands. It’s like remotely accessing the command line of your Minecraft server. The connection is encrypted when you use PuTTY as a link between your computer and your VPS. PuTTY also allows you to choose among a variety of encryption methods, such as AES, 3DES, and Public-key authentication. PuTTY is not a necessity but is definitely a helpful hand.
- Winscp (Windows secure copy) is another file transfer application that eases the connection between you and your remote server. This tutorial uses Winscp to edit files and create new directories on the Minecraft server. There are also other tools for navigating through file systems and managing a Linux remote machine from Windows, like FileZilla and Cyberduck. Alternatively, you can just install a graphical user interface such as GNOME on your server to manage things more easily and clearly.
- Screen is an app that works with Linux and Unix-like operating systems. Unlike the former applications, we have to install this one on our server. We use screen to have a detached session. Meaning that the server’s processes go on in the background even if we close PuTTY or disconnect from the server.
After going through all the requirements of how to setup a Minecraft server, let’s dive into the actual process.
How to Make a Minecraft Server with Friends
You can play Minecraft with your friends if you like. Setting up a server is far easier than what people normally think! Just follow these steps:
First, you have to select the hosting. You can have it hosted by yourself on your PC, or on a VPS, or maybe even for free. If you would like to go for self-hosting, then port forward the settings to enable friends to be able to connect via your public IP. After that, pass around your server’s IP address. If you are not up for port forwarding, there is always Hamachi to create a virtual LAN environment for you.
Be reminded that the hosting services you pick need to allow for external connections in order to play the game.

Create a Minecraft Server on Windows/Mac
While our main tutorial focuses on Linux VPS hosting (super reliable for larger groups), you can absolutely set up a server on your Windows or Mac system. Here’s what you’ll want to do:
- Get the official server.jar file from Minecraft.net itself. This will be the life of your server!
- Make sure Java is installed. That’s the magic it needed.
- Time to start the server! This will be done by entering a command line instruction such as java -Xmx1024M -Xms1024M -jar server.jar nogui. That’s quite scary, but it’s just telling your computer to run the server with a limited amount of memory.
- Opening the firewall for incoming connections must be allowed next. Your computer firewall will try and protect you but might block your friends from joining the server.

Step-by-Step Guide on How to Make a Minecraft Server
There are a few presumptions for this step-by-step tutorial:
- You want to use a VPS for hosting a Minecraft server.
- The OS of your server is Linux, with the latest version of Ubuntu.
- The OS of your personal computer is Windows.
Considering these factors, you’re only 9 tiny steps away from the moment you can setup minecraft server.
1. Downloading Putty and Winscp
Use this link to download and install Putty.
Use this link to download and install WinSCP.
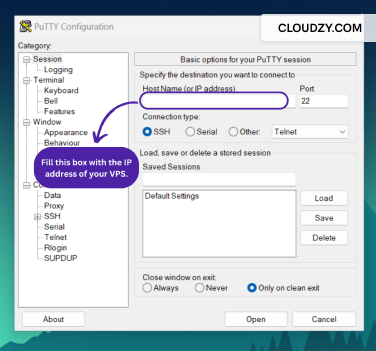
2. Connecting to Your Vps Using Putty
Using Putty to connect to a VPS is rather simple. All you need to do is enter the login credentials of your VPS. The first step requires you to enter the IP address.
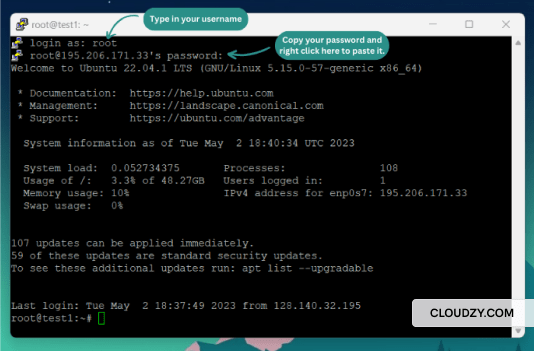
After entering the IP address, you can see the Putty terminal. Here’s where you enter your username and the password of your VPS. All of this information is provided to you by your VPS provider.
Note: Right click on the password line to paste your password. CTRL + V doesn’t work here.
3. Installing the Minecraft Server Software
To download and install the original Minecraft server on your VPS, open this link and copy the “server.jar” download link.
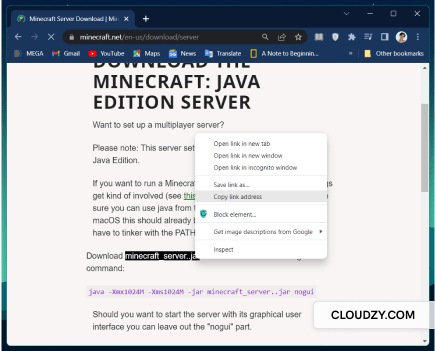
Now, back to the Putty terminal, type in this command:
$ wget [paste the server.jar link]
4. Installing Java
Before installing Java, let’s first update the server with the following command:
$ sudo apt update
Now, install Java with this command:
$ apt install openjdk-17-jdk openjdk-17-jre -y
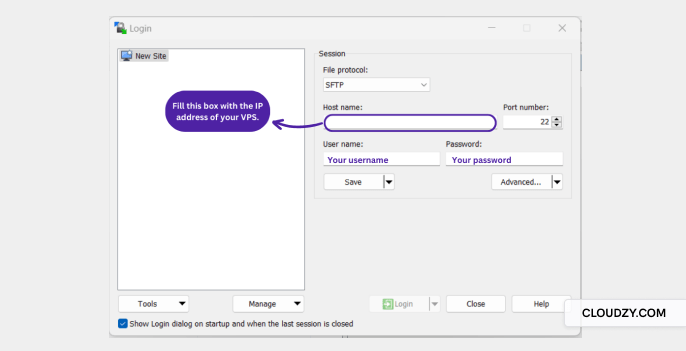
5. Entering Winscp for Making Changes to the Server.
Using Winscp for managing the server, requires you to login into it first.
Now, let’s create a new folder in your VPS for the Minecraft server.
To do so, right click on the right-hand side of Winscp, click new, click on directory, and name your new directory.
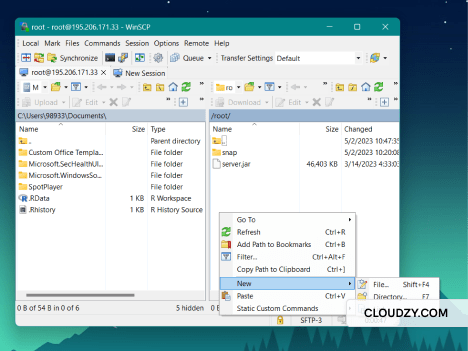
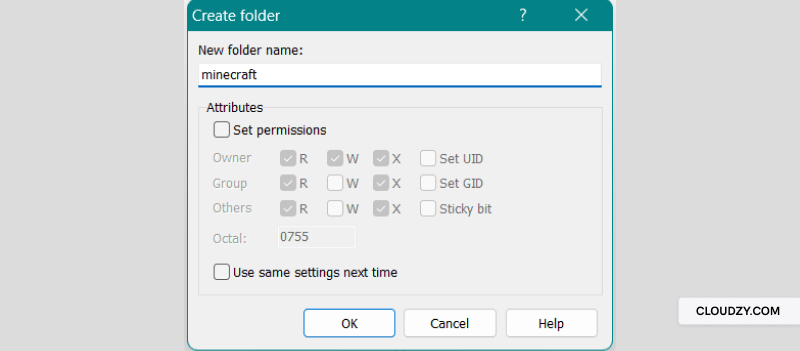
Now name the folder whatever you desire and click OK.
And as the last step, drag the .jar file and paste into the newly created folder.
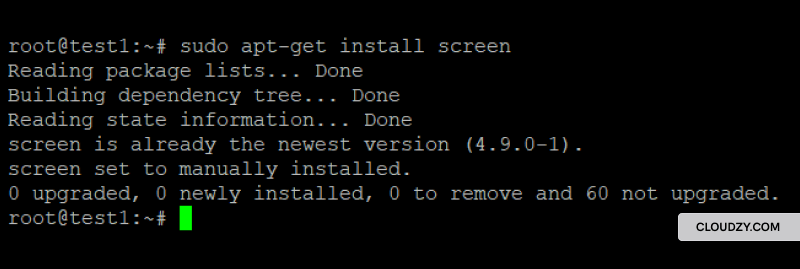
6. Installing Screen
Use the following command to install the screen in order to have a continuous connection to the server:
$ sudo apt-get install screen -y
After installation, type this command to run Screen:
$ sudo screen
7. Running the Server
Since the server is now in the minecraft folder, you have to change the directory on the PuTTY terminal.
Type in this command to change the directory:
$ cd [your folder’s name]
Now to run the server, we have to copy and paste the command provided by the Minecraft website.
java -Xmx1024M -Xms1024M -jar server.jar nogui
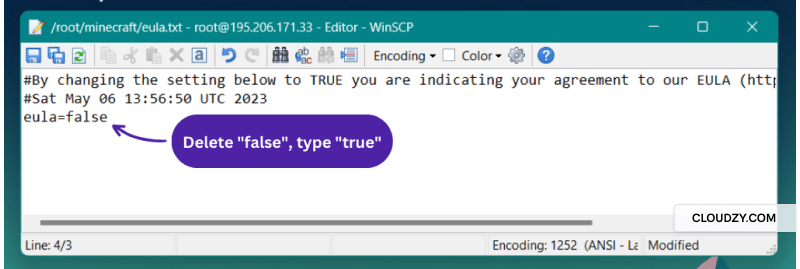
After running this command, you’ll see this error:

To solve this problem, open Winscp, in the minecraft folder open eula.txt and on the last line change false to true and save the document. Then go ahead and run the server again.
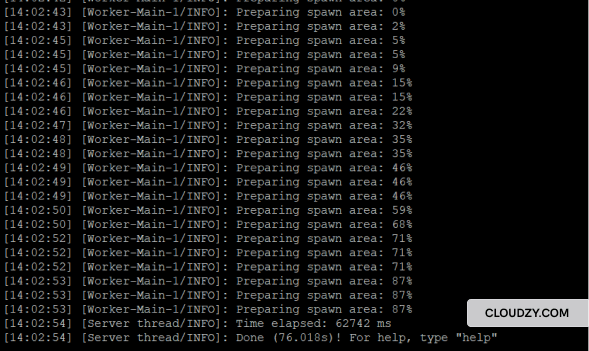
To rerun the server, you need to paste the command again and be patient until your Minecraft server is ready. Wait a few minutes until you see Done!
Congratulations, you just learned how to make a Minecraft server and actually made one. For an optimal experience, consider researching the best Minecraft server hosting options.
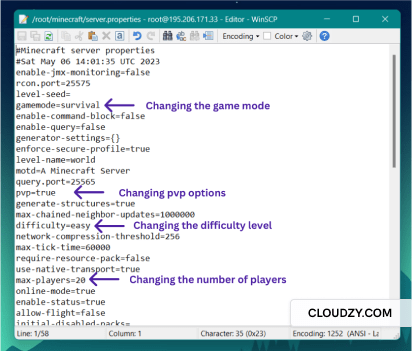
8. Configuring the Server
You can use Winscp to change the configurations of your server. To do so, you should open the server folder in Winscp and open the “server.properties” file. You can change the server’s name, number of players, difficulty level, game mode, etc. After applying the desired changes, save changes and close the file. You should rerun your server, each time you make a change to it.
9. Connecting to the Server From Minecraft Launcher
Open your Minecraft launcher app on Windows, select the multiplayer option, and add your server. To add your server, you have to give it a name and enter its IP address. When your server is loaded to Minecraft, click join server and start playing.

What to Look For in a Minecraft Server Hosting Provider?
Since Minecraft is an online game, the speed and quality of the Internet connection affect your performance. So, choosing the right service provider is determinative of a good gaming experience.
Here’s a list of reasons why as a video game enthusiast, you should be picky when choosing a Minecraft server:
-
Uptime Guarantee ⏲️
The most important factor in a smooth game experience is an uninterrupted connection to the server. From amateur players to pro gamers, all agree that laggy connections and recurrent server crashes kill the buzz and ruin the joyful experience of the game. High uptime not only enhances performance but also ensures that you and other players of your Minecraft world can continue your adventures no matter when. Since the server is up and running, players can join anytime. This is specifically important if you plan on making money from your Minecraft server. If you consider it a business, you should get high-quality infrastructures that satisfy your players. So, a reputable provider who guarantees at least 99% uptime and has reliable servers should be preferred over those providers who get a lot of downtime complaints.
-
Large Server Fleet 🌎🌍🌏
The location of the server can affect the frequency of data lags and latency. Therefore, choosing a location that’s as close to your player base is important. You can have more efficient options with a provider that has a large server fleet and covers various locations all around the world.
-
Scalable Resources 🔽🔼
If you want your server to be a warm host to multiple players, you should make sure that the provider offers to upgrade your server’s resources. Because as you attract more players, you will need more technical resources like RAM and storage.
-
Security 💂
Several types of attacks can target Minecraft servers. For example, people may want to get unauthorized access to your server, or the player you killed 10 minutes ago may perform a DDoS attack on your server and cause it to crash down. In order to avoid such disasters, you’d better choose a provider that values your security and has robust anti-attack strategies.
Cloudzy’s Minecraft server VPS has all you’re looking for gathered in a VPS plan with minimum cost and maximum performance. Considering all the factors mentioned above, Cloudzy’s game server VPS has a 99.95% uptime guarantee, active servers in more than 12 locations, various plans with scalable resources, and, most importantly, AI-powered protection against DDoS attacks. But that’s not the extent of the fancy we offer. In Cloudzy’s game server VPS, you can choose among various payment methods, take advantage of our 24/7 customer support, and enjoy the high-speed connection of the most modern Internet infrastructure. Check out our Minecraft server VPS plans.

Host lag-free game servers with high-speed NVMe VPS hosting.
VPS for GamingConclusion
This blog post tried to encourage you to make a Minecraft server by listing its benefits and providing a simple-to-follow guide. We talked about how to make a Minecraft server and discussed things to consider before choosing a service provider because knowing what you should be looking for is as important as knowing how to setup a server in minecraft. Overall, hosting a Minecraft server is not so complicated and can be done with a few clicks and on a reasonable budget.
FAQ
How can I allow external players to use my Minecraft server?
Is it possible to host a Minecraft server on a PC?
How much does a Minecraft server cost?