This post is dedicated to explaining how to use SSh to connect to a Remote Server in Linux. We also cover the method using PuTTY to connect to a remote Linux server. Of course, PuTTY is not the only SSH client you can use for your remote connections. Take a look at this comparison of the best SSH clients for Windows in 2022 and choose the one that matches what you want. Accessing devices remotely became a requirement a long time ago, and we can hardly imagine how it would be if we could not control computers from remote places.
There are several ways to connect to a remote machine depending on the operating system you are using, but the two most widely used protocols are:
- Secure Shell (SSH) for Linux based devices
- Remote Desktop Protocol (RDP) for Windows devices
Both protocols use client and server applications to create remote connections. These tools allow you to access and remotely control other machines, transfer data, and do virtually everything you can accomplish when physically sitting in front of the computer.
What Is the SSH and What Does it Stand for?
SSH (Secure Shell), also referred to as “Secure Socket Shell,” is a protocol that allows you to securely connect to a remote device or a server using a text-based interface. There are two most widely used protocols to connect to a remote machine: SSH and RDP. Creating an SSH connection needs both a client and a server component.
When a secure SSH connection is created, a shell session will begin, and you will be able to manipulate the server by typing commands within the client on your local machine. Those who want to access a device remotely in a highly secure fashion, particularly system and network administrators, use this protocol to get the job done.
Get an RDP server with instant setup, full root access, and NVMe storage.
Buy RDPHow Does SSH Work?
To create an SSH connection, you need two components:
the client and the corresponding server-side part. TThe SSH client is an application you are running on a device you are using to connect to another computer or server. The client uses the data provided by the remote host to initiate the connection. When the credential is validated, the client creates an encrypted connection.
On the server-side, there is a part called the SSH daemon (SSHD) that constantly listens to a specific TCP/IP port for potential client link requests. If a client has started a connection, the SSH daemon will reply with the software and protocol versions it supports, and the two will share their identification data.
If the received credential is right, SSH will establish a new session for the appropriate environment. The default version of the SSH protocol for SSH server and SSH client communication is version 2.
Also Read: Best SSH Client for Windows in 2022
What Is a Terminal?
If you’re new to Linux, you would like to get acquainted with the terminal. Think of it as the ultimate command shortcut hub that is the generic way to communicate with a Linux server.
Using the command line might seem like a challenging job, but it’s simple if you start with the basics, like these 15 basic commands every user should know.
The terminal becomes even more crucial if you’re planning to develop an application (or learning to develop one) using PHP, or Python. Unlike Windows, which makes a mess of Python trying to recreate it with a GUI, Linux integrates Python and other programming languages into the terminal. So, Even though you have to go through some steps to install Python on Windows only to get some ineffective mess, Linux comes with it, already and accessible from the command line.
Build on a Linux VPS with root access, NVMe, and AMD EPYC power.
View Linux PlansWhat is SSL?
SSH uses SSL (Secure Socket Layer) to provide security to the data transferred between web browser and server. The Encryption of the link between a web server and a browser is done with SSL, ensuring that all data passed between them remain private and free from attack. In other words, creating public and private keys between remote servers and local computers connecting via SSH is part of the SSL security protocol. This extra layer of protection is helpful, particularly in the case of brute-force password attacks.
How to Create an SSH Connection?
Because creating an SSH connection needs both a client and a server component, you need to make sure that they are installed on local and remote machines.
OpenSSH is an open-source SSH tool commonly used for Linux distributions and is relatively easy to use. It needs access to the terminal on the server and the device you are using to connect to. Please notice that Ubuntu does not have an SSH server installed by default. At this point of this SSH remote connection guideline, we now understand SSH and its related concepts, So let’s dive into installing an OpenSSH Client.
Step 1: Install an OpenSSH Client
Before installing the SSH client, make sure it is not already installed on your system. A lot of Linux distributions already have an SSH client.
- Run the following command to install OpenSSH on your device:
sudo apt-get install openssh-client
- Type superuser password when required.
- Press Enter to finish the installation process.
Provided that you have the necessary permissions to access together with the hostname or IP address, you can now use SSH on any computer with a server-side application on it.
Step 2:Install an OpenSSH Server
To accept SSH connections, the server-side part of the SSH software toolkit must be installed on the computer. To do so, you must go through the following steps:
- Open the terminal on your server machine. You can either look for a terminal or click CTRL + ALT + T on your keyboard.
- Enter the following command to install your SSH server:
sudo apt-get install openssh-server
- Type superuser password when required.
- Press Enter and Y to allow the installation to continue after the disk space prompt.
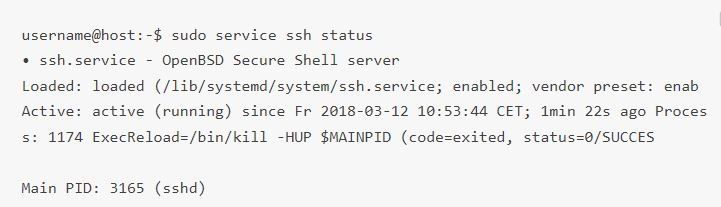
After doing the above steps, you will have the appropriate support files installed for you, and then you can check whether the SSH server is running on the machine by entering this command:
sudo service ssh status
The terminal answer should look identical to this if the SSH service is running correctly:
Another approach to know if the OpenSSH server is installed correctly and will accept connections is to rerun the ssh localhost command in your terminal prompt. The response will look similar to this screen when you run the command for the first time:
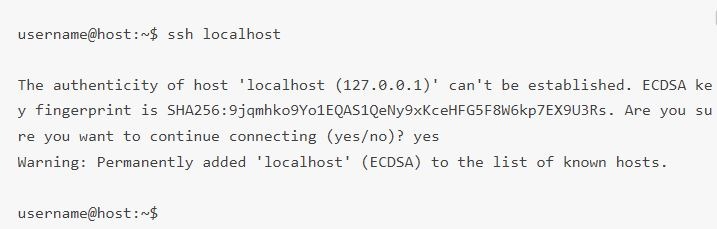
Now, enter yes or y to continue.
Great job! Your server is now ready to accept SSH remote connection requests from a different computer using an SSH client.

How can I use SSH to connect to a remote server in Linux?
Now that you have the OpenSSH client and server installed on every device you need; you can create a secure SSH remote connection to your servers via the following steps:
- Open the SSH terminal on your computer and launch the following command:
If the username on your local device matches the one you are going to connect to on the server, you can run this command:
ssh your_username@host_ip_address
If the username on your local device matches the one on the server you are going to connect to, you can run this command:
ssh host_ip_address
And press Enter.
- Enter your password and press Enter. Note that you won’t get any feedback on the screen when you type. If you paste your password, ensure it is stored securely and not in a text file.
- When you connect to a server for the first time, you’ll be asked if you want to continue connecting. Just type “yes” and press Enter. This message would only appear this time because the remote server is not identified on your local computer.
- The ECDSA fingerprint key is now added, and you are connected to the remote server.
If the device you are attempting to remotely link to is on the same network, it is safer to use the private IP address rather than the public IP address. Otherwise, you would only need to use the public IP address. You can now manage and control a remote device using your terminal. If you have trouble connecting to a remote server, ensure the correctness of the IP address for the remote device, your username, and your password. Moreover, check to see if the port SSH daemon is listening to is not blocked by a firewall or forwarded incorrectly.
Build on a Linux VPS with root access, NVMe, and AMD EPYC power.
View Linux PlansFurther steps into remote control SSH
Now that you can create an SSH remote connection to your server, we highly recommend a few further steps to improve the remote control SSH and its security. Because when you use default values for the setup related to ssh remote connection, your system becomes more prone to hacking and intrusions, making the whole access SSH remotely not safe and resulting in your system being a target of scripted attacks.
Here are some suggestions for improving SSH security which you can take advantage of via editing the sshd configuration file:
- Modify the default TCP port where SSH daemon is listening and Change it from 22 to something much higher like 245976. Pay attention not to use easy-to-guess port numbers, such as 222, 2222, or 22222.
- Use SSH key pairs for authentication of passwordless SSH login. They are safer and allow logging in without using your password, delivering you a faster and more convenient approach.
- Disable password-based logins on your server. Because If your password gets cracked, disabling this will eliminate the possibility of using it to log into your servers. Before doing so, it is crucial to ensure that key pairs’ authentication works correctly.
- Disable root access to your server and use a regular account with the su – command (to switch to a root user).
We now know better about SSH remote connection and how to access SSH remotely. We referred to PuTTy multiple times in this article; naturally, if you are not familiar with PuTTy, you will have some questions about it. So aside from delivering SSH remote connection guideline article, we will give you an overview of PuTTy and show you how to use it to connect to a Linux server.
What Is PuTTY?
PuTTY is a popular Windows terminal emulator that is not limited to Windows operating systems. PuTTy is free and open-source, so it’s also popular with Linux users and offers a text user interface for remote computers running any of its supported protocols including SSH and Telnet.
Note: PuTTY is free to download software and offers a simple way to access the Unix shell environment from your windows system. Unlike Unix, Windows does not have a pre-installed SSH server or client. That is why the network file transfer program supports a variety of protocols, including Telnet clients.
Also Read: Generate SSH Keys in Windows 10
How to Download and Install Putty on Ubuntu Linux?
The Linux version of PuTTY is a graphical terminal application that is not pre-installed in most Linux distributions. Although, you can easily install puTTY via terminal on a Linux-based device.
If you don’t have PuTTY installed, please visit the Download PuTTY page and download the Linux installer from the Package Files section of the page.
The good news for Linux users is that PuTTY is available in the Ubuntu universe repository. To install PuTTY on Linux Ubuntu, you should first make sure that the universe repository is enabled. Use this command:
sudo add-apt-repository universe
Once the universe repository is enabled, you can update Ubuntu with this command:
sudo apt update
Then install PuTTY with this command:
sudo apt install putty
When PuTTY’s installation is done, you can start PuTTY by looking for it on the menu. The Linux version of PuTTY looks almost the same as the Windows version. So, you won’t have any difficulty finding your way through new and changed settings.
How to Connect to a Linux Server Using PuTTY?
If you want to connect to a Linux server using PuTTY after installing it, you need to take these steps:
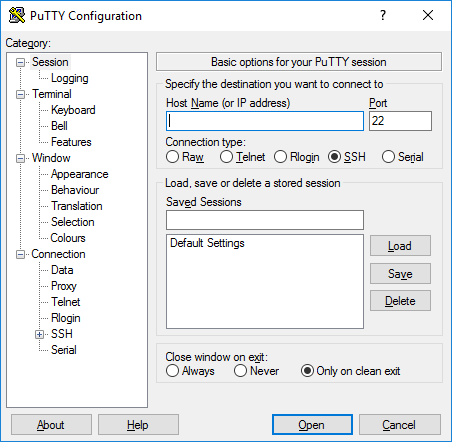
Step 1: Configure PuTTY
The main session configuration screen will appear when you launch PuTTY. Begin by entering the Host Name (or IP address) of the server you’re trying to connect to.
The port will be set to 22 by default, as this is the standard port for SSH on most servers which is a vulnerability because hackers will know which port to target by default. You should change the SSH port using these instructions and then change the number in PuTTY. Make sure that the Connection type is set to SSH.
Suppose you don’t use a private key to connect to your server and don’t like to save your configuration for later use. In that case, you should click Open to enable an SSH immediate connection to your server that authenticates it with your account password.
If this is the first time you connect to your server, PuTTY will show a Security Warning to let you know that it does not have a key in the registry for this server. It’s usual for your first connection.
If the connection is successful, you will be asked to enter your password. Once you do, you will now be connected to a shell on your server.
Also Read : Install MikroTik CHR on VPS (Using PuTTY)
Step 2: Save the PuTTY Configuration for Next Times
PuTTY allows you to save the configuration you use to connect to a server so that you don’t have to type all the information each time. After you have filled in all the necessary fields and are ready to connect, make sure you are on the main session configuration screen described above.
You can see the hostname and port number of your server. Enter the name of your saved SSH session configuration in the text box under Saved Sessions and press Save.
How to Setup SSH Public Key Authentication on Linux?
PuTTY may also be configured to use SSH keys. SSH keys are safer and sometimes more convenient, methods of authentication.You can use PuTTY itself to generate them. Here’s our guide on generating SSH keys using PuTTY on Windows. You can use it to quickly beef up your SSH security.
You need to follow a few steps to set up public-key authentication via SSH on a Linux (or macOS computer):
Step 1: Generate a key pair
First, Log in to the computer you’ll use for accessing the remote host, and use the command line SSH to generate a key pair by the RSA algorithm. To generate RSA keys, type the following on the command line, and click on enter:
ssh-keygen -t rsa
Step 2: Supply a filename and password
You will have to give a filename to save the key pair and a password to protect your private key. If you want to continue with the default filename and location for your key pair, click on Enter or Return without entering a filename. Alternatively, you can enter a filename such as My_ssh_key at the prompt and press Enter or Return. Pay attention that many remote hosts are configured to accept private keys with the default filename and path. Therefore, you must explicitly invoke this on the SSH command line or in an SSH client configuration file (~/.ssh/config).
You need to enter a password with at least five characters and click Enter or Return. If you click on Enter without a password, it will generate your private key without password protection.
Step 3: Copy public key
Use SFTP or SCP for copying the public key file to your account on the remote system.
Step 4: Enter your account credentials
You’ll be asked for your account password now. Your public key will be duplicated to your home directory and kept with the same filename on the remote system.
Step 5: Login to the remote system
Log in to the remote system with your account username and password
Step 6: Create the necessary file on your account
In case your account on the remote system does not already have a ~/.ssh/authorized_keys file, create one by typing the following commands:
mkdir -p ~/.ssh
touch ~/.ssh/authorized_keys
Step 7: Add public key file’s contents to the authorized-keys file
On the remote system, add the contents of your public key file, like ~/id_rsa.pub, to a new line in your ~/.ssh/authorized_keys file using the following command:
cat ~/id_rsa.pub >> ~/.ssh/authorized_keys
You may want to check the contents of ~/.ssh/authorized_keys to make sure your public key was correctly added via the below command:
more ~/.ssh/authorized_keys
Step 8: Remove the public key file
now you can safely delete the public key file from your account on the remote system using the following code on the command line:
rm ~/id_rsa.pub
Alternatively, if you like to keep a copy of your public key on the remote system, move it to your .ssh directory via this command:
mv ~/id_rsa.pub ~/.ssh/
Step 9: Add your public key to other systems (Optional)
At this point of the SSH Public Key Authentication setup, you can repeat these steps to add your public key to other remote systems you want to access from the computer with your private key using SSH public key authentication.
Step 10: SSH to your account on the remote system
Now, you should be able to use the advantage of SSH remote connection, utilizing your account on the remote system that has your private key. If your private key is password-protected, the remote system will ask you for the password or passphrase (like the picture below). Pay attention that your private key password or passphrase is not sent to the remote system.
In case your private key is not password-protected, the remote system will bring you to the command line in your home directory without asking you for a password or passphrase, and you will see an output similar to this:

Click the Open tab, enter the password, and connect.
Aside from SSH remote connection, multiple remote desktop tools enable you to take control of a system from far away. Let’s briefly discuss these tools.
Also Read: Everything You Need to Know About SSH SOCKS5 Proxy
Important remote desktop standards
VNC and RDP are two remote desktop Protocols; both of these technologies have similar goals, but their methods differ.
What Is VNC?
Sometimes VNC (virtual network computing) is confused with VPN (Virtual Private Network) by mistake. They both perform the same in the peer-to-peer networking environment, allowing remote access to a computer. However, they are not essentially the same.
VNC offers complete device access through desktop sharing systems that allow you to take total control of your machine remotely. Remote desktop capabilities enable productivity for all interested parties, including individual users, organizations, and IT staff.
On the other hand, a VPN offers remote access to the network rather than to the system itself, which indicates that you can only access shared data and equipment, such as a shared printer in a workplace.
Tunnel VNC over SSH
If you connect to a remote desktop using the Virtual Network Computing (VNC) protocol, your connection will not be secure. Some VNC clients do not protect your connection beyond the initial sign-in point.You can tunnel a VNC connection over a Safe Shell (SSH) tunnel to get around the problem. The SSH tunnel provides a safe connection for VNC, allowing you to use VNC connections when the usual VNC port (port 5901) is blocked.
Some corporate networks will block standard ports, such as port 5901, for extra protection, so tunneling VNC over SSH will allow you to overcome this issue.
What Is RDP?
RDP (Remote Desktop Protocol) is a network communication protocol created by Microsoft that allows users to remotely link to another device. Remote Desktop Protocol is an extension of T.120 protocols (regular protocols) as part of the ITU (International Telecommunications Union).
Get an RDP server with instant setup, full root access, and NVMe storage.
Buy RDPFinal thought: SSH Remote Connection
To create an SSH remote connection and use it to connect a server in Linux, you need the client and the corresponding server-side part as two components. This guideline article explained how to access SSH remotely and use its benefits. We are also proud to offer various Linux VPS plans to help you use its great qualities the most. At cloudzy, we do our best to provide you with outstanding Linux VPS solutions so that your selected service has excellent security and performance, delivering you an exceptional hosting experience.
FAQ
What is SSH?
SSH is a protocol used for security while connecting to a remote server. The ssh command utilizes this protocol to transfer data between the client and the host in an encrypted form.
How to set up SSH keys?
Generate SSH Keys
Name your SSH keys
Enter a password (optional)
Move the public key to the remote system
Test your connection.
What is SSH key pair?
Each SSH key pair includes two keys called: a public key and a private key. Anyone who has a copy of the public key can encrypt data, but this data can only be read by a person holding the corresponding private key.
Where is SSH private key?
If you use the default name, your private key will be stored in “/root/. ssh/id_rsa”.