

A self-hosted WireGuard VPN gives your laptop and phone an encrypted path to a server you control. It is useful when you want a stable exit IP, secure access on untrusted Wi-Fi, or a private route into another network. It does not make you anonymous: websites still see a single VPS address, and the hosting provider still operates the underlying network.
This guide builds an IPv4 full-tunnel VPN on Ubuntu Server. You will install WireGuard, generate keys with restrictive permissions, enable routing, add firewall and NAT rules, connect desktop and mobile clients, and verify the tunnel. The same design can support IPv6, but only after the VPS has routed IPv6 space and you configure IPv6 forwarding and firewall rules separately.
What Is WireGuard?
WireGuard is a modern, cross-platform VPN protocol and implementation that carries encrypted IP packets over UDP. The WireGuard protocol specification defines a fixed set of cryptographic primitives, including ChaCha20-Poly1305, Curve25519, BLAKE2s, SipHash24, and HKDF. That deliberately small design makes configuration and auditing simpler than protocols with many interchangeable cipher suites.
WireGuard has no central account system or built-in user directory. Each device is a peer with its own keypair, tunnel address, and AllowedIPs rules. On a VPS, one peer normally acts as the internet-facing gateway while laptops and phones initiate connections to it.
Why Use WireGuard on a VPS?
- Simple peer model: Each device gets one keypair and one peer entry.
- Small attack surface: WireGuard uses a compact protocol and a fixed cryptographic suite rather than exposing a long menu of legacy options.
- Good performance: Kernel integration on Linux and efficient cryptography can deliver high throughput, although the result still depends on CPU, network capacity, latency, and packet size.
- Cross-platform clients: Official clients are available for Windows 10 and 11, macOS, Android, and iOS, while Linux and several BSD systems provide native tools or packages.
- Roaming: A peer can change networks and source IP addresses without receiving a new WireGuard identity; the server learns the latest authenticated endpoint.
- Clear routing control: AllowedIPs determines both which destinations use the tunnel and which tunnel addresses belong to each peer.
Related reading: Cloudzy's VPS-for-VPN guide. For older deployments, see Cloudzy's PPTP setup guide; do not choose PPTP for a new security-sensitive VPN.
Skip the Manual Setup: One-Click WireGuard
If you don't have a technical background, or you'd rather not handle the setup yourself, Cloudzy offers a one-click WireGuard VPN deployment. The rest of this guide covers the manual build; this section covers the shortcut.
- Log in to the Cloudzy control panel.
- Select WireGuard from the list of applications.
- Create a VPS in your desired location with the plan of your choice. An Ubuntu machine with basic specifications is enough.
Once your VPS is ready, log in and run the following command to display your configuration:
cat client.confYou will see something like this:
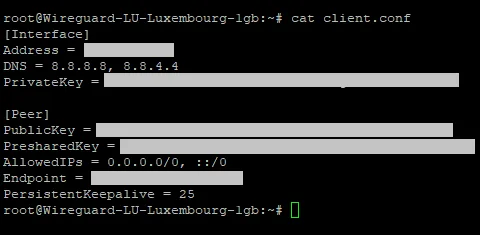
Use that configuration to create a new tunnel in the WireGuard client on your PC, and the connection is ready. If you would rather understand every moving part, or you need a layout the one-click image does not cover, continue with the manual build below.
How to Set Up WireGuard on Ubuntu
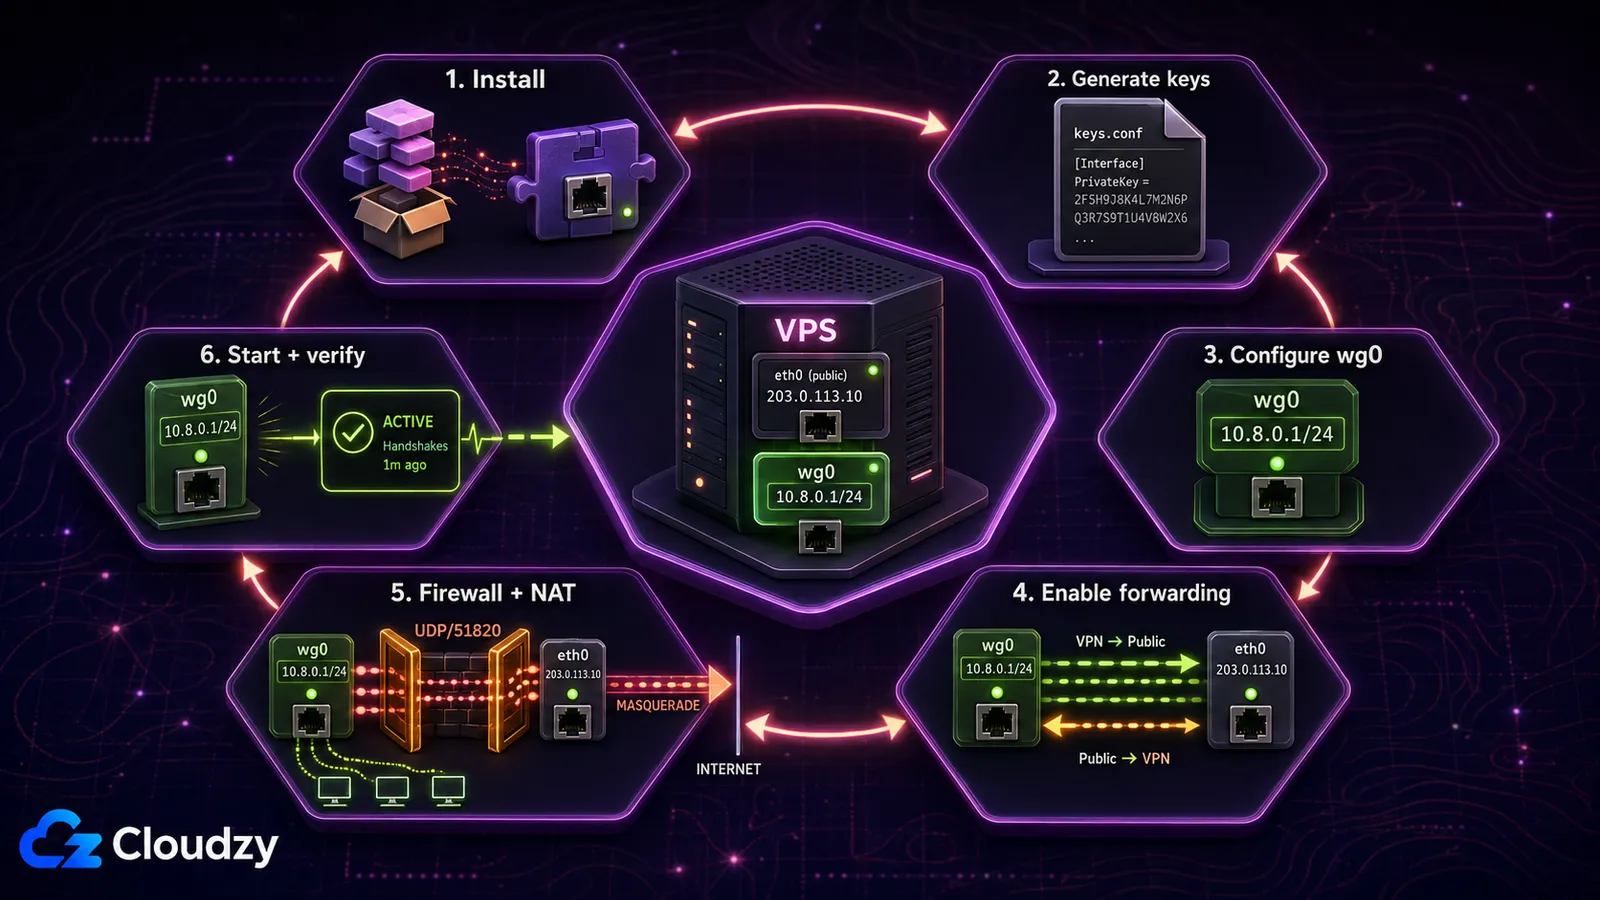
The commands below target a current Ubuntu Server release. Run them over SSH as a user with sudo access. Keep the SSH session open until the firewall is confirmed, and take a VPS snapshot first if your provider supports one.
Prerequisites
- One Ubuntu VPS with a public IPv4 address
- A non-root account with sudo access
- SSH access and the VPS provider's recovery console details
- One client device with the official WireGuard app or command-line tools
You do not need a second Ubuntu server. The client can be a Windows PC, Mac, Linux laptop, Android phone, or iPhone.
Step 1: Install WireGuard
sudo apt update
sudo apt install wireguard -y
Confirm that the tools are available:
wg --versionStep 2: Generate the Server Keys Securely
Create the WireGuard directory and generate the keypair with a restrictive umask. The private key must never be copied to a client or published in logs.
sudo install -d -m 700 /etc/wireguard
sudo sh -c 'umask 077; wg genkey > /etc/wireguard/server.key; wg pubkey < /etc/wireguard/server.key > /etc/wireguard/server.pub'
Display the keys when you need to paste them into configuration files:
sudo cat /etc/wireguard/server.key
sudo cat /etc/wireguard/server.pub
Step 3: Create the Server Configuration
Open the interface configuration:
sudo nano /etc/wireguard/wg0.confPaste the following block and replace SERVER_PRIVATE_KEY with the private key from the previous step:
[Interface]
Address = 10.8.0.1/24
ListenPort = 51820
PrivateKey = SERVER_PRIVATE_KEY
The 10.8.0.0/24 tunnel network is an example. Choose another private range if it overlaps with a home, office, or cloud network you need to reach. Do not add SaveConfig = true: it can rewrite the file when the interface shuts down and erase hand-edited changes.
sudo chmod 600 /etc/wireguard/wg0.confStep 4: Enable IPv4 Forwarding
The VPS must route packets between wg0 and its public network interface. Put the setting in a dedicated sysctl file:
sudo nano /etc/sysctl.d/70-wireguard-routing.confnet.ipv4.ip_forward = 1Apply and verify it:
sudo sysctl -p /etc/sysctl.d/70-wireguard-routing.conf
sysctl net.ipv4.ip_forward
This follows the routing model in Ubuntu's WireGuard gateway guide. IPv6 needs a routed IPv6 prefix, separate tunnel addresses, IPv6 forwarding, and IPv6 firewall rules; do not send client traffic to ::/0 until that path is complete.
Step 5: Add Firewall and NAT Rules
Find the VPS public interface name. In the output below, note the value after dev; common names include eth0, ens3, and enp1s0.
ip route show defaultReopen wg0.conf and add the following lines under [Interface]. Replace eth0 everywhere if your public interface has another name:
PostUp = iptables -I FORWARD 1 -i %i -o eth0 -j ACCEPT; iptables -I FORWARD 1 -i eth0 -o %i -m conntrack --ctstate RELATED,ESTABLISHED -j ACCEPT; iptables -t nat -A POSTROUTING -s 10.8.0.0/24 -o eth0 -j MASQUERADE
PreDown = iptables -D FORWARD -i %i -o eth0 -j ACCEPT; iptables -D FORWARD -i eth0 -o %i -m conntrack --ctstate RELATED,ESTABLISHED -j ACCEPT; iptables -t nat -D POSTROUTING -s 10.8.0.0/24 -o eth0 -j MASQUERADE
If UFW is active, allow SSH before touching its state, then open the WireGuard UDP port:
sudo ufw allow OpenSSH
sudo ufw allow 51820/udp
sudo ufw status
If UFW is currently inactive and you want to enable it, confirm that the OpenSSH rule exists first. Do not disable and re-enable UFW over SSH just to apply these rules; that adds avoidable lockout risk.
Step 6: Start the WireGuard Interface
sudo systemctl enable --now wg-quick@wg0
sudo systemctl status wg-quick@wg0 --no-pager
sudo wg show
If the service fails, run journalctl before changing anything else:
sudo journalctl -u wg-quick@wg0 -n 50 --no-pagerAdd a WireGuard Client

Every device needs a unique keypair and tunnel IP. Never reuse one client configuration on two devices: duplicate keys and addresses make routing unpredictable and prevent clean revocation.
Step 1: Generate the Client Keys
The official desktop and mobile apps can generate keys when you create an empty tunnel. On a Linux client, use:
umask 077
wg genkey | tee client.key | wg pubkey > client.pub
Keep client.key on that device. Copy only client.pub to the server.
Step 2: Add the Peer on the Server
sudo nano /etc/wireguard/wg0.confAppend one peer block. Replace CLIENT_PUBLIC_KEY with the client's public key:
[Peer]
PublicKey = CLIENT_PUBLIC_KEY
AllowedIPs = 10.8.0.2/32
The Address = 10.8.0.2/32 line assigns the tunnel address on the client. In the server's [Peer] block, AllowedIPs = 10.8.0.2/32 associates that address with this peer for routing and source validation. Use 10.8.0.3/32 for the next device, then continue upward without duplicates.
sudo systemctl restart wg-quick@wg0Step 3: Build the Client Configuration
Create client.conf on the client and replace all placeholders:
[Interface]
PrivateKey = CLIENT_PRIVATE_KEY
Address = 10.8.0.2/32
DNS = 1.1.1.1

[Peer]
PublicKey = SERVER_PUBLIC_KEY
Endpoint = VPS_PUBLIC_IP:51820
AllowedIPs = 0.0.0.0/0
PersistentKeepalive = 25
AllowedIPs = 0.0.0.0/0 makes this an IPv4 full tunnel. For access only to the VPN network, use AllowedIPs = 10.8.0.0/24. PersistentKeepalive is useful for a client behind NAT that needs the mapping to remain reachable while idle; the WireGuard quick-start guide notes that most peers do not need it.
Step 4: Import the Configuration
Use the WireGuard client installation guide to get the supported client for your platform.
- Windows: Choose Add Tunnel, then import client.conf.
- macOS: Choose Import tunnel(s) from file and select client.conf.
- Android or iOS: Import the file or scan a QR code generated from it.
On an Ubuntu or Debian client that holds client.conf, install qrencode and render the file in that client's terminal:
sudo apt install qrencode -y
qrencode -t ansiutf8 < client.conf
The QR code contains the client's private key. Show it only in a trusted terminal, do not save screenshots, and clear the terminal after the phone imports it.
Step 5: Verify the Tunnel
Activate the tunnel, generate traffic from the client, and run these checks on the VPS:
sudo wg show
ip -brief address show wg0
A recent handshake and increasing transfer counters confirm that WireGuard is exchanging packets. Then verify the full-tunnel exit from the client:
curl -4 https://api.ipify.org; echoThe command should return the VPS public IPv4 address. If there is no handshake, check the endpoint address, UDP port, cloud firewall, UFW rule, and keys. If there is a handshake but no internet access, check IP forwarding, the public interface name, NAT rules, and DNS.
Can You Put WireGuard Behind Nginx?
The NGINX stream-module documentation explains how NGINX can relay UDP from one port to another, so it can forward UDP/80 or UDP/443 to WireGuard on UDP/51820. That is a UDP relay, not an HTTP reverse proxy. It does not convert WireGuard into TCP or HTTPS, and it does not make the protocol look like ordinary web traffic.
For most deployments, changing WireGuard's ListenPort and opening the matching UDP port is simpler than adding NGINX. If a network blocks UDP entirely or uses deep packet inspection, an NGINX UDP relay will not solve the problem. The WireGuard limitations documentation states that obfuscation is outside the protocol's scope.
Connect the VPS to a Home Network
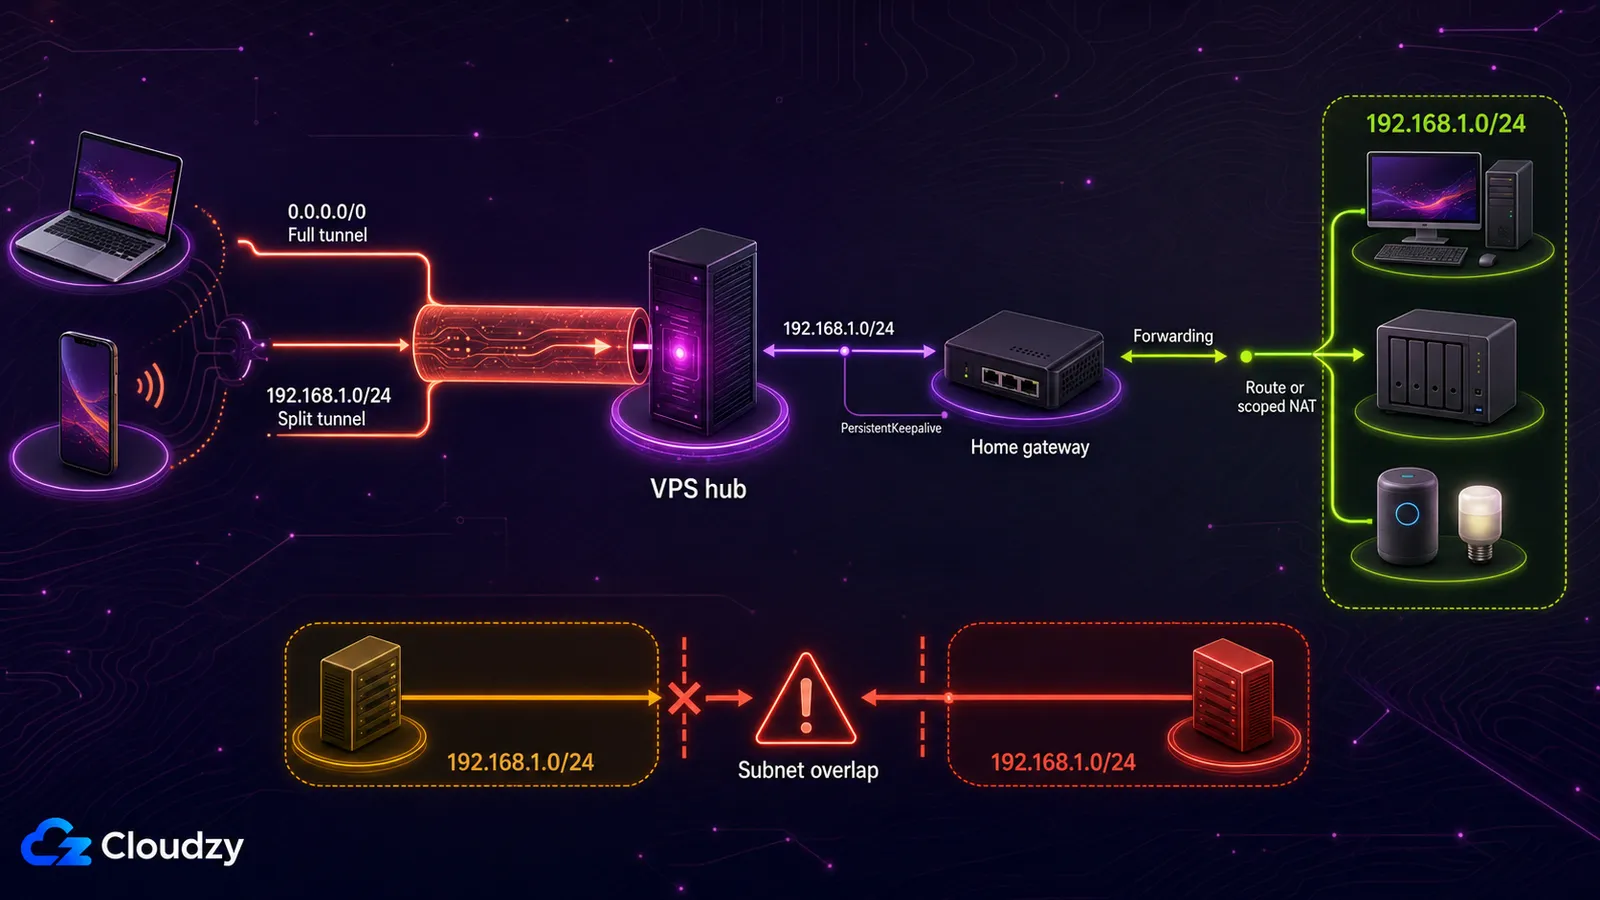
A VPS can act as a hub between a roaming client and a device inside your home. The home-side peer initiates an outbound WireGuard connection to the VPS, which avoids requiring a public home IP. Set PersistentKeepalive on that home peer when it sits behind NAT.
Reaching the full home LAN takes more than adding a peer. The VPS peer entry for the home gateway must include the home subnet in AllowedIPs, such as 192.168.1.0/24. A remote client using a full tunnel (AllowedIPs = 0.0.0.0/0) already sends that home-subnet traffic through the VPS; add 192.168.1.0/24 to the client only when you're using split tunneling. The home gateway must also forward traffic between WireGuard and the LAN. Add either a route on the home router or a carefully scoped NAT rule on the home gateway. Check for overlap first: a client connected to another 192.168.1.0/24 network can't route both networks cleanly without renumbering or more advanced policy routing.
Self-Hosted WireGuard vs. a Commercial VPN
Self-hosting changes who operates the VPN, but it doesn't automatically improve anonymity. A personal VPS gives you one stable exit IP that's easy to associate with a hosting network. A commercial service usually gives you shared exit addresses and easy location switching, but you have to rely on its policies, operations, and any independent audits it publishes.
WireGuard itself is lightweight, and a small VPS is often a reasonable starting point for one person and a few devices. Do not treat a fixed RAM or vCPU number as a throughput guarantee. Test with your real device count, region, packet size, and expected bandwidth, then resize if CPU saturation, packet loss, or latency becomes the limit.
Choose self-hosting when a stable personal exit IP, remote access, or control over the server matters more than location choice and convenience. Choose a commercial VPN when you want many countries, shared exits, broad consumer-device support, and someone else to handle failures.
| Decision Factor | Self-Hosted WireGuard | Commercial VPN |
|---|---|---|
| Cost model | One server plus your admin time | Subscription, often discounted for longer terms |
| Exit locations | One location per server | Many locations available in the app |
| Setup | You configure keys, routing, firewall rules, and clients | Install the app and sign in |
| Maintenance | You patch, monitor, back up, and troubleshoot | The provider operates the service |
| Privacy model | You control the server, but the hosting provider can still observe metadata | You rely on the provider's policies and any independent audits it publishes |
| Best fit | Stable personal exit IP, remote access, and infrastructure control | Location switching, low maintenance, and broad device support |
Conclusion
A reliable WireGuard deployment comes down to five things: protected private keys, unique peer addresses, correct AllowedIPs, working forwarding and NAT, and a firewall rule for the UDP listening port. Verify both the handshake and the public exit address before relying on the tunnel, and keep the VPS patched after deployment.
If you want to build the server manually, start with a clean Cloudzy Ubuntu VPS. If you would rather skip the installation steps, use Cloudzy's one-click WireGuard deployment and move straight to client configuration and verification.
Frequently Asked Questions
Why Does WireGuard Show a Peer but No Handshake?
A peer entry only proves that the configuration loaded. No handshake usually means the client is not reaching the server or the keys do not match. Check the client's Endpoint, the server's public IP, UDP/51820 in both the provider firewall and UFW, and the public keys on both sides. Generate traffic from the client before checking because WireGuard is quiet when idle.
Why Does the Tunnel Connect but Internet Access Stop?
A handshake with no internet access usually points to routing rather than encryption. Verify net.ipv4.ip_forward, confirm the public interface name in the NAT rule, check the FORWARD rules, and test DNS separately from raw IP connectivity. Also make sure AllowedIPs on the client matches the intended full-tunnel or split-tunnel design.
Does Every Client Need PersistentKeepalive?
No. Add it when a peer behind NAT needs its mapping kept open during idle periods, which is common for phones, home gateways, and some restrictive networks. Leave it out when the peer communicates frequently or does not need the remote side to reach it while idle.



Discussion
Comments
Sign in to join the discussion.