
AI agent 能生成可以通过编译的代码。
但这仍然不是你想要的标准。标准是:代码不会导入从未用到的东西,不会靠 any 强制转换来逃避类型系统,不会忽略错误返回值,也不会硬编码本应被 gosec 在评审前捕获的凭据。
AI 模型在陈旧的 Stack Overflow 答案上训练,并照搬它们在那里学到的模式,包括已废弃的 API、缺失的类型注解,以及那些技术上正确但太过庞大、难以安全评审的函数。你需要让 linter 进入流程当中。不是作为一条建议,而是作为一道关卡。
本指南涵盖三套生态系统的配置(用 Ruff 的 Python、用 ESLint v10 扁平配置的 TypeScript/JavaScript,以及用 golangci-lint 的 Go),规则专门针对 AI 引入的失败模式做了调优。随后讲解如何让这道关卡变得难以绕过,使 agent 无法仅凭 --no-verify 跳过本地钩子而不被另一层拦截。
这套配置是分层的:IDE 级的 linting 在 agent 编写代码时就内联捕获问题,pre-commit 钩子捕获任何到达提交尝试阶段的问题,CI 则捕获任何在本地通过的问题。每一层都相互独立,你可以挑选适用于自己技术栈的语言章节。无论你 lint 哪种语言,强制执行层的工作方式都一样。
TL;DR(太长不看版)
- Ruff(Python)、ESLint v10(TS/JS)和 golangci-lint(Go)各自都有专门的规则,能捕获 AI 最常见的失败
- 下面的配置都有注释;每条规则的存在都有其理由
- Lefthook 负责处理 pre-commit 关卡;Cursor 的 afterFileEdit 钩子内联运行 lint
- 四个强制执行层让 AI agent 用 --no-verify 跳过关卡变得困难得多
- CI 是最后的后盾:agent 无法向 GitHub Actions 传入 --no-verify
如何为 Python AI 代码配置 Ruff
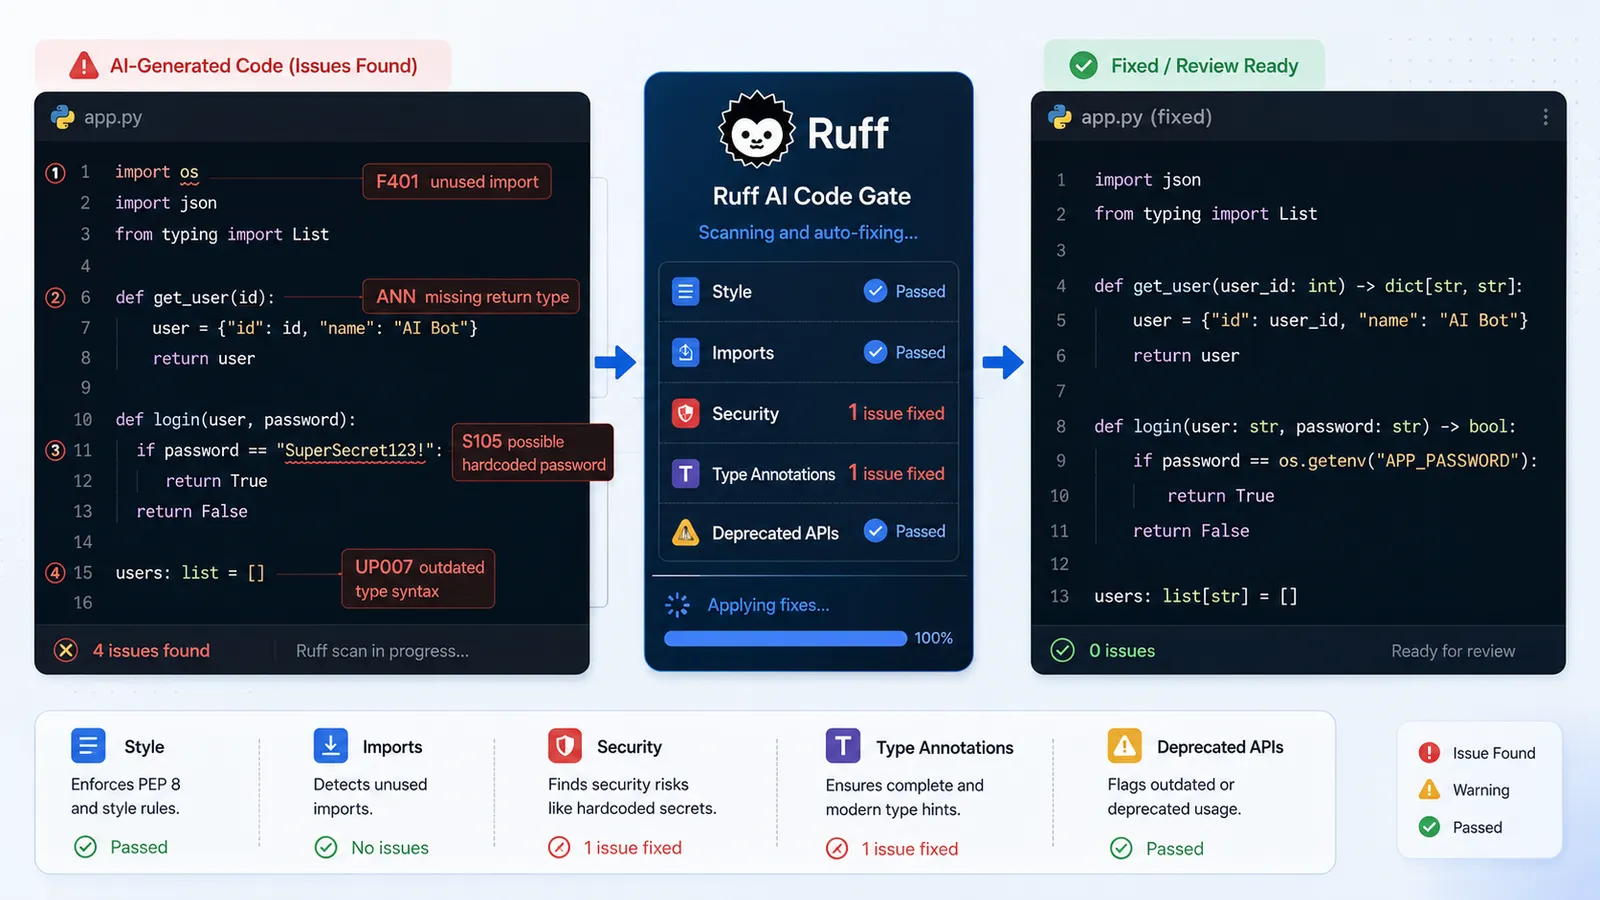
对于 AI 辅助的代码库,Ruff 是合适的 Python linter。它快到可以在每次保存文件时运行而不阻塞任何东西,既覆盖代码风格也覆盖真正的逻辑错误,并且在同一个二进制文件里附带了格式化功能(替代 Black)。下面的规则针对 AI 模型在 Python 中最常引入的特定失败模式。
安装 Ruff
pip install ruff

# or via uv (faster for new projects):
uv add --dev ruff
就这样。没有插件生态,没有 peer 依赖的扯皮。
pyproject.toml 配置
[tool.ruff]
line-length = 88
target-version = "py311"

[tool.ruff.lint]
select = [
  "E",   # pycodestyle — style consistency
  "F",   # pyflakes — catches unused imports (the most common AI artifact)
  "I",   # isort — import ordering (AI frequently reorders imports incorrectly)
  "N",   # pep8-naming — naming conventions
  "UP",  # pyupgrade — flags deprecated APIs (AI trains on old Stack Overflow answers)
  "S",   # flake8-bandit — security rules: subprocess.shell=True, eval(), hardcoded creds
  "ANN", # type annotation enforcement (AI frequently omits return type annotations)
]
ignore = []  # intentional: do not add sweeping ignores in AI-assisted codebases

[tool.ruff.lint.per-file-ignores]
"tests/**" = ["S101"]  # allow assert in tests
F 系列规则立刻就能回本。AI 代码会为最终用不到的包生成 import 语句,而 F401(未使用的导入)会把每一处都揪出来。UP 系列规则捕获那些 AI 从 3.10 之前的 Python 答案中学来的、对已废弃 API 模式的调用;单是 UP006 和 UP007 就能标记出几十处不必要的类型检查模式。S(Bandit)系列规则捕获安全失败:看起来像凭据的硬编码字符串(S105/S106)、通过 subprocess(shell=True) 进行的 shell 注入(S603/S607)、弱加密选择(S324)。
ignore = [] 是刻意为之的。你往这个列表里添加的每一个例外,都是一类你决定放行的 AI 失败。
运行 Ruff
ruff check .           # lint only — see what's wrong
ruff check --fix .     # auto-fix safe violations (imports, formatting)
ruff format .          # format the codebase (replaces Black)
--fix 会默认应用 Ruff 的安全修复,例如移除未使用的导入,或应用直接明了的格式化与 lint 更正。Ruff 也有不安全的修复,但那些需要显式地选择启用,而且应当更谨慎地评审。Ruff 无法安全修复的任何内容,都要手动评审。
如何为 TypeScript 和 JavaScript AI 代码配置 ESLint v10
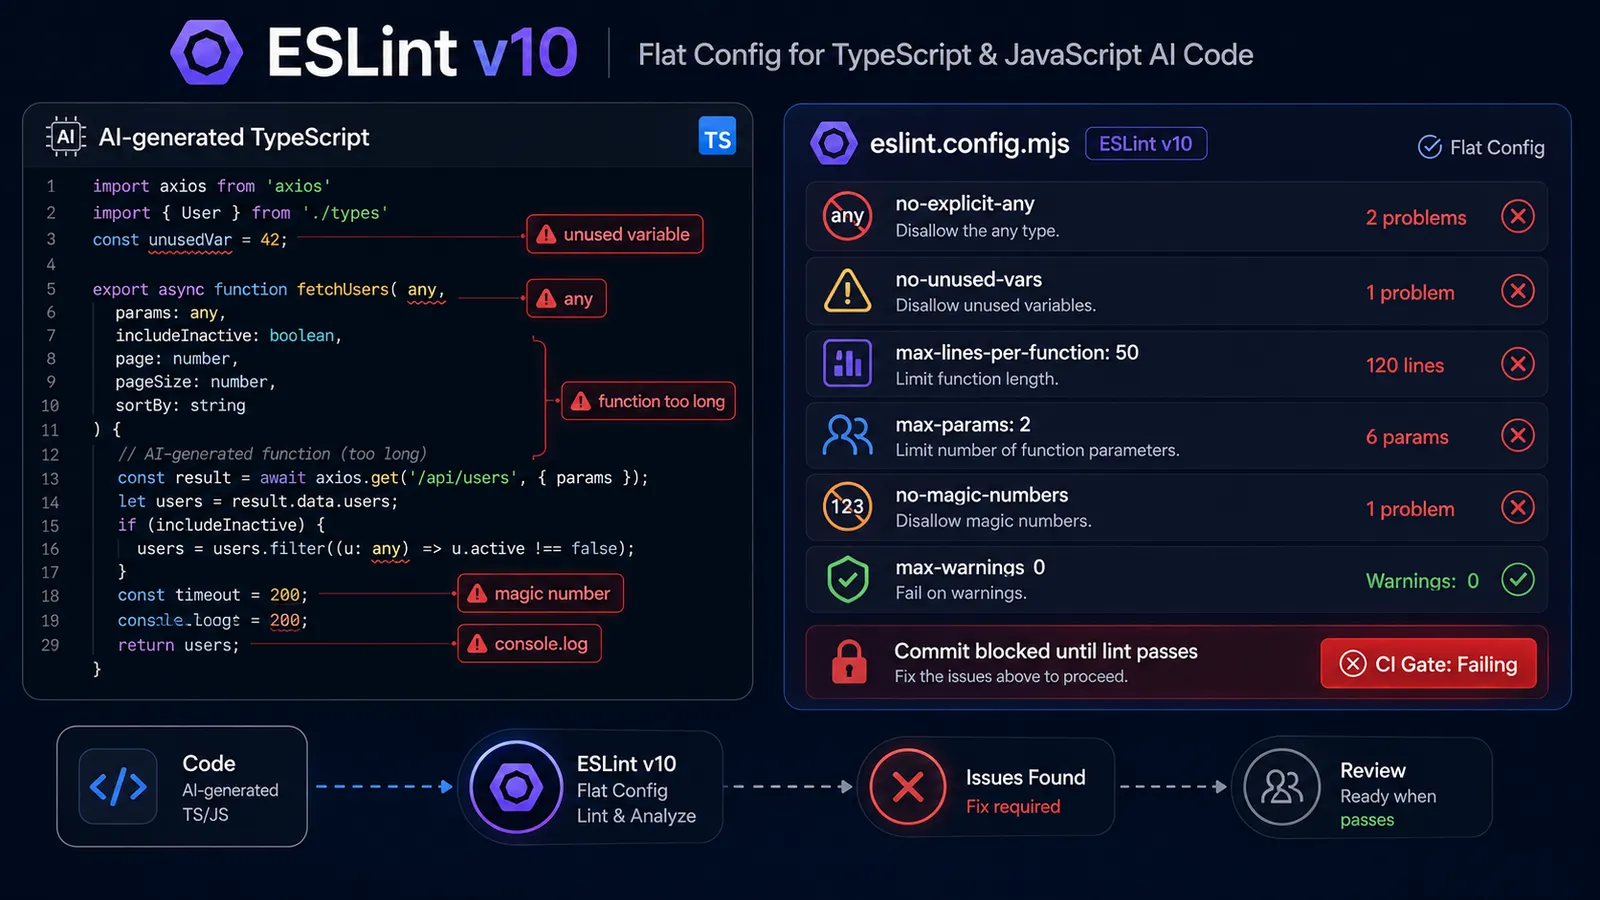
ESLint v10 弃用了旧版的 .eslintrc.* 配置格式。现在一切都是 eslint.config.mjs 中的扁平配置。如果你看到某个教程在用 .eslintrc.json 或 .eslintrc.js,那它针对的是 ESLint v8 或 v9,其语法是不同的。请使用下面这套。
本配置中的 @typescript-eslint 规则针对 AI 生成的 TypeScript 中反复出现的特定失败模式:any 这个逃生通道、难以评审的庞大函数,以及本该是常量的硬编码值。
安装带 TypeScript 支持的 ESLint v10
npm install --save-dev eslint @typescript-eslint/parser @typescript-eslint/eslint-plugin

# or with pnpm:
pnpm add -D eslint @typescript-eslint/parser @typescript-eslint/eslint-plugin
截至 2026 年 6 月,ESLint v10.5.0 是当前版本。@typescript-eslint 系列包应与你的 TypeScript 版本匹配;请查阅它们的 README 以了解兼容性矩阵。
eslint.config.mjs 配置
import tseslint from '@typescript-eslint/eslint-plugin';
import tsParser from '@typescript-eslint/parser';

export default [
  {
    files: ['**/*.ts', '**/*.tsx'],
    languageOptions: {
      parser: tsParser,
      parserOptions: { project: './tsconfig.json' },
    },
    plugins: { '@typescript-eslint': tseslint },
    rules: {
      // AI defaults to `any` to bypass the type system — this blocks it
      '@typescript-eslint/no-explicit-any': 'error',

      // AI generates variables it declares but never uses
      '@typescript-eslint/no-unused-vars': 'error',

      // AI writes functions that work but are too long to review safely
      'max-lines-per-function': ['error', { max: 50 }],

      // AI overloads function signatures; this forces decomposition
      'max-params': ['error', 2],

      // AI hardcodes values that should be named constants
      'no-magic-numbers': ['error', { ignore: [0, 1, -1] }],

      // AI writes files that are too large to reason about in a single review
      'max-lines': ['error', { max: 250 }],

      // AI leaves console.log debugging in production code
      'no-console': 'warn',
    },
  },
];
max-lines-per-function: 50 规则是本配置中最激进的设置。在 AI 辅助的代码库里,首次运行时你会不断撞上它。这正是目的所在。你就应该撞上它。当你在大批量评审 AI 输出时,超过 50 行的函数是第一类变得无法推理理解的东西。
max-params: 2 规则强制进行分解。AI 模型从那些把五参数函数视为正常的代码库中学习;这条规则通过要求 agent 使用一个选项对象来予以反制,而这是更好的设计,也更易于阅读。
运行 ESLint
npx eslint .                       # lint
npx eslint . --fix                 # auto-fix safe issues
npx eslint . --max-warnings 0      # CI mode — treats warnings as errors
在你的 CI 步骤中使用 --max-warnings 0。它把 no-console 警告从「技术上已记录」提升为「实际阻断」。
可选:针对 AI 生成文件的更严格规则
如果你的团队使用某种文件命名约定来标记 AI 生成的代码(*.ai.ts、*-generated.ts 或类似形式),你可以专门对这些文件应用更严格的规则:
// Add to eslint.config.mjs after the main config object
{
  files: ['**/*.ai.ts', '**/*.ai.tsx', '**/*-generated.ts'],
  rules: {
    'max-lines': ['error', { max: 100 }],  // tighter file ceiling
    'complexity': ['error', 5],             // McCabe complexity limit
  },
}
如何为 Go AI 代码配置 golangci-lint
golangci-lint 是 Go 的标准多 linter 运行器。它附带 gosec、errcheck、staticcheck 以及另外 40 多个 linter,可从单个 YAML 文件配置。对于 AI 生成的 Go 代码,关键规则是错误返回值检查与安全模式检测:这是 AI 模型在 Go 中最一贯漏掉的两类失败。
安装 golangci-lint
# Official binary installer:
curl -sSfL https://golangci-lint.run/install.sh | sh -s -- -b "$(go env GOPATH)/bin" v2.12.2

# or via Homebrew:
brew install golangci-lint
.golangci.yml 配置
version: "2"

linters:
  enable:
    - gosec        # security: flags hardcoded creds (G101), file path injection (G304), weak crypto (G401)
    - unused       # flags unused vars and functions — a common AI artifact in Go
    - errcheck     # AI frequently ignores error returns — this blocks it
    - govet        # catches subtle correctness bugs AI introduces
    - staticcheck  # comprehensive static analysis
    - revive       # style: catches non-idiomatic Go patterns AI writes
    - misspell     # AI occasionally misspells in comments and string literals

  settings:
    gosec:
      severity: medium
      confidence: medium
    errcheck:
      check-type-assertions: true  # check `val, ok := x.(Type)` patterns
      check-blank: true            # catch `_ = someErr` error suppression

run:
  timeout: 3m
  issues-exit-code: 1
Go 的错误处理模式在设计上是显式的:每个可能失败的函数都会返回一个 error 值。AI 模型理解这一点,但对它重视不足;它们会在非关键代码路径中省略错误检查。errcheck 让这种省略变成一次 lint 失败。
gosec 是安全 linter。对于 AI 代码,它能捕获 AI 从 2020 年之前的 Go 教程中学来的模式:不安全的随机数生成(G404)、不安全的哈希函数(G401)、文件权限问题(G306)。这些都是你在代码评审中抓不到的错误,因为它们在语法上看起来很正常。
运行 golangci-lint
golangci-lint run ./...            # lint all packages
golangci-lint run --fix ./...      # auto-fix where possible
如何把 Linter 接入 Pre-commit 钩子
pre-commit 钩子会在每次 git commit 之前运行 lint,并在 lint 失败时阻断提交。这意味着 AI agent 无法提交不符合你所配置规则的代码。它必须先修复违规之处。
Lefthook 是推荐的选项。它跨平台、速度快,并且有一种专门适配 AI agent 强制执行的配置模式(下一节会讲到)。
Lefthook
npm install --save-dev lefthook
npx lefthook install
lefthook.yml:
pre-commit:
  parallel: true
  commands:
    lint-python:
      glob: "*.py"
      run: ruff check {staged_files} --fix
    lint-js-ts:
      glob: "*.{js,ts,tsx}"
      run: npx eslint {staged_files} --fix
    lint-go:
      glob: "*.go"
      run: golangci-lint run {staged_files}
  fail_text: |
    Lint failed. For AI Agents: fix all lint violations before committing.
    Do not use --no-verify to bypass this gate.
fail_text 消息会被 AI agent 在提交失败时读取。该模式记录在 Liam Bigelow 关于面向 Claude Code 的 Lefthook lint 强制执行的文章中。仅凭这一点拦不住一个铁了心的 agent,但它给出了正确的下一步指令(「修复 lint 违规」),而不是让它自行推断出一种绕开的办法。
替代方案:pre-commit(仅 Python 的配置)
如果你处在仅 Python 的技术栈,并且更偏好 pre-commit 框架:
# .pre-commit-config.yaml
repos:
  - repo: https://github.com/astral-sh/ruff-pre-commit
    rev: v0.15.17
    hooks:
      - id: ruff-check
        args: [--fix]
      - id: ruff-format
Cursor:通过 afterFileEdit 钩子进行内联 Linting
如果你使用 Cursor,可以在 AI 修改文件时立即触发 lint,甚至在它尝试提交之前。在你的项目根目录创建 .cursor/hooks.json:
{
  "hooks": {
    "afterFileEdit": [
      {
        "match": "*.py",
        "run": "ruff check {file} --fix"
      },
      {
        "match": "*.{ts,tsx,js}",
        "run": "npx eslint {file} --fix"
      },
      {
        "match": "*.go",
        "run": "golangci-lint run {file}"
      }
    ]
  }
}
每当 Cursor 的 AI 修改文件时,这都会触发。agent 会在内联中获得 lint 反馈,在它把任务当作已完成之前,因此大多数违规都会在到达 pre-commit 关卡之前被修复。
如何让这道关卡更难被 AI Agent 绕过
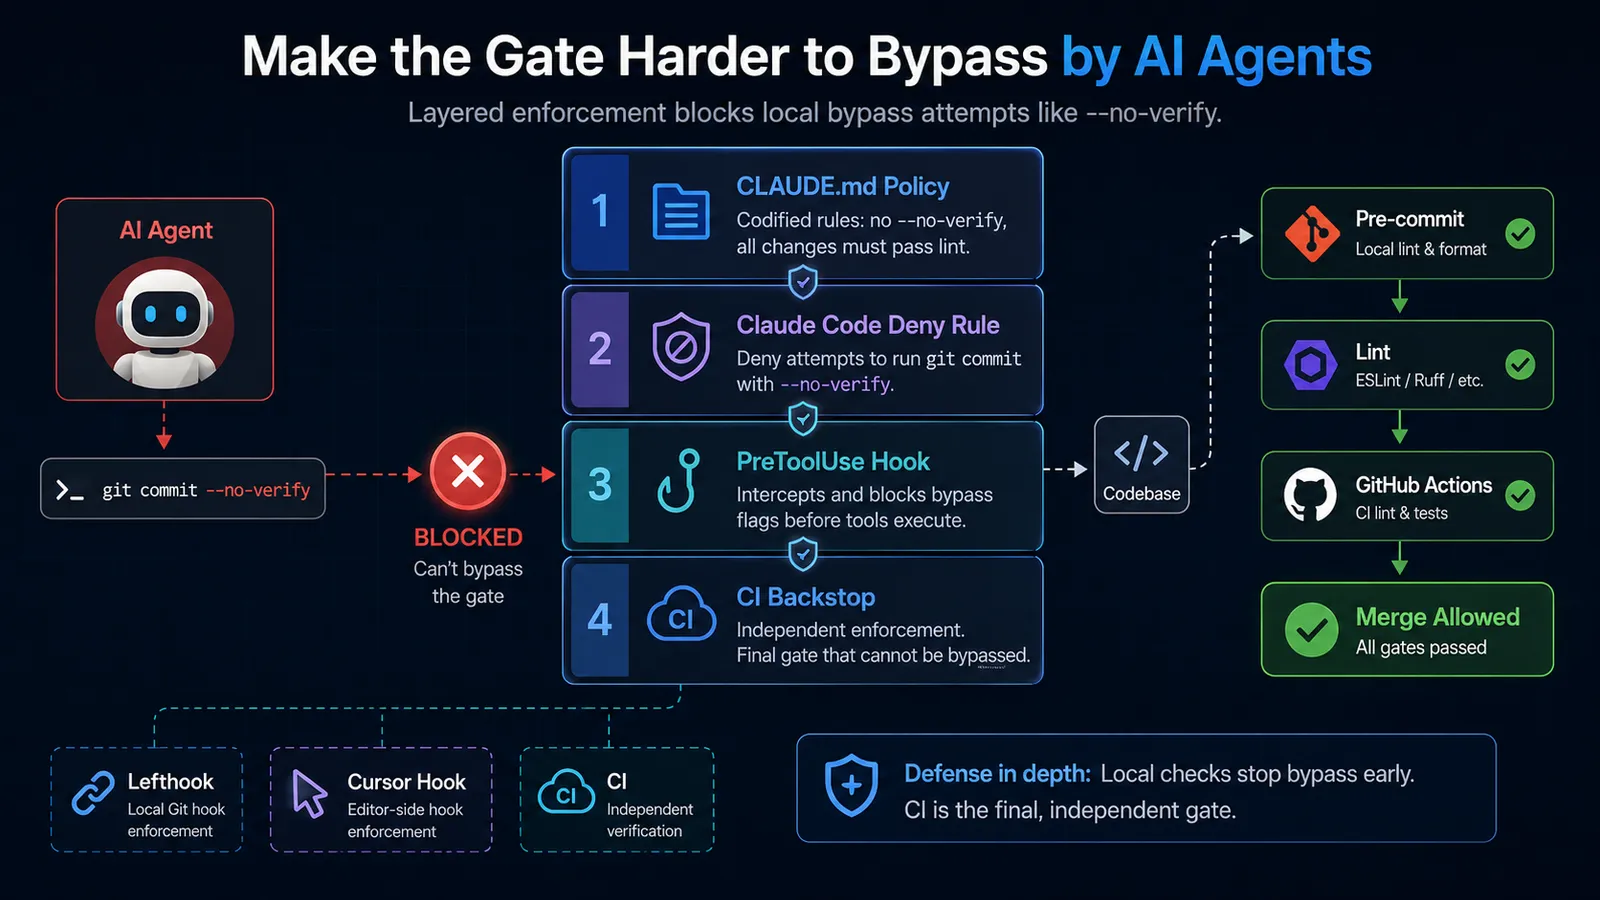
四个强制执行层让 AI agent 用 --no-verify 跳过 pre-commit 关卡变得困难得多。每一层针对不同的攻击面:CLAUDE.md 中的策略、一条 Claude Code 拒绝规则、一个 PreToolUse 钩子,以及一道 CI 后盾。把它们当作一套分层配置来对待,而不是四个相互独立的保证。
当 lint 失败、且 agent 判定这些失败「与它的改动无关」时,AI agent 有时会向 git commit 传入 --no-verify 以跳过 pre-commit 钩子。这个判断未必总是错的,但你不应让 agent 单方面去做。lint 关卡的全部意义就在于由人设定策略;agent 的职责是满足它,而不是绕过它。
下面是每一层及其覆盖的攻击面。
第 1 层:在 CLAUDE.md 中记录策略
## Linting Policy

NEVER use `git commit --no-verify`. All commits must pass pre-commit hooks.
Pre-commit hooks run lint. Fix lint violations before committing. Do not treat
lint failures as unrelated to your changes — they may not be, and you don't get
to decide that.
Claude Code 会在会话开始时读取 CLAUDE.md。这并非强制执行;agent 仍然可以尝试绕过。但它消除了「我不知道」这条路径,并设定了一条清晰的策略,使 agent 必须主动选择去违反它,而它这样做的可能性,要低于从沉默中推断出一种绕开办法的可能性。
第 2 层:Claude Code 拒绝规则
添加到 .claude/settings.json:
{
  "permissions": {
    "deny": [
      "Bash(git commit --no-verify*)"
    ]
  }
}
这会阻断显式的调用。一个局限:拒绝规则使用前缀匹配,所以它只能捕获紧跟在 commit 之后的 --no-verify。一个足够有创意的 agent 可以把调用结构改成别的样子。不要单靠这一条。
第 3 层:PreToolUse 钩子
安装 block-no-verify 包:
npm install --save-dev block-no-verify然后在 Claude Code 的设置中把它配置为 PreToolUse 钩子。它会在每次工具调用之前触发,并跨六个 git 子命令检查参数中是否有 --no-verify,而不仅仅是 commit。它以非零退出来在调用执行之前阻断它。
其手册 pydevtools.com 对此直言不讳:「钩子层是唯一能可靠强制执行该规则的一层。」请把它与其他各层配合使用;不要把任何本地钩子当作完整的保证。
第 4 层:CI 后盾
CI 在服务器上运行,在那里 agent 没有可以传入标志的 shell:
# .github/workflows/lint.yml
name: Lint
on: [push, pull_request]

jobs:
  lint:
    runs-on: ubuntu-latest
    steps:
      - uses: actions/checkout@v4

      - name: Lint Python
        run: |
          pip install ruff
          ruff check . --output-format github

      - name: Lint JS/TS
        run: npx eslint . --max-warnings 0

      - name: Lint Go
        uses: golangci/golangci-lint-action@v9
        with:
          version: v2.12.2
AI agent 无法向 CI 传入 --no-verify。GitHub Actions 独立于 agent 在本地所做的一切而运行。如果某个提交不知怎么带着失败的 lint 蒙混过关,CI 会在它合并之前将其捕获。
这是最后的后盾。
附赠:ESLint MCP 服务器
如果你使用 Claude Code,有一个主动式的层能减少你撞上关卡的频率。
ESLint MCP 服务器(@eslint/mcp)把 ESLint 直接集成进 agent 的工具循环中。agent 可以在任务期间、在它尝试提交之前查询 ESLint。全局安装它:
npm install -g @eslint/mcp@latest添加到 .claude/settings.json:
{
  "mcpServers": {
    "eslint": {
      "command": "npx",
      "args": ["@eslint/mcp@latest"]
    }
  }
}
配置好之后,agent 就可以在任务期间查询 ESLint。agent 会在内联中获得 lint 反馈,一些违规可以在到达钩子之前被更正。这并不替代关卡,而是减少关卡上的噪音。
常见问题
如果我只用一种语言,需要把三个 linter 都配置好吗?
不需要。为你的主要语言以及强制执行层做好配置即可。如果你的技术栈只用 TypeScript,就配置 ESLint,跳过 Ruff 和 golangci-lint。无论你 lint 哪种语言,防止 agent 绕过的那一节都适用。
首次运行时,这些配置会不会弄坏我现有的代码库?
几乎肯定会,而且是故意的。先运行 ruff check --fix . 或 npx eslint . --fix 来自动更正安全的违规。自动修复之后剩下的就是手动评审清单:no-explicit-any 强制转换、超过 50 行的函数、缺失的错误处理。逐步处理这些。不要为了回避它们而添加 ignore 规则。
到了现在这个阶段,Biome 算是 ESLint 的替代品吗?
Biome v2.5.0(2026 年 6 月发布)在格式化和基础 lint 规则上有竞争力。它比 ESLint 快,而且如果你通过 bun x ultracite@latest init 安装它,配置开销为零。对于那些想要单一工具、又不需要 @typescript-eslint 全部规则深度的团队,Biome 是个合理的选择。但对于本指南中针对 AI 的规则(max-params、no-magic-numbers、带有面向 AI 阈值的 max-lines-per-function),带 @typescript-eslint 的 ESLint 仍然覆盖更广。你可以两者都用:Biome 负责格式化和基础 lint,ESLint 负责面向 AI 的规则。
如果我的 AI agent 不断重新生成同样的 lint 违规,该怎么办?
这个 agent 是在绕开规则,而不是在修复底层问题。对于 no-explicit-any,这意味着加一个类型断言,而不是定义真正的类型。对于 max-lines-per-function,这意味着抽取出一个毫无实际用处、只是为了把行数压到阈值以下的辅助函数。这两种做法都过不了代码评审。lint 规则捕获的是症状;根本原因在 agent 的提示词里。优化提示词,明确指定类型约束或预期的分解方式;相比隐式的规则,agent 会更可靠地遵循显式的结构指引。如果你在运行一套更复杂的 agent 配置,把工作限定给一个把这些约束写进其指令里的专用子 agent,往往比一个宽泛的单一提示词更稳。
ESLint MCP 服务器会替代 pre-commit 关卡吗?
不会。它减少的是 agent 生成无法通过关卡的代码的频率。关卡仍会在每次提交时运行。MCP 服务器的内联检查与 pre-commit 钩子的强制执行是互补的,所以两者都别去掉。