Knowing how to connect to your website via SSH lets you establish certain connections between a local machine and a remote host. These days many businesses are taking advantage of emerging technologies to raise their performance and cut down expenses, and SSH is not separate from this technology.
New signs of progress lead to new requirements, and modern security technology can fight against the useless and weak approaches and methods. This is why we want to dive into the SSH solution.
So keep reading to discover essential tips about SSH, which can make secure and reliable connections for you. Before we cover how to connect your website via SSH, we should know what SSH is.
What is SSH?
SSH stands for secure shell and is a secure communication protocol that initiates the encrypted connections on the network through HTTP(hypertext transfer protocol). HTTP shares data of websites for computers, and SSH adds excellent security to it to access remote resources.
SSH supports different types of server access security, like file transferring and synchronization, FTP over SSH, secure copy, and private network access to the server with OpenSSH. So, you will be able to connect your website using an SSH client to transfer data securely through a GUI or a command line.
Of course, you should at first change the SSH port from its default value to make it truly secure.
Also Read : Port Forwarding on Windows VPS
Tip: As Linux and Mac Os have built-in SSH interfaces, there is no need to install an SSH client.
 Start Blogging
Self-host your WordPress on top-tier hardware, featuring NVMe storage and minimal latency around the world — choose your favorite distro.
Get WordPress VPSHow to connect to a host using SSH?
To get started on connecting your site via SSH, you need tools to make it happen. For starters, you should SSH into a server using a terminal that we get to in the following lines so that you will be able to establish a connection through SSH.

How to SSH into a server using a terminal?
Mac and Linux Os can initiate SSH connections using the Terminal. The Terminal is a kind of emulator similar to DOS, runs commands line instructions both on your system and remote server.
So there is no sign of a graphical user interface to ease making an SSH connection to your host. You have all the essential and valuable options in this simple type-based black screen to come up with the right result.
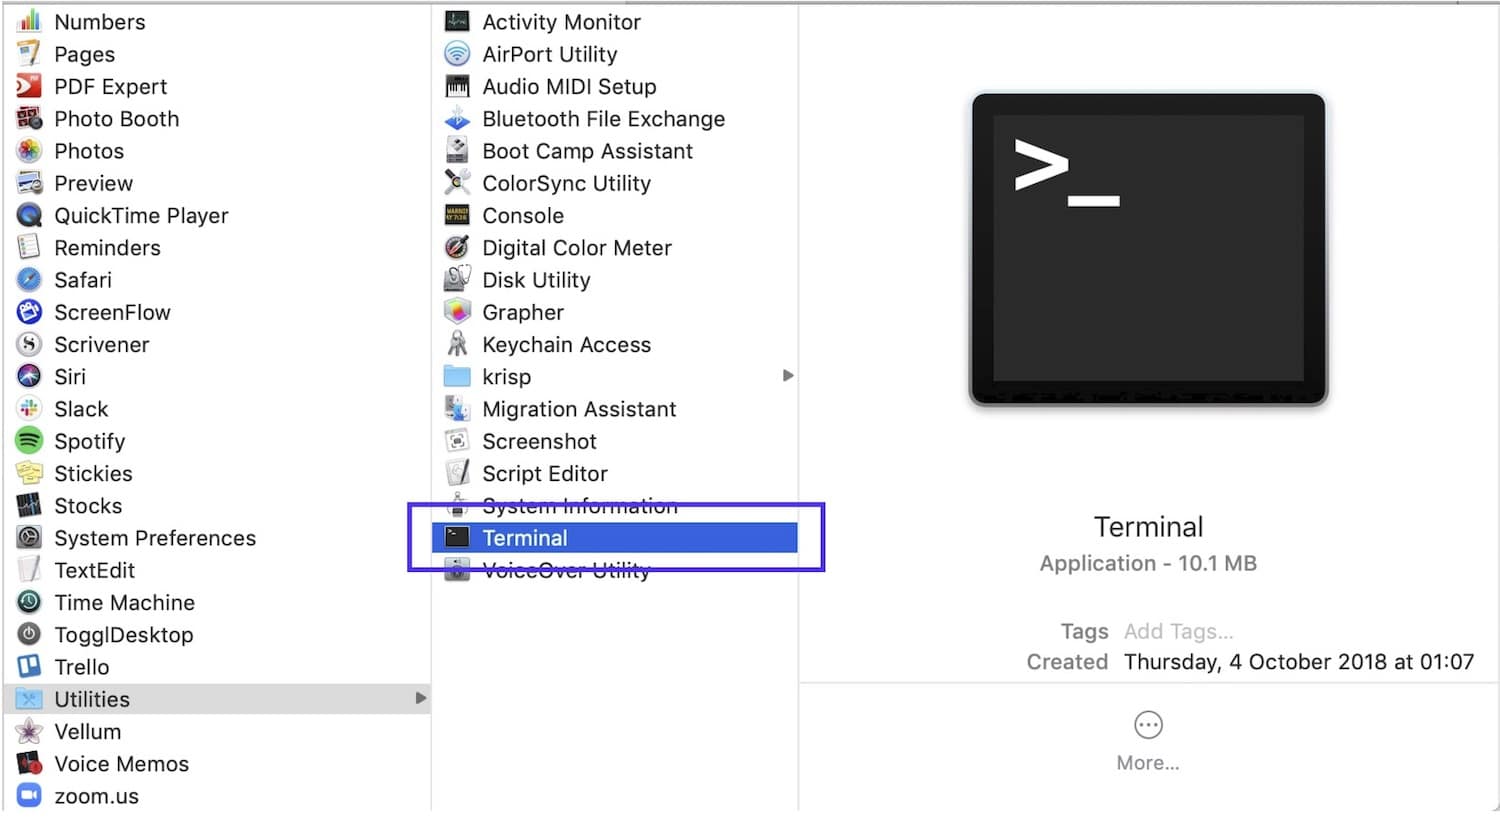
- First, click on the launch Pod icon and then type “Terminal” in the search bar
- Either you can navigate to Terminal via Applications > Utilities
How to connect to a web server using Putty?
Putty is a free SSH terminal software known as an SSH client application that runs on Microsoft Windows to access your VPS, physical machine, or multiple virtual machines in one host to manage them. easy to use.
Unlike Terminal, to connect your web server using SSH, you need to download and install Putty first and then head into the next steps.
Putty SSH Client Installation on Windows
- Go to the official website and download the Putty latest version
Tip: You can choose the package that best fits your Windows version, and it is recommended to download the 32-bit version to be safer.
These two methods do the same thing for you to connect via SSH server from Windows or Mac Os. Once you used SSH client or Terminal as the pre-requirement to connect your host, now let’s go forward with the Command line to run the codes and send commands to the destination server. Now, you should know some information to complete the checklist.
Also Read : Install MikroTik CHR on VPS (Using PuTTY)
Requirements to connect to your website via SSH

- Server IP Address: it is your domain name or an Ip address
- SSH port: the post is given by your hosting provider
- SSH username: it refers to your FTP username( not for WordPress admin)
- SSH password: it is your FTP password
- When PuTTY installation goes completed, open it, and use it to connect to your website.
- To connect the PuTTY SSH client, open it and then enter your server IP and SSH Port.
- Click the Open button to proceed.
- A login pop-up appears that asks you to type your SSH username and press Enter
- Then, enter your SSH password and press Enter again.
After you have successfully connected to your server via the PuTTY SSH client, then you can run the necessary command lines right now.
14 useful and basic SSH commands
With these SSH commands, you can move files, delete folders, create new directories, change user permissions, and so on.
- The Is Command: This command calls a list of the files and directories in the current folder.
ls
- The cd Command: This command changes the directories and moves on to different locations. For example $ cd /home
cd
- The mkdir: This command creates a new directory
mkdir
- The touch Command: This command adds a new file to the directory
touch
- The rm Command: This command removes a file or folder
rm
- The cp Command: This command copies files and folders.
Note: You need to specify the file name or directory and where you want to copy it. For example: $ cp [options] [source] [destination]
cp
- The mv command: This command moves files, and you should type the source and destination of the file. mv [source] [destination]
mv
Now let’s see the optional items you can add at the beginning of this command.
- -f: this option will delete the destination file and allow you to create a new file when you don’t access written permission.
- -u: copy the source file only if it is newer than the destination file.
- -n: this won’t overwrite an existing file and protect it from changing
- -a: this option archives the files.
- -R: it is only used for folders; it copies all the files and folders inside the target folder.
- Clear command: this command clears the terminal screen.
clear
- Tar command: this command creates and unzip compressed archives.
tar cvzf ArchiveName.tar.gz /path/to/directory
- Wget command: this command downloads files from the internet.
wget http://fileurl/filename.ext
- Du command: this command shows you the Get the files and folders size in a particular directory.
du
- History Command: this command shows the recently used commands
history 50
- PWD command: this command delivers you the full path of your current directory. After running this command you see something like this: home/user/public_html
pwd
- Find command: this command searches for files and shows these attributes (name, size, file type, etc.). You should use it like this: find [starting directory] [options] [search term]
find
Also read: Google Chrome Silent Install
Generating a key pair steps

- Generate the public key in Terminal
- Add the key pair to your hosting account.
- Generate the private key through your SSH client(Putty)
Also Read: Generate SSH Keys in Windows 10
How to Generate the public key pair in Terminal?
Generating Public key authentication for Linux and Mac starts typing commands in the Terminal and using Open SSH.
- Open the terminal box At the shell prompt, type the following command:
- The ssh-keygen program asks you to specify the location and the filename of the key file.
Tip: You can type a new name or use the default and press enter.
- You can optionally create a passphrase to protect your key.
- Copy the public half of the key pair to your server using the below command
ssh-copy-id -i ~/.ssh/id_rsa.pub user@server
Enter your username instead of the user and server, then the server address you want to use the key authentication.
- Enter your user account password for that SSH server when prompted
Tip: You can now authenticate to your server with the key pair.
 Start Blogging
Self-host your WordPress on top-tier hardware, featuring NVMe storage and minimal latency around the world — choose your favorite distro.
Get WordPress VPSHow to Generate your Private SSH Key Pair?
Generating a new SSH key is the first thing you need to create the high-security authentication level. It would help if you had this SSH key to connect your server with maximum security for your login process.
When keys are correctly generated, they can guarantee improved security and a fast and convenient way of accessing and managing your servers.
Instead of following up that traditional way using username and password, the Terminal or the SSH client can make it more professional for you.
Also Read: Hosting Multiple Websites on a Single Server
Generating a private SSH key with the SSH client
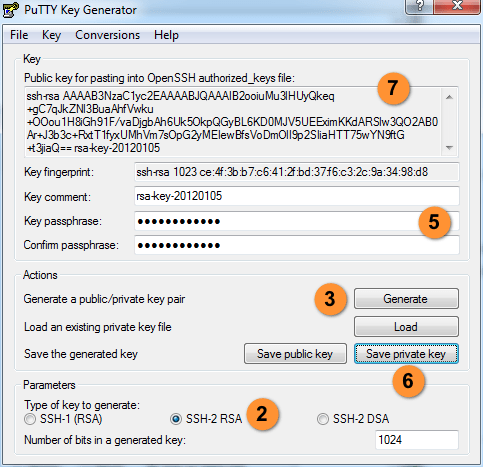
- First, Go to the PuTTYgen program
- Then, Select SSH-2 RSA in the type of key to generate section.
- Next, click the Generate button from the Actions section.
Tip: In this step, start moving your mouse in the window till the green progress bar becomes full.

The reason is to realize your random movement for the authentication method. This is one of the most reliable techniques you can benefit from the attackers.
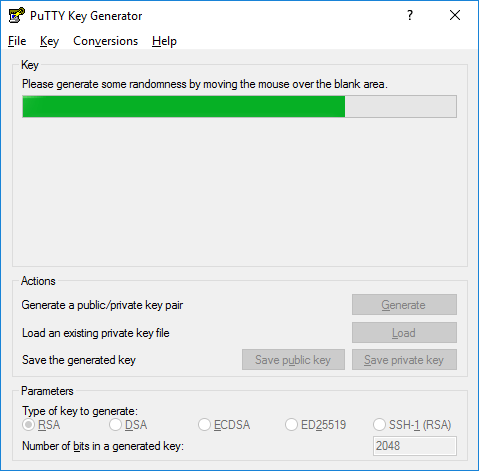
- After that, When the progress bar is completed, PuTTYgen generates your SSH key pair.
- Enter a passphrase in the Key passphrase field and reenter it in the “Confirm passphrase” field.
- Click the Save private key button
Tip: (remember to save the private key it will be needed for the next connection to your machine)
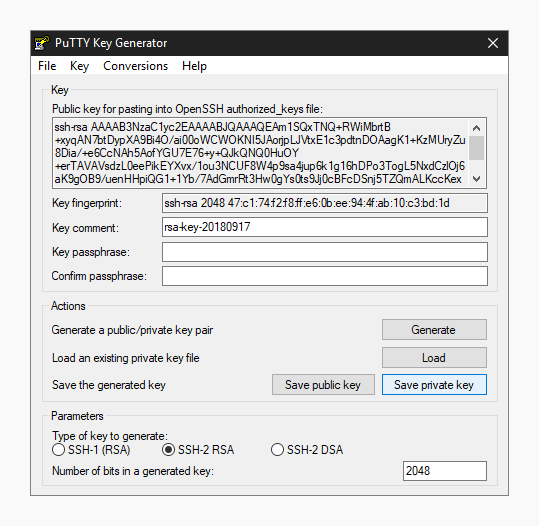
- Right-click in the text field named “Public key for pasting into OpenSSH authorized_keys file” and then choose “Select All.”
- Now Right-click in the same text field again and choose “Copy.”

How to import your SSH Key
When you have a new key saved on your computer, now you should import it into the PuTTY key agent.
These two steps import the SSH key to the PuTTY
- Click the Agent button that opens the key manager in the PuTTY Configuration window.
- Click the “Add Key button, “then find the location you saved the private key, select it and click Open.
Tip: Enter your key passphrase if it is necessary.
 Start Blogging
Self-host your WordPress on top-tier hardware, featuring NVMe storage and minimal latency around the world — choose your favorite distro.
Get WordPress VPSConclusion
Connect to your website via SSH has different advantages and steps that we explain in the context as well as possible. In general, to be a pioneer in this modern world in business communication networks, you need to take a step with high-quality control on your website files and logins on your cloud servers.
Therefore, creating a public key for authentication encrypts your connections to the servers. The private key used by the receiver can decrypt the connection. In the end, this bidirectional process will provide a secure interaction between two network endpoints. Then take it seriously to win, not losing in making interaction in this digital age.

