
Internet-facing web applications are routinely probed for SQL injection, credential abuse, and known-vulnerability patterns. SafeLine is a GPL-3.0 self-hosted WAF that runs as a Docker Compose stack and filters HTTP/S traffic before forwarding allowed requests to the origin. Its free Personal plan supports up to 10 applications.
This tutorial covers the installation and three areas that need particular attention: the reverse-proxy architecture decision, the Docker network configuration when SafeLine sits behind an existing proxy like Nginx Proxy Manager, and a verification command you can run after install to confirm the WAF is actually intercepting attacks.
The Short Version
- Install SafeLine on a Linux VPS with Docker Compose. Use the one-line installer, or take the manual Docker Compose path to inspect the Compose definition and environment configuration before you start the stack.
- Decide the reverse-proxy architecture before you install: SafeLine as the only proxy, SafeLine behind an existing Nginx Proxy Manager, or SafeLine sharing the box with Caddy. Each shape needs different port assignments and X-Forwarded-For settings.
- After install, verify the WAF by sending a curl SQL-injection probe at the protected URL. In Balanced or Strict mode, a 403 response plus a matching Attack Events entry confirms blocking. In Monitor mode, the matching event confirms detection even though the response may stay successful.
- The free Personal tier covers up to 10 applications and the core detection engine. Geo-blocking, attack log export, and external notifications need the Lite tier; more powerful attack detection and load balancing need Pro.
Before You Begin: Prerequisites and What This Tutorial Covers
This tutorial assumes you have a Linux VPS you can SSH into with root or sudo access, and that Docker is installed. You will leave with a working SafeLine instance protecting at least one site and a verification command you can re-run anytime.
You need:
- A Linux VPS. The commands below assume a Debian or Ubuntu-style system with systemd; verify package and service names on other distributions.
- At least 1 vCPU, 1 GB RAM, and 5 GB disk according to the official deployment requirements. For practical production headroom, this guide recommends 2 vCPU, 4 GB RAM, and 20 GB disk.
- Docker 20.10.14 or later and Docker Compose 2.0 or later.
- An x86_64 CPU with SSSE3 support; verify it with
lscpu | grep ssse3rather than assuming the instruction is present. - A domain or subdomain with DNS pointing at the VPS public IP if you plan to expose the protected application over public HTTPS.
- Ports appropriate to the selected topology. Shapes A and C normally give SafeLine ports 80 and 443, while Shape B leaves those ports with Nginx Proxy Manager and assigns SafeLine a different listener such as 10080.
- Root or sudo access.
At the VPS provider firewall or security group, expose only the public ports the selected topology needs. Restrict SSH and TCP 9443 to trusted administration sources. In Shape B, keep TCP 10080 closed to public IPv4 and IPv6, and keep backend ports such as 8080 private in every topology. Direct access to 10080 would bypass NPM and invalidate the X-Forwarded-For trust boundary.
Note
For manual ARM64 deployment, set ARCH_SUFFIX=-arm. SafeLine's official deployment documentation states that ARM requires a Pro license and that the Personal Edition is not supported on ARM. Use an x86_64 VPS for the Personal Edition.
Verify Docker before starting:
docker --version
docker compose version
Both commands should return installed versions. Continue only if Docker is version 20.10.14 or later and Docker Compose is version 2.0.0 or later; otherwise upgrade before installing SafeLine.
Choose Your Reverse-Proxy Architecture First
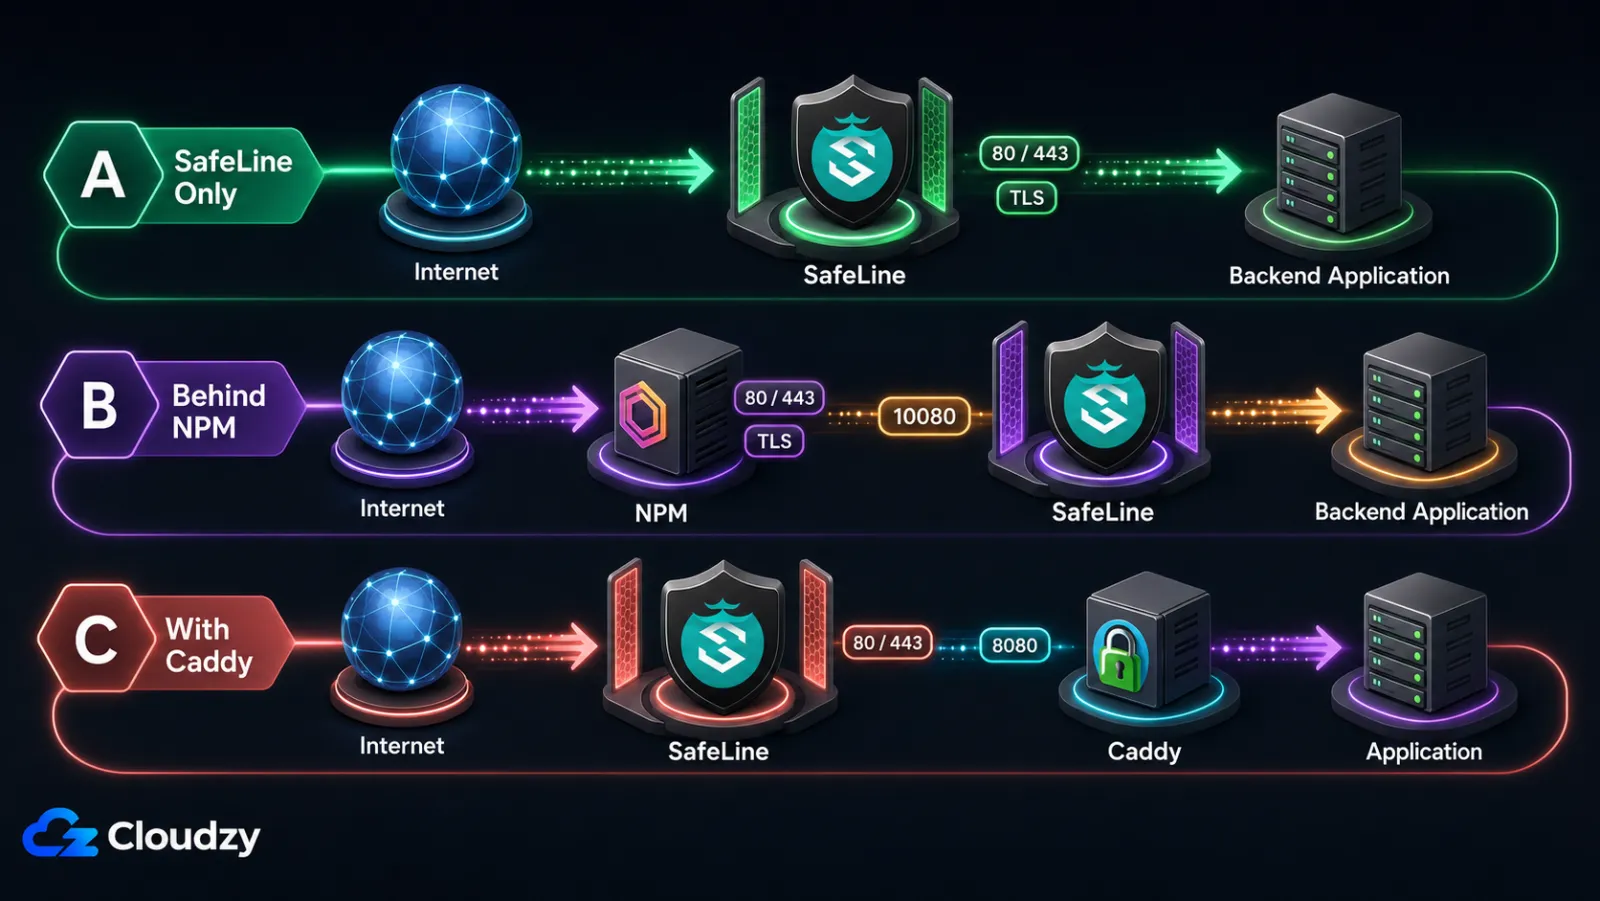
A fresh VPS lets SafeLine own ports 80 and 443 outright. A VPS that already runs Nginx Proxy Manager, Caddy, or the application's own Nginx does not, and the architecture decision is the difference between a smooth install and a port conflict at first boot. Get this right once at the start and the rest of the deployment is mechanical.
The three shapes:
- Shape A, SafeLine as the sole reverse proxy. SafeLine owns ports 80 and 443 and manages TLS for the protected application. Current CE releases include a Free Cert workflow, while manual certificate upload remains available; verify the precise certificate options in the installed release. The backend runs on a non-public port and SafeLine routes to it.
- Shape B, SafeLine behind Nginx Proxy Manager (NPM). NPM keeps ports 80 and 443 and handles SSL. SafeLine listens on port 10080 (HTTP only, since NPM already terminated TLS). NPM forwards into SafeLine; SafeLine forwards into the backend. This is a common setup when NPM is already deployed.
- Shape C, SafeLine alongside Caddy. Caddy's automatic HTTPS competes with SafeLine for port 443. A workable arrangement gives SafeLine ports 80 and 443, and moves Caddy to a non-public internal HTTP port such as 8080 for the SafeLine to Caddy to application hop.
| Shape | Owns Port 443 | SSL Management | Complexity | Best For |
|---|---|---|---|---|
| A, SafeLine only | SafeLine | Inside SafeLine | Low | Fresh VPS or willing to migrate |
| B, Behind NPM | NPM | In NPM (Let's Encrypt) | Medium | Existing NPM deployment |
| C, With Caddy | SafeLine | Inside SafeLine | Medium-high | Existing Caddy you want to keep |
Key takeaway: Shape A is simplest for a fresh VPS; Shape B is the right choice when NPM is already running; Shape C needs a deliberate Caddy port reassignment.
Install SafeLine on Your VPS
The install itself is the easy part. SafeLine ships two install paths: an automated installer that pulls a remote script from waf.chaitin.com, and a manual Docker Compose path that lets you inspect everything before it runs. Pick whichever matches your security policy.
Step 1: Confirm Docker Is Ready
Re-check the Docker version and that the Docker daemon is running:
docker --version
docker compose version
sudo systemctl status docker
Expected output includes active (running) for the Docker daemon. If it is not running, start it with sudo systemctl start docker and enable it on boot with sudo systemctl enable docker.
Step 2: Run the SafeLine Installer
There are two sub-paths. Pick one.
Step 2a, automated install. Run the installer with root privileges:
sudo bash -c "$(curl -fsSLk https://waf.chaitin.com/release/latest/manager.sh)" -- --enThe script asks where to place the SafeLine data directory, pulls the Docker images, and starts the stack. After installation, run sudo docker exec safeline-mgt resetadmin to retrieve or reset the administrator credentials, as described in the official deployment guide. Store the resulting credentials securely.
Note
This command downloads and executes a remote shell script from waf.chaitin.com as root. The official one-liner includes curl -k, which disables TLS certificate verification. Review the downloaded script before execution, or use Step 2b if that risk is unacceptable. SafeLine is also available as a one-click Cloudzy deployment, but that image uses /opt/safeline, /opt/safeline/.env, and /opt/safeline/docker-compose.yml. Do not use this guide's /data/safeline paths unchanged on the Cloudzy image.
Step 2b, manual Docker Compose install. Download and inspect the official Compose file, then start the stack:
sudo mkdir -p /data/safeline
cd /data/safeline
sudo wget -O /data/safeline/compose.yaml "https://waf.chaitin.com/release/latest/compose.yaml"
POSTGRES_PASSWORD="$(openssl rand -hex 32)"
sudo tee .env >/dev/null <<EOF
SAFELINE_DIR=/data/safeline
IMAGE_TAG=latest
MGT_PORT=9443
POSTGRES_PASSWORD=$POSTGRES_PASSWORD
SUBNET_PREFIX=172.22.222
IMAGE_PREFIX=chaitin
ARCH_SUFFIX=
RELEASE=
REGION=-g
MGT_PROXY=0
EOF
unset POSTGRES_PASSWORD
# Also adjust SUBNET_PREFIX if your VPS already uses 172.22.222.0/24.
sudo chmod 600 /data/safeline/.env
sudo docker compose up -d
After docker compose up -d completes, list the running containers to confirm:
sudo docker compose psYou should see containers for safeline-mgt, safeline-detector, safeline-tengine, safeline-pg, safeline-fvm, safeline-luigi, and safeline-chaos. If any container shows Exited, see Step 3 for the two most common causes.
Step 3: Resolve Common Install Errors
Two errors come up often enough that they deserve their own step.
Subnet overlap. If the install fails with Pool overlaps with other one on this address space, the default SafeLine subnet conflicts with an existing Docker network. As documented in a SafeLine installation troubleshooting walkthrough, fix this by editing /data/safeline/.env:
sudo nano /data/safeline/.env
# Find the line:
#   SUBNET_PREFIX=172.22.222
# Change to an unused range, for example:
#   SUBNET_PREFIX=172.30.30
sudo docker compose -f /data/safeline/compose.yaml down
sudo docker compose -f /data/safeline/compose.yaml up -d
IPv6 resolver error. If safeline-tengine crashes with nginx: [emerg] invalid IPv6 address in resolver, first inspect the resolver file and determine who manages it:
readlink -f /etc/resolv.conf
cat /etc/resolv.conf
Do not edit /etc/resolv.conf directly if it is generated by systemd-resolved, NetworkManager, or the VPS provider. Correct the malformed nameserver value in the managing service's configuration, regenerate the resolver file, and then restart Tengine:
sudo docker restart safeline-tengineStep 4: Access the Dashboard
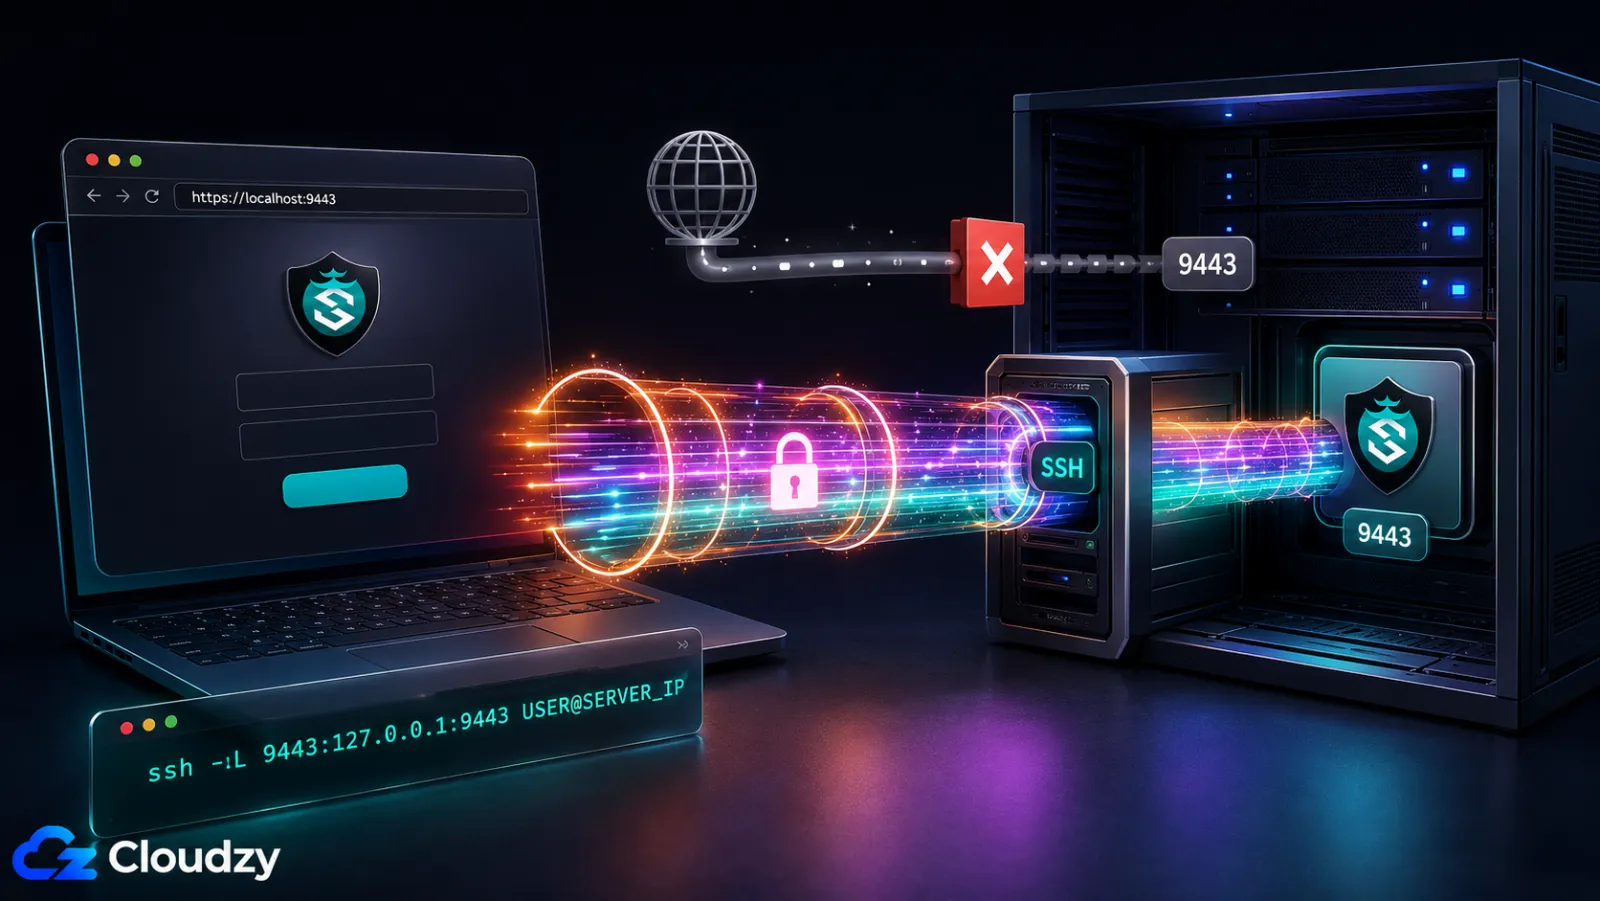
SafeLine's management dashboard listens on TCP 9443 over HTTPS. Do not leave this administrative port open to the whole internet. Restrict it to a trusted source address or VPN, or block public access and use an SSH tunnel:
ssh -L 9443:127.0.0.1:9443 USER@SERVER_IPOpen https://localhost:9443 through the tunnel. A self-signed-certificate warning is expected on first access; verify that the SSH connection reached the intended server before proceeding.
If you lost the initial credentials, reset the admin password from the host:
sudo docker exec safeline-mgt resetadminThe command prints administrator credentials you can use to sign in again.
Configure SafeLine for Your Architecture
SafeLine is running now, but it is not yet protecting anything. The dashboard's Applications page is where you tell SafeLine which sites to protect and where to forward cleaned traffic. The configuration differs depending on the architecture you picked earlier, so each shape gets its own subsection. Work through only the one that matches your setup.
Shape A: SafeLine as the Sole Reverse Proxy
For Shape A, SafeLine listens on ports 80 and 443 directly and forwards cleaned traffic to your backend application on a non-public port. In the dashboard:
- Navigate to Applications, then Add Application.
- Set the listening port to 443 and enable SSL. Use the certificate workflow available in your installed SafeLine release. Current CE releases include Free Cert application and renewal handling, while manual certificate upload remains available.
- Set the upstream to
http://127.0.0.1:8080. If the backend runs in Docker, publish its port only on loopback, for example"127.0.0.1:8080:8080"in the service's ports section. Avoid a hard-coded container IP such as172.17.0.5because it can change when the container is recreated. - Save the application. SafeLine immediately starts listening on 443 and forwarding cleaned traffic to the backend.
- Confirm your domain's DNS A record points at the VPS public IP and that ports 80 and 443 are reachable from outside.
If port 443 was already bound by another process, SafeLine's container will fail to bind and the dashboard will show an error on that application. Stop the conflicting process, or pick a different port, before adding the application.
Shape B: SafeLine Behind Nginx Proxy Manager
Shape B keeps NPM doing what it already does (owning 80 and 443, handling Let's Encrypt) and slots SafeLine in as a dedicated security tier behind it. The traffic flow is: client, then NPM (port 443, TLS termination), then SafeLine (port 10080, HTTP), then the backend application.
Inside the SafeLine dashboard:
- Applications, then Add Application. Set the listening port to 10080 and leave SSL off (NPM already terminated TLS).
- Set the upstream to the application's internal address, as described in Shape A.
- Save the application.
In Nginx Proxy Manager:
- Hosts, then Proxy Hosts, then Add Proxy Host.
- Details tab: set the domain name, scheme
http, and forward port 10080. If NPM runs directly on the host, use127.0.0.1as the forward hostname. If NPM runs in Docker on Linux,127.0.0.1points to the NPM container rather than the VPS host. Add Docker's host-gateway mapping to the NPM Compose service, then usehost.docker.internalas the forward hostname:
extra_hosts:
  - "host.docker.internal:host-gateway"
From the NPM Compose directory, run sudo docker compose up -d so the container is recreated with the new host mapping.
- SSL tab: request a Let's Encrypt certificate, force SSL, and enable HTTP/2.
- Leave NPM's Advanced tab empty for X-Forwarded-For. In the current NPM template, Advanced content is inserted at server scope and does not override the generated location-level headers under NGINX's inheritance rules. The generated location sends:
proxy_set_header X-Real-IP $remote_addr;
proxy_set_header X-Forwarded-For $proxy_add_x_forwarded_for;
The second directive appends the address observed by NPM as the rightmost value in the header.
- Save the Proxy Host.
Back in SafeLine, configure source-IP extraction only after confirming the effective header chain. SafeLine 9.3.1 introduced flexible XFF extraction with direction and index selection.
- Settings, then Advanced, then Real IP from Header. Set the header name to
X-Forwarded-For. - Use custom extraction from the end of the header and select the rightmost address added by NPM. Exact index labels vary by version, so verify the result in Logs, then Access. If the installed release predates 9.3.1, update it before following this topology.
- If Cloudflare or another CDN sits before NPM, first configure NPM to trust only that provider's published proxy ranges so the address appended by NPM is trustworthy. Do not select a fixed position until you have inspected and tested the actual header chain.
- Save and reload the application.
Test the configuration from a machine outside the VPS:
curl -H "X-Forwarded-For: 1.2.3.4" "https://yourdomain.com/"The SafeLine access log should show your real public address, not 1.2.3.4 or NPM's bridge address.
Prevent users from bypassing SafeLine by keeping the backend listener private. For a Docker Compose backend, publish the port only on loopback:
ports:
  - "127.0.0.1:8080:8080"
For a service running directly on the host, configure it to listen on 127.0.0.1:8080 instead of 0.0.0.0:8080. Verify both internal ports from a machine outside the VPS:
curl --connect-timeout 5 "http://YOUR_VPS_PUBLIC_IP:10080"
curl --connect-timeout 5 "http://YOUR_VPS_PUBLIC_IP:8080"
The TCP connections should be refused or time out. An HTTP error or "Empty reply from server" still means the port is publicly reachable and must be secured. If loopback binding is impossible, create firewall rules tailored to the actual interface, Docker network, and destination container rather than applying a generic DOCKER-USER rule.
Shape C: SafeLine With Caddy
For Shape C, SafeLine takes ports 80 and 443; Caddy moves to a non-public internal HTTP port. The traffic flow is: client, then SafeLine (443, TLS), then Caddy (8080, internal HTTP), then the application backend.
Edit /etc/caddy/Caddyfile:
:8080 {
bind 127.0.0.1
reverse_proxy 127.0.0.1:3000
}
The :8080 site block is the important part: Caddy now listens on an internal HTTP port instead of competing with SafeLine for 443. The bind 127.0.0.1 line keeps that listener local to the VPS. Reload Caddy with sudo systemctl reload caddy and confirm with sudo ss -ltnp | grep -E ':(443|8080)' that Caddy is bound to 8080, not 443.
In SafeLine, add an application that listens on 443 with SSL enabled, then set the upstream to http://127.0.0.1:8080. The X-Forwarded-For setting can stay on the default network-connection option because Caddy is behind SafeLine, not in front of it.
Pick a Protection Mode and Verify the WAF Is Blocking Attacks
SafeLine has three protection modes that decide what happens when the engine flags a request as malicious. The right starting mode depends on the application; the verification step is the same in any mode.
Protection Modes: Monitor, Balanced, Strict
Each application in SafeLine carries its own protection mode setting, configurable under Applications, then your app, then Protection Mode:
- Monitor. SafeLine logs requests it would otherwise block but does not block them. This is the safest starting point for a complex production application with rich input forms (a forum, an admin panel with WYSIWYG fields, an API that accepts free-form JSON payloads). Run Monitor for a few days, review the Attack Events page, and confirm there are no false positives against real users before promoting to Balanced.
- Balanced. The default mode. SafeLine's vendor-published GitHub figures report 71.65% detection, 99.45% accuracy, and a 0.07% false-positive rate for Balanced mode. Strict mode is reported at 76.17% detection, 99.38% accuracy, and a 0.22% false-positive rate. These are vendor-reported results rather than an independent benchmark, and the README does not identify the dataset as WAF-Eval. Treat them as comparative product figures, not guaranteed production performance.
- Strict. A more aggressive ruleset with stricter heuristics and the detection-versus-false-positive trade-off shown above. Worth trying after a week or two of clean Balanced operation, once you understand your traffic.
Recommendation: Balanced for a fresh deployment with no live traffic to disturb. For an existing production application, start in Monitor for a few days, look for false positives in the Attack Events log, and promote to Balanced once you have tuned any exceptions. Strict is worth trying after a week or two of Balanced once you understand your traffic.
Verify the WAF With a curl SQLi Test
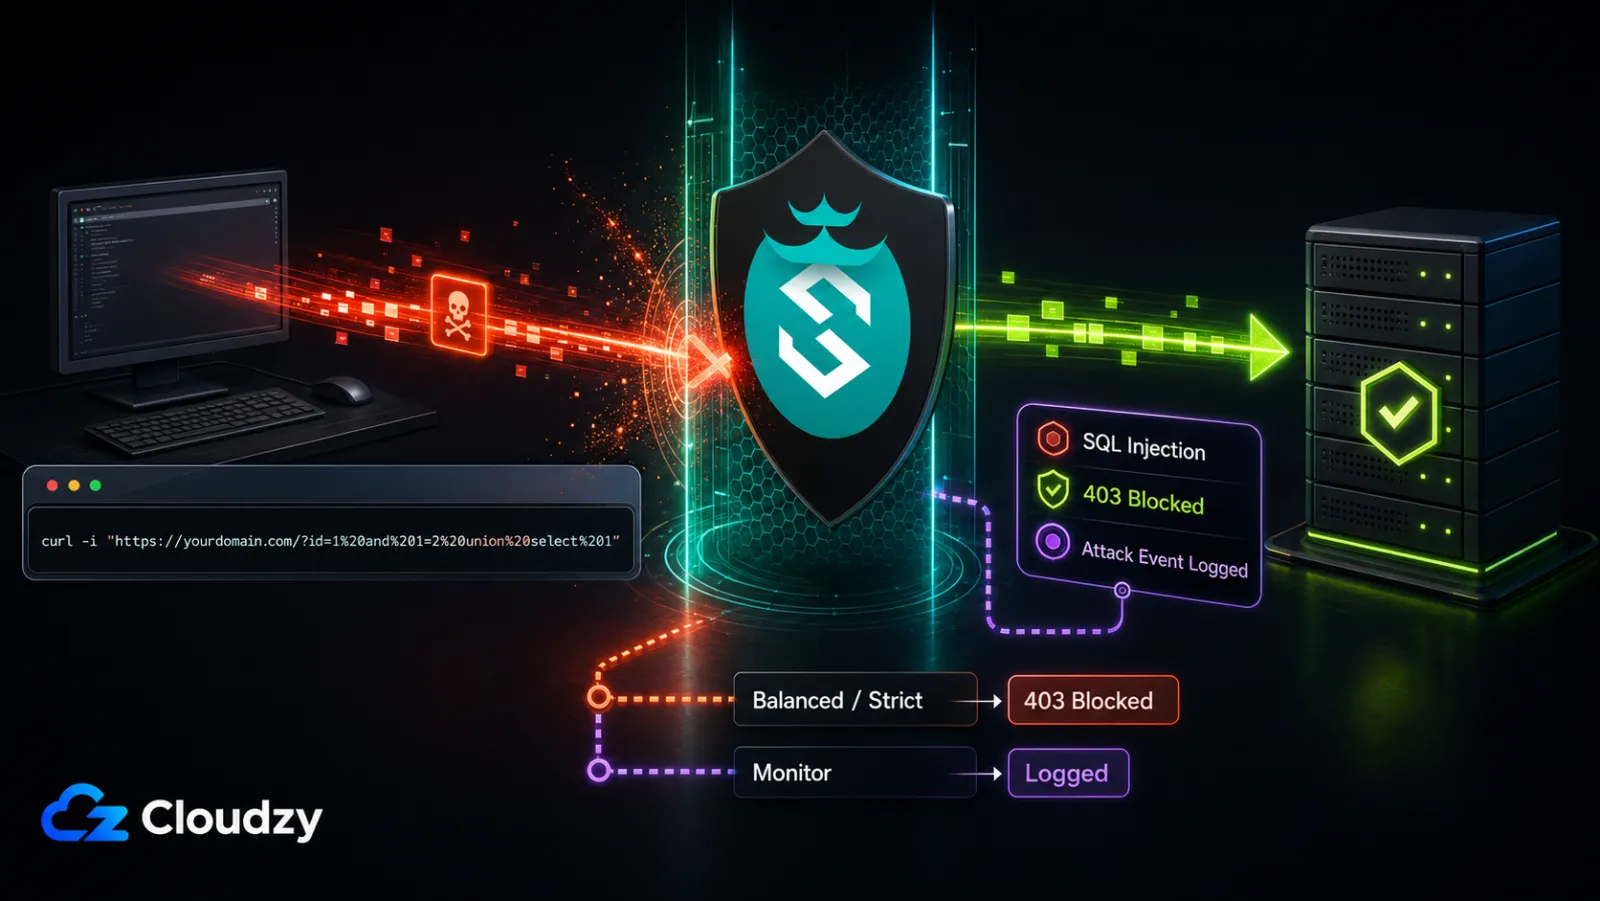
The final step before considering the install done is to confirm the WAF actually intercepts an attack. Run a benign SQL-injection probe against your protected site from any machine outside the VPS:
curl -i "https://yourdomain.com/?id=1%20and%201=2%20union%20select%201"This is SafeLine's published SQL-injection test vector. In Balanced or Strict mode, expect a 403 status and a SafeLine block response. In Monitor mode, expect the request to be logged without blocking. The HTTP version and exact response body can vary, so confirm the result with a matching entry in Attack Events.
Then open the dashboard through the restricted access method from Step 4 and navigate to Logs, then Attack Events. You should see a new entry with the matching timestamp, attack type SQL Injection, source IP matching the machine you ran curl from, and the offending query string in the request detail. Click into the event for the full request and response captured by SafeLine.
If the curl request returned 200 OK, interpret the result alongside the Attack Events log:
- A matching SQL Injection event means the application is probably in Monitor mode; logging without blocking is expected.
- If there is no matching event, confirm that DNS resolves to the intended VPS, verify the SafeLine listener and upstream configuration, and correlate the request time with SafeLine's access log.
- Also confirm that protection is enabled and that no IP whitelist, custom allow rule, or path exception covers the test request.
Key takeaway: If the curl probe returns 403 with the SafeLine interception page and an entry appears in Attack Events with the attack type SQL Injection, the WAF is intercepting traffic correctly.
What the Free Tier Covers and What Requires a Paid Plan
The free Personal tier is enough to protect most single-VPS deployments. The paid tiers start to matter when you need operational features (notifications, log export, geo-blocking) or outgrow the 10-application limit.
The breakdown, sourced from the CyberServal pricing page:
- Personal, free. Up to 10 applications. Includes the semantic detection engine (SQLi, XSS, command injection, path traversal, SSRF, XXE, CRLF), rate limiting, bot CAPTCHA challenge, dynamic HTML/JS encryption against automated scrapers, web ACL rules, and certificate management. Current CE releases also include Free Cert application and renewal handling.
- Lite, $10/month or $100/year. Adds geo-blocking, the threat intelligence IP database, Discord and Telegram notification integration, attack log export, and raises the application limit to 20.
- Pro, $100/month or $1,000/year. Adds more powerful attack detection, per-service and global configurations, custom interception pages, upstream load balancing, master-slave node sync, and unlimited applications. See the current pricing table for changes.
- Ultimate, custom pricing. Tailored enterprise terms with 1-on-1 support across channels and custom feature development.
SafeLine processes and stores application data inside its local Compose stack. However, current CE release notes mention Threat Intelligence Sharing, so operators should review the installed version's UEP, privacy, and sharing controls and observe outbound connections before treating the deployment as zero-egress.
Where to Go from Here
The installation is complete and the WAF is verified. A few follow-up tasks will help keep the deployment healthy.
- For any production application with rich user input (a forum, an admin panel, a free-form API), set the protection mode to Monitor for three to seven days, review the Attack Events page daily, and promote to Balanced once you have tuned any false positives.
- On the Lite tier, set up the Discord or Telegram notification integration so attack alerts reach you outside the dashboard.
- Schedule a monthly maintenance window. Before upgrading, back up SafeLine's data and environment configuration, read the current release notes, and use the supported upgrade procedure for your installed version. Do not rely only on
docker compose pullfollowed bydocker compose up -d, because the Compose definition or required environment variables can change between releases. Cloudzy one-click users should work from/opt/safelineand follow the marketplace image's instructions. - Subscribe to the SafeLine releases page for security patch notifications and to the project repository for issue tracking.
If you do not yet have a VPS for this deployment, SafeLine is available as a one-click deployment in Cloudzy's marketplace. A plan with 4 GB RAM provides the practical headroom recommended in this guide; recheck the current pricing table on Cloudzy at publication because plan specifications can change. The one-click image uses /opt/safeline and /opt/safeline/docker-compose.yml, so the architecture and dashboard instructions apply, but this guide's /data/safeline commands do not apply identically.
Frequently Asked Questions
Does SafeLine WAF Replace Nginx Proxy Manager, or Do I Run Both?
SafeLine can replace Nginx Proxy Manager when deployed as the sole reverse proxy. However, it does not need to replace NPM. A common setup keeps NPM in front for SSL and routing and layers SafeLine behind it as a dedicated security tier. Both work; the choice depends on whether you want one tool doing both jobs or two tools each doing one job well.
Is the Free Tier Enough for a Single WordPress Site or Small SaaS?
Yes, for protection. The free Personal tier includes the semantic detection engine, rate limiting, bot CAPTCHA challenge, and dynamic HTML/JS encryption, which are core defenses for a single site. The paid tiers add operational features such as geo-blocking, attack log export, external notifications, higher application limits, more powerful detection, and load balancing. Whether a paid tier is necessary depends on the required features and application count, not traffic volume alone.
Does SafeLine Work on a 1 GB RAM VPS?
SafeLine's official minimum is 1 GB RAM. That can be enough for testing or a very light workload, but production capacity depends on traffic, enabled features, and log retention. For a small production deployment, 2 vCPU and 4 GB RAM is a conservative starting point; monitor memory use and scale from measured load.
Why Does ARM64 Require a Paid License?
SafeLine's official deployment documentation states that ARM deployments require a Pro license and that the Personal Edition is unsupported on ARM. If you want the Personal Edition, choose an x86_64 VPS; if you require ARM, plan for a Pro license.
What Does Chaitin Tech Receive From My SafeLine Instance?
The exact outbound data can vary by release and enabled features. Current CE release notes mention Threat Intelligence Sharing, while the installed version may also expose UEP or other sharing controls. Review those settings and the release notes for your installed version, then validate egress at the network level. SafeLine's local containers handle application data, but that fact alone does not prove that declining UEP stops every outbound request.
Discussion
Comments
Sign in to join the discussion.