Have you ever wondered how exactly hostnames are linked to IP addresses? Like, how is this process happening? Or, even more specifically, how do we avoid memorizing long IP addresses and complex alphanumerics in the IPV6 system? In a nutshell, DNS Server is the answer to these questions. This article will introduce essential concepts and discuss the MikroTik DNS server and its setup. So, You can use this step-by-step tutorial to understand how to do DNS configuration on MikroTik.
- What is DNS & How Does It work?
- VPS and MikroTik — Do I need One?
- DNS configuration on MikroTik step-by-step tutorial
- How to Configure DNS in MikroTik using the terminal?
- How to Put Static DNS Entry in MikroTik Cache DNS?
- How to Block DNS Request from WAN Interface?
- What Is MikroTik Dynamic DNS & How to Set It Up?
- MikroTik DNS Forwarding for Faster Browsing
- Summary + 1 Solution to MikroTik Problems
- FAQ
What is DNS & How Does It work?
Domain Name Server (DNS) is essential for a computer network, meaning that there is no possibility of web communication without its presence.
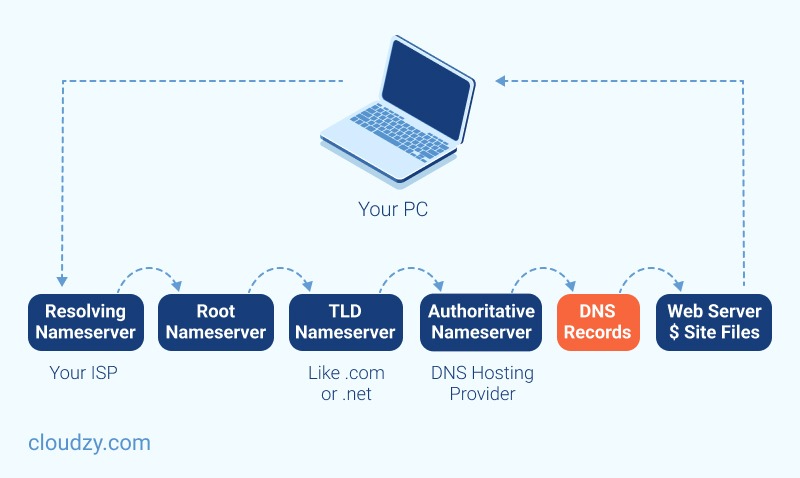
A Domain Name System (DNS) converts domain names into IP addresses, allowing browsers to access different websites and other internet resources. You can use IP Addresses to locate every device on the internet. But instead of memorizing a long list of IP addresses, you can enter the website’s name, and then the DNS gets its IP address for you. MikroTik Router has both DNS Client and DNS Server features. The Mikrotik DNS Server has features that provide domain name resolution for the clients connected to it.
A user types a domain name such as www.mikrotik.com in the browser’s navigation bar; then, the browser sends a request to the DNS server to get the IP Address of that domain name. The DNS server responds with the associated IP address of the domain. The browser can communicate with the Web Server to get the requested information by getting the IP address. You should pay attention that if you use a public DNS server, every time a user requests for different domains, the request goes through your WAN connection, using paid bandwidth and causing latency.
However, if you use the DNS feature of MikroTik Router, it will cache the DNS information from the root DNS Server and reply to DNS queries to the connected clients. This technique provides you with faster solutions and saves paid bandwidth.
What are the benefits of using a DNS server?
A Domain Name System is a centralized utility that gives the IP addresses a domain name.
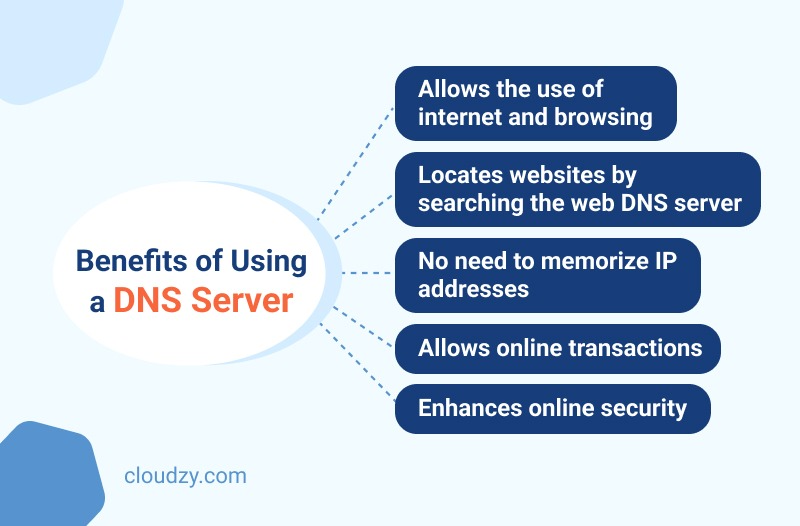
Here’s a list of the advantages of DNS servers:
- DNS is the only system that allows online users to browse and use the internet.
- Only by typing the name of websites DNS servers help you in finding the website using your web browser (like Chrome, Safari, Firefox, and Internet Explorer)
- You don’t need to memorize numbers. Meaning that, Instead of IP addresses or a string of numbers, you enter the domain name or URL; this makes searching through the internet easier for you.
- DNS servers make online transactions possible.
- DNS servers let you identify the data service’s technical functionality, defining the DNS protocol, detailed data structures specification, and data communication exchanges. Moreover, DNS adds an extra layer of security, making the process much safer.
- DNS enhances the security of DNS infrastructure, which is an essential factor for dynamic, secure updates.
- When customers visit your website, they will experience more reliable, secure, and faster online transactions.
The question that you probably have in mind right now is How to configure the Mikrotik DNS server?
Do I need to get a Mikrotik DNS Server? Before moving on to the tutorials, you need to configure DNS on Mikrotik, I want to give you some insights on using a VPS as your Mikrotik DNS server.
VPS and MikroTik — Do I need One?
A Virtual Private Server is a virtual machine created on a powerful physical server. Each VPS owns a dedicated part of the host server’s resources like RAM, CPU, and storage. You can choose any operating system you prefer from the various options we provide, or you can upload your own custom ISO, including RouterOS. The benefit of having a VPS as your router is that you don’t have to dedicate a whole computer to it. You can use your own home laptop and connect to your MikroTik VPS and use it as your Router. Unlike your home computer, this VPS will be online and working 24/7, with internet connection and power provided by the data center, meaning that you wouldn’t need an expensive internet provider, do not need to keep your home computer on all the time, and no extra cost will be billed for electricity.
Cloudzy offers ISO upload specifically for MikroTik users, allowing you to easily upload your customized setup and enjoy MikroTik. With Cloudzy’s MikroTik VPS, you can get everything you need for your router at a fraction of cost. You get 99.95% uptime, 1 Gbps network connection, minimum latency, and a minimum of 15 global locations to choose from.
If you are new to the world of routers, don’t risk using your own computer. Get a MikroTik VPS from Cloudzy and create an environment for yourself to learn and work with MikroTik.
DNS configuration on MikroTik step-by-step tutorial
The following steps will show you how to configure the DNS service in MikroTik Router.
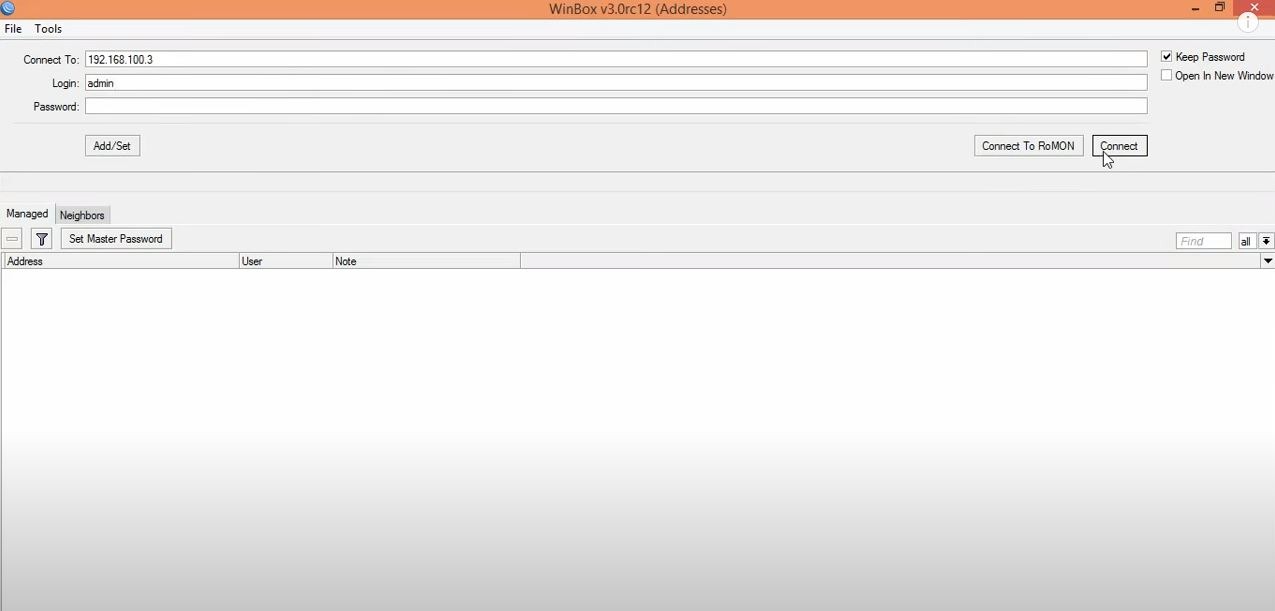
Step 1: Open Winbox and connect to your MikroTik
Winbox is a useful utility that allows the administration of MikroTik RouterOS using a fast and simple GUI.
Quick Tip:
You might come across a term called ”MikroTik RouterOS DNS,” this is referred to as a feature that allows you to store DNS cache, i.e., particular domain names, and server them to DNS clients under much less DNS resolution time. Also, with RouterOS DNS, you can provide false DNS information to your clients, redirecting every DNS request to your own page.
Step 2: Choose the DNS item from the IP menu
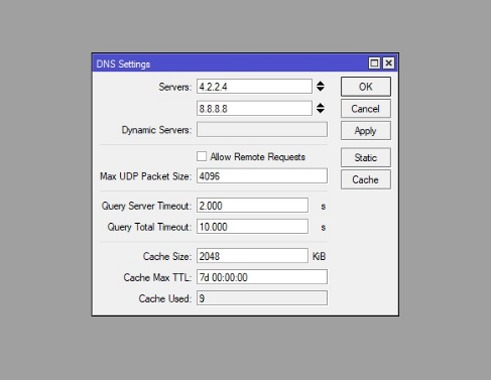
You will see the DNS Settings window on the screen by doing so.
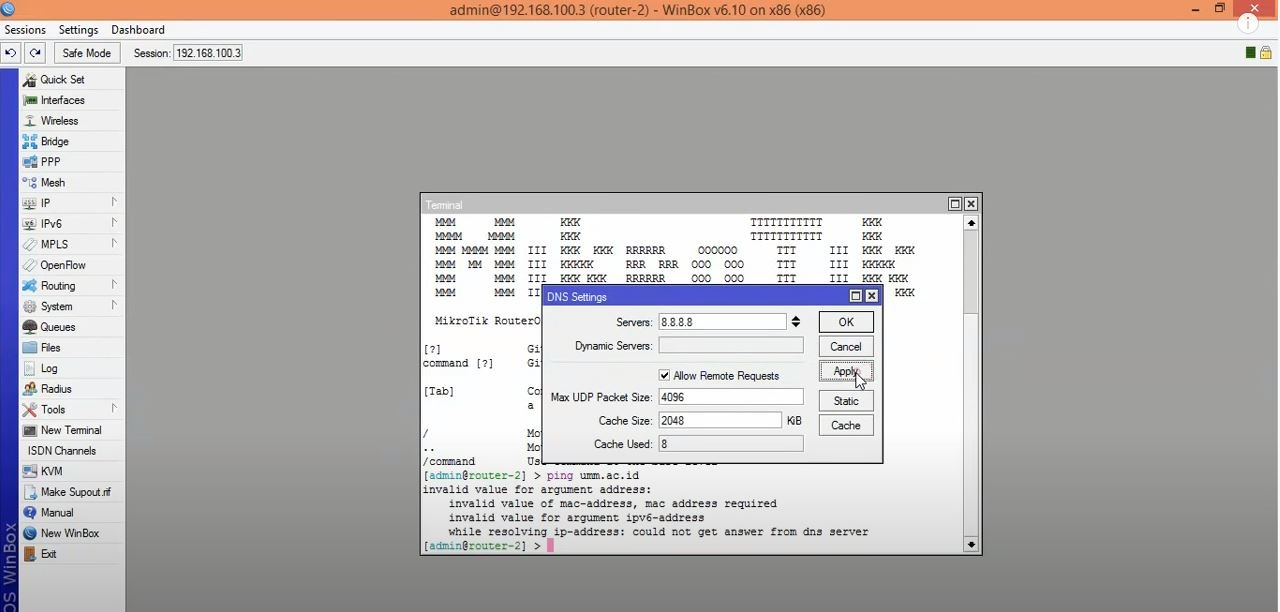
Step 3: Adjust your DNS settings and filling the necessary info
You have to put your ISP-provided DNS Server IP in that input box at this point of the Mikrotik DNS Server configuration. Notice that you can also use Google public DNS server IPs like 8.8.8.8 and 8.8.4.4.
Moreover, we will list all of your options in the following to help you understand each one:
- Servers: you should enter the IP address of a DNS service on the internet or your network here.
- Dynamic Server: the Dynamic Server’s name must be here if you use one.
- Allow Remote Request: Choosing this option will let you use MikroTik as a DNS server and respond to users. Since this option is essential, we will discuss it more in the next step.
- Max UDP Packet Size: This field is for specifying the final UDP packet size.
- Query Server Timeout: MikroTik waits for a server to respond to its request; this field sets this waiting time.
- Query Total Timeout: Entering the entire waiting time for a DNS response.
- Cache Size: Entering the amount of cache space and cache of DNS records.
- Cache max TTL: DNS TTL (time to live) is a setting that tells the DNS resolver how long to cache a query before requesting a new one.
- Cache Used: This value will be specified by the MikroTik router.
Step 4: enabling caching feature for MikroTik DNS server
If you click on the Allow Remote Requests checkbox, as shown below, you can use the caching DNS feature of MikroTik Router. Additionally, it enables you to put a custom measure for the cache size if you want. (The default cache size is 2048 KB or 2 MB.)
Step 5: Click on Apply and then OK
Now you know how to config a MikroTik DNS server using Winbox. Some people prefer to use a command-based configuration since it is more straightforward.
 Linux Hosting Simplified
Want a better way to host your websites and web apps? Developing something new? Simply don’t like Windows? That’s why we have Linux VPS.
Get your Linux VPSHow to Configure DNS in MikroTik using the terminal?
How to Configure DNS in MikroTik using the terminal?
Setting up the MikroTik DNS server configuration with the terminal is pretty simple. Here is what you should do:
- Step 1: First, you must connect to your MikroTik by SSH or console.
- Step 2: Then, you should enter the following command to enable DNS and its configuration.
ip dns set servers=8.8.8.8,8.8.4.4 allow-remote-requests=yes max-udp-packet-size=4096 query-server-timeout=2.000 query-total-timeout=10.000 cache-size=2048 cache-max-ttl=7d
After going through the previous steps of configuring the Mikrotik DNS Server, MikroTik Caching DNS is now enabled to use your MikroTik IPs as DNS IPs for your network client. If everything is done correctly, your client will receive a response from the MikroTik cache DNS Server. You can check your DNS cache by going to IP > DNS menu item and clicking on the Cache button. Your cached domain name will be in the DNS Cache window. To flush cached objects, you should click on the Flush Cache button.
How to Put Static DNS Entry in MikroTik Cache DNS?
Whenever MikroTik cache DNS gets a new domain, it dynamically stores DNS entry. But occasionally, you may want to put static host entries like your local servers or even printers. To address this, MikroTik cache DNS enables you to enter static hosts. The following steps will describe putting static host entry in MikroTik DNS Server.
- Click on “Static” button, From “DNS Settings” window.
- Click on “PLUS SIGN (+)“. A new DNS Static Entry window will appear.
- Put your hostname (like FTP) in the Name input field and the host’s IP Address in the Address input field.
- Finally, Click Apply and OK button.
You can put as many host entries as possible with the above steps.
How to Block DNS Request from WAN Interface?
If you turn your MikroTik router into a DNS server, all of your MikroTik IP addresses can be used as DNS servers. You can even use WAN IP (a public IP), which is a problem. Because if people outside of your LAN use your WAN IP as a DNS IP, your MikroTik will provide them DNS solutions, and it would be consuming your paid bandwidth.
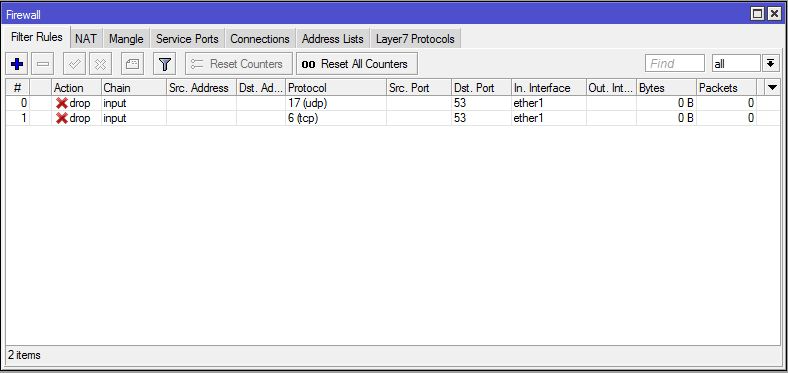
So, you have to stop DNS requests from outside of your LAN. To stop DNS requests outside of your LAN, you should apply firewall rules. Firewall rules can help you drop all DNS requests from your WAN interface. The following steps will guide you on how to block DNS requests from the WAN interface:
- Go to “IP > Firewall” menu and click on “PLUS SIGN (+)“.
- From “General” tab, select input from the Chain drop-down menu, choose “UDP” from the Protocol drop-down menu and put 53 in “Dst. Port input box” and then choose your WAN Interface (like ether1) from “In. Interface” drop-down menu.
- Click on “Action” tab and choose drop option from “Action” drop-down menu.
- Click on Apply and OK button.
- Again, click on PLUS SIGN (+), choose input from the Chain drop-down menu, choose “TCP” from the Protocol drop-down menu, and put 53 in Dst. Port input box and then choose your WAN Interface from In. Interface drop-down menu.
- At last, click Apply and OK button.
What Is MikroTik Dynamic DNS & How to Set It Up?
MikroTik Dynamic DNS, or MikroTik DDNS, is an IP updating tool that allows you to connect to your server, website, device, etc., regardless of how many times your IP address changes. Since most ISPs assign a DHCP (Dynamic Host Configuration Protocol) server to their clients, it’s a good idea to enable MikroTik DDNS for your home router so you can access your device without having to update your IP records each time your IP address changes.
Here is how you can set up MikroTik Dynamic DNS Using Winbox:
Step 1: Connect to MikroTik RouterOS
Step 2: System > Scheduler > Add
Step 3: Choose a name for your scheduled task
Step 4: Start Time = startup
Step 5: Set your preferred Interval.
Step 6: Enter the following in the On Event section and click OK:
/tool fetch url="https://ipv4.cloudns.net/api/dynamicURL/\?q=your-string-here" mode=https
If you need to configure MikroTik Dynamic DNS for multiple interfaces, in Step 6, type in the following in the On Event section and click OK:
/tool fetch url="https://ipv4.cloudns.net/api/dynamicURL/\?q=your-string-here&ip=X.X.X.X" mode=https
Note: (Check the following policy boxes: FTP, Read, Policy, Password, Sensitive, Reboot, Write, Test, Sniff, Romon.)
Set Up MikroTik Dynamic DNS Using Console:
To configure MikroTik DDNS using console, enter the following command:
/ system scheduler add name="cloudns" on-event="/tool fetch url=\"https://ipv4.cloudns.net/api/dynamicURL/\?q=your-string-here\" mode=https" start-date=jan/01/1970 start-time=startup interval=1h comment="" disabled=no
(The start-date is an example.)
MikroTik DNS Forwarding for Faster Browsing
MikroTik DNS forwarding allows you to redirect unresolved DNS queries to your DNS server. It’s best to use MikroTik DNS forwarding to resolve external DNS requests for two reasons: security and optimized traffic.
If you use MikroTik DNS forwarding for both internal and external DNS queries, you’re creating two problems for your infrastructure:
- Leaving your internal DNS information vulnerable on the open Internet.
- DNS cache cannot be filled with internal and external DNS information; as a result, whenever there is a request for external DNS data, network bandwidth is consumed heavily, affecting overall speed and performance.
Summary + 1 Solution to MikroTik Problems
In this guide, we discussed multiple fundamental concepts of the MikroTik DNS server and its advantages, plus a step-by-step configuration tutorial. MikroTik has many features, but if you have ever experienced difficulties such as bandwidth limitation or available routing marks, we’ve got the solution.
At Cloudzy, we offer a custom ISO option, allowing you to upload your preferred operating system, such as RouterOS, and create a MikroTik VPS in more than 15 global locations. Cloudzy MikroTik VPS is also the best solution to your networking problems. To master networking, you will need a router, but why buy a physical one that costs at least $100 when you can use our MikroTik VPS for as little as $10?
With robust infrastructure and ultrafast NVMe storage, our MikroTik VPS can deal with heavy workloads even if many devices use its resources simultaneously.
Please contact our support team if you have any questions to make sure you choose the best VPS plan.
FAQ
What is MikroTik DNS?
Domain Name System (DNS) is usually knowns as the Phonebook of the Internet. In other words, DNS is a database that links hostnames such as “thisexample.org” to a specific IP address, making it easier for you to access different websites.
Why is configuring Mikrotik DNS server important?
DNS translates domain names to IP addresses so browsers can load and show you Internet resources. Every device connected to the Internet has a unique IP address that other machines use to find the device. Configuring Mikrotik DNS servers eliminate the need for humans to memorize IP addresses.
What is MikroTik RouterOS?
MikroTik RouterOS is the stand-alone Linux-based operating system that powers MikroTik RouterBOARD hardware, helping to modify the computer system into a reliable network router.
How many types of DNS are there?
There are three main kinds of DNS Servers, called primary servers, secondary servers, and caching servers.


2 thoughts on “DNS Setup on MikroTik | A Quick Guide to MikroTik DNS Server”
In my opinion you are not right. Let’s discuss it. Write to me in PM, we will talk.
Heyy there! This post could not be written any better!
Reading this post reminds me of my good old room mate!
He always kept talking about this. I will forward this pate to him.
Fairly certawin hhe will ave a good read. Many thanks for sharing!