
Is your Linux system running slower than expected? A Linux disk speed test reveals storage bottlenecks instantly. Whether you’re troubleshooting a sluggish server or verifying that your VPS provider delivers promised SSD performance, learning how to check disk speed in Linux gives you concrete data to work with.
Modern storage comes in different types – traditional Hard Disk Drives (HDDs), faster Solid State Drives (SSDs), and ultra-fast storage options. Each performs differently, and knowing how to test hard drive speed helps you make informed decisions about upgrades or hosting choices.
Why You Should Run a Disk Speed Test in Linux
 Storage performance directly impacts system responsiveness. A slow disk creates bottlenecks that affect everything from file transfers to application loading times. Running a Linux disk speed test operation reveals whether your storage meets your needs or if an upgrade would improve performance.
This becomes especially important when managing multiple systems or evaluating hosting providers. Performance testing helps identify issues before they impact production workloads.
Key scenarios for disk testing: • Comparing VPS providers’ actual vs advertised performance with a buy Linux VPS setup • Troubleshooting slow backup processes and file operations
• Deciding between HDD and SSD upgrades using Linux check disk speed methods • Monitoring storage degradation over time • Verifying RAID configuration performance
For enterprise users managing remote systems, combining disk testing with Linux RDP server access provides comprehensive performance monitoring capabilities.
Test Disk Speed in Linux Using Commands
Linux provides several command-line tools for measuring storage performance. Each Linux test drive speed tool serves different purposes and provides unique insights into your disk’s capabilities. The command-line approach offers precise control and consistent results across different Linux distributions.
These tools form the foundation of professional system administration and performance monitoring. Understanding when to use each tool helps optimize your Linux disk speed test command line workflow.
| Tool | Best For | Measures | Installation Status | Limitations |
| dd | Quick write tests | Sequential write speed | Pre-installed | Write-only, results vary |
| hdparm | Read speed checks | Sequential read speed | Often pre-installed | Read-only testing |
| fio | Comprehensive testing | Random/sequential I/O | Requires installation | Complex configuration |
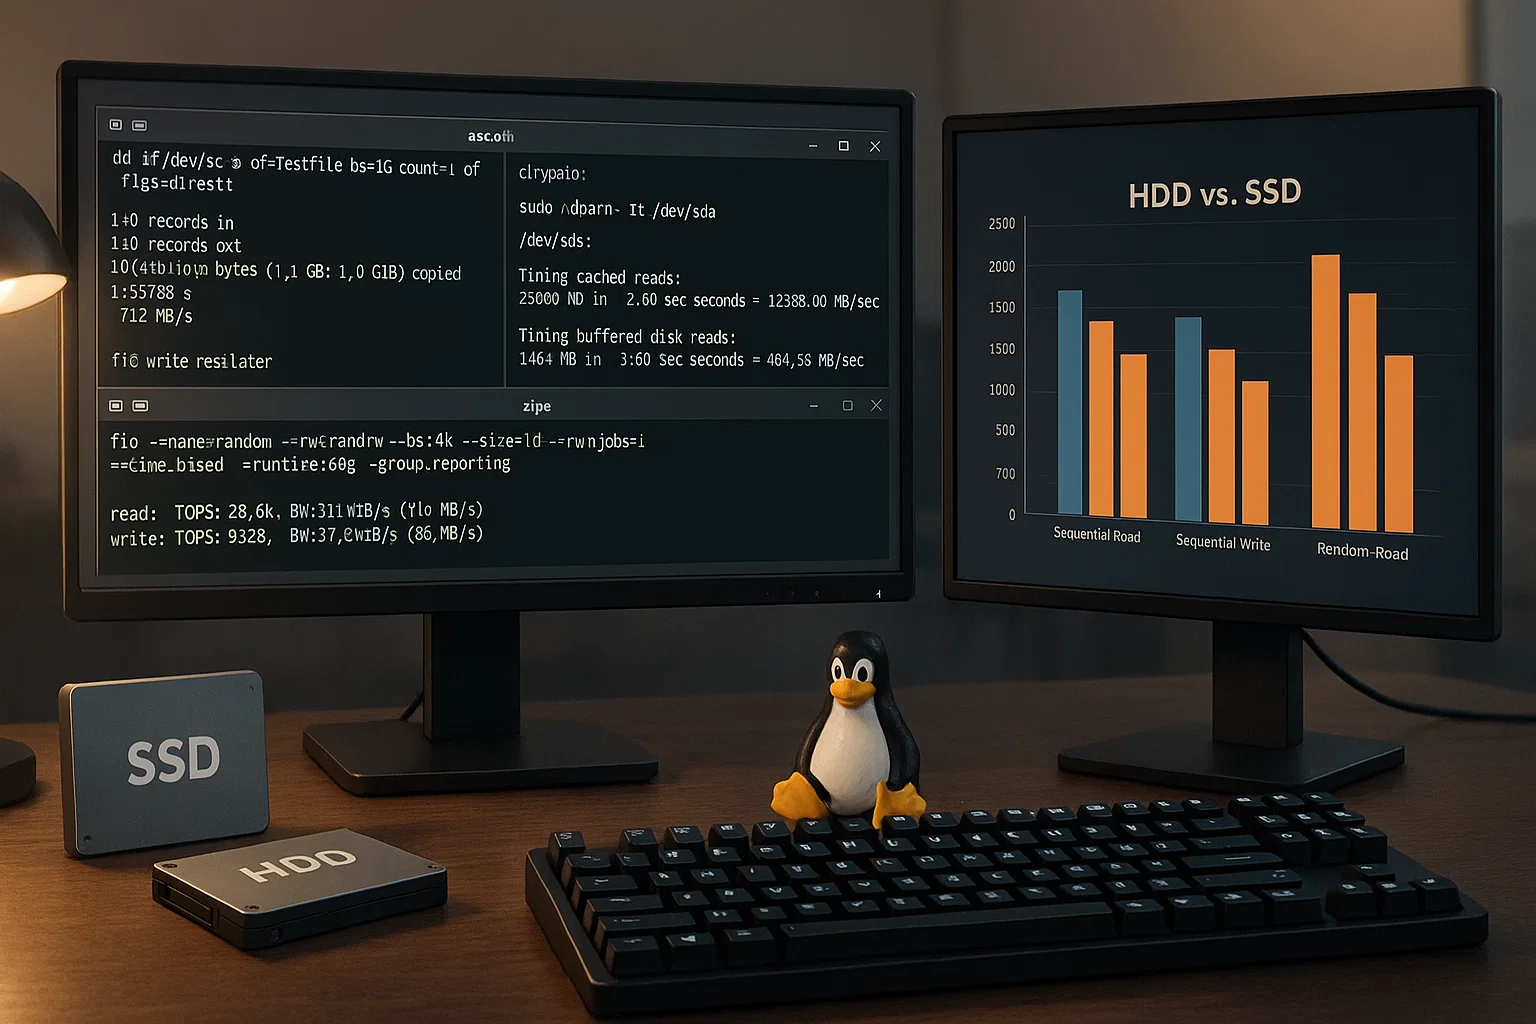
Linux Test Disk Speed Using dd
The dd command is available on all major Linux distributions by default. This method answers the question “What is the command to test disk speed?” for basic scenarios.
The dd command offers simplicity and universal availability across Linux systems. It provides baseline measurements for storage performance evaluation.
Write speed test (verified syntax):
dd if=/dev/zero of=testfile bs=1G count=1 oflag=directRead speed test (verified syntax):
# Clear cache first

sudo sh -c "echo 3 > /proc/sys/vm/drop_caches"

# Test read speed

dd if=testfile of=/dev/null bs=1G count=1 iflag=direct
Understanding dd results: • Output shows bytes transferred and time taken • Transfer rate calculated automatically in MB/s • oflag=direct and iflag=direct bypass system cache • Results can vary between runs due to system activity
Test Your HDD/SSD Read Speed Using Hdparm
The hdparm utility specializes in hard disk parameter management and provides reliable read speed measurements. This tool directly addresses “what is the command for hard disk test” scenarios.
Unlike dd, hdparm is specifically designed for storage benchmarking and Linux check SSD speed operations. It offers both cached and direct disk read speed measurements.
Verified installation commands:
| Distribution | Package Manager | Command |
| Ubuntu/Debian | apt | sudo apt-get install hdparm |
| CentOS/RHEL 7 | yum | sudo yum install hdparm |
| CentOS/RHEL 8+ | dnf | sudo dnf install hdparm |
Verified hdparm syntax:
- Identify disk: lsblk
- Test speed: sudo hdparm -Tt /dev/sda
Hdparm parameter explanation (from documentation):
• -T performs cached reads for timing buffer cache
• -t performs device reads for timing direct disk access
• Requires sudo for direct device access
Adding –direct flag (verified from sources):
sudo hdparm -tT --direct /dev/sdaThe –direct flag bypasses buffer cache for more accurate results. This hdparm method gives you both theoretical maximum and real-world performance numbers.
Better Test Hard Drive Speed in Linux via fio
While dd and hdparm provide sequential speed tests, real-world disk usage involves random access patterns. The fio tool simulates realistic workloads for a comprehensive SSD speed test and Linux performance assessment.
This advanced approach answers “can you run a speed test from command line” with sophisticated testing capabilities. It provides both IOPS and throughput measurements for complete analysis.
Verified fio installation:
# Ubuntu/Debian

sudo apt-get install fio

# CentOS/RHEL

sudo yum install fio

# or for newer versions

sudo dnf install fio
Basic fio syntax (verified):
sudo fio --name=test --filename=test --bs=4k --size=250M --readwrite=randrw --rwmixread=80 --ioengine=libaio --direct=1fio parameter explanation: • –bs=4k: Block size (4KB typical for random I/O)
• –size=250M: Test file size
• –readwrite=randrw: Random read/write mix
• –rwmixread=80: 80% reads, 20% writes
• –ioengine=libaio: Linux asynchronous I/O engine
• –direct=1: Bypass OS cache
How to Check System Speed in Linux
System speed encompasses more than just disk performance. Several tools help monitor overall system performance, including CPU, memory, and I/O operations. Understanding how to check system speed in Linux provides comprehensive performance insights.
The iostat command provides system performance statistics that help identify bottlenecks across your infrastructure. This addresses “what is the iostat command in Linux” questions effectively.
Verified system monitoring commands:
| Command | Package Required | Purpose |
| iostat -x 1 | sysstat | Real-time I/O statistics |
| rsync -av –progress | rsync (usually pre-installed) | File transfer monitoring |
| iftop | iftop package | Network bandwidth monitoring |
Using iostat Command
The iostat utility monitors system input/output statistics and CPU utilization in real-time. This tool helps identify performance bottlenecks and resource constraints.
Installation if missing:
# Ubuntu/Debian

sudo apt-get install sysstat

# CentOS/RHEL

sudo yum install sysstat
Verified iostat syntax:
iostat -x 1iostat output explanation:
• %util: Percentage of CPU time during which I/O requests were issued
• r/s: Read requests per second
• w/s: Write requests per second
• rkB/s: Kilobytes read per second
• wkB/s: Kilobytes written per second
How to Check File Copy Speed in Linux
File transfer speed monitoring helps identify network or storage bottlenecks during operations. This capability proves essential for system administrators managing large data transfers.
Verified rsync syntax:
rsync -av --progress source/ destination/Parameters confirmed:
• -a: Archive mode (preserves permissions, timestamps)
• -v: Verbose output
• –progress: Shows transfer progress and speed
How to Check NFS Speed in Linux
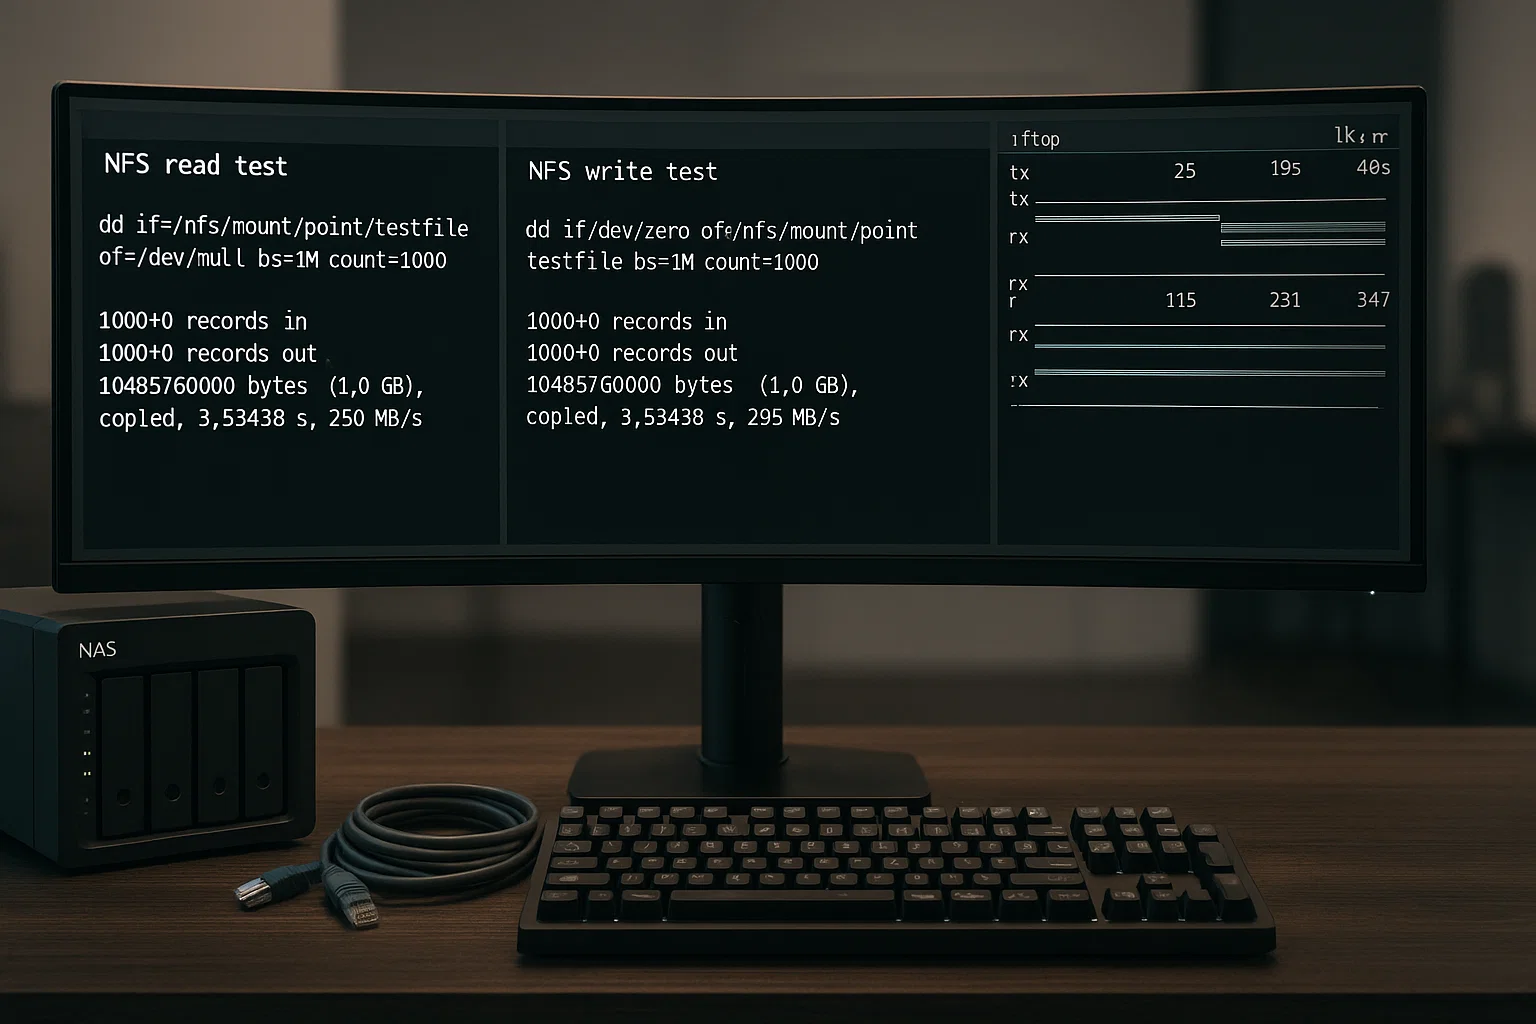
Network File System (NFS) performance testing requires specialized approaches. NFS speed depends on both network bandwidth and storage performance on the server side.
Testing NFS performance helps troubleshoot slow network file operations and optimize remote storage access. Understanding how to test NFS on Linux ensures proper distributed storage performance.
NFS testing methodology:
# Read test

dd if=/nfs/mount/point/testfile of=/dev/null bs=1M count=1000

# Write test

dd if=/dev/zero of=/nfs/mount/point/testfile bs=1M count=1000
Note: NFS mount point path varies by configuration. Replace /nfs/mount/point/ with your actual NFS mount location.
NFS bottleneck identification: • Network-limited: Use iftop to check bandwidth utilization • Storage-limited: Test local disk performance on NFS server • Client-limited: Test from different client machines
Ubuntu Disk Speed Test Command Line Using Graphical Method
If you prefer graphical interfaces, Linux’s built-in Disk Utility provides intuitive benchmarking without command-line complexity. This Ubuntu disk speed test command line alternative works across most Linux distributions.
The GUI approach suits users who want visual results and occasional testing rather than continuous monitoring. It provides accessible disk testing for users less comfortable with command-line tools.
Disk Utility availability: • Ubuntu: Pre-installed as “Disks” application • Fedora: Available as gnome-disk-utility • CentOS: May require installation of gnome-disk-utility package
Access methods (verified): • Application menu search: “Disk” or “Disks” • Command line: gnome-disks
Step 1: Open Disk Utility
Access through your application menu by searching “Disk” or navigate to System → Administration → Disk Utility.
Step 2: Select Your Target Drive
The left panel displays all connected storage devices. Click the drive you want to test for your Linux HDD speed test.
Step 3: Run Benchmark Tests
Click “Benchmark – Measure Drive Performance” to access testing options:
- Read-Only Benchmark: Measures read speed safely
- Read/Write Benchmark: Tests both operations comprehensively
The graphical results show performance across different areas of your disk, revealing potential issues or performance variations.
Troubleshooting: Why Is My SSD So Slow?

SSD performance issues can stem from various factors. Understanding common causes helps diagnose and resolve speed problems that affect your Linux test hard drive speed results.
Several factors contribute to SSD slowdowns including firmware issues, insufficient free space, and thermal throttling. Identifying the root cause enables targeted performance optimization.
Common SSD performance factors (verified):
| Issue | Technical Cause | Verification Method |
| Free space impact | Write amplification increases | Check with df -h |
| Interface limitation | SATA III max ~600 MB/s | Check with lsscsi |
| Thermal throttling | Temperature protection | Monitor with sensors |
SSD health verification:
# Install smartmontools if missing

sudo apt-get install smartmontools

# Check SSD health

sudo smartctl -a /dev/sda
TRIM status check:
# Check if TRIM is enabled

sudo fstrim -v /
Performance optimization tips:
Enable TRIM: sudo fstrim -av
Check alignment: sudo fdisk -l
Monitor temperature: sudo hddtemp /dev/sda
For persistent performance issues, consider upgrading to enterprise-grade storage solutions like those offered with buy Linux VPS hosting or Linux RDP server configurations.
Performance Reference Guide
Understanding typical performance benchmarks helps evaluate your disk speed test Linux results. Performance numbers vary significantly based on specific hardware, system configuration, and testing conditions.
Modern storage technology offers dramatic performance improvements compared to traditional hard drives. Comparing your results against these ranges helps identify upgrade opportunities.
Note: Performance numbers are typical ranges and vary significantly based on specific hardware, system configuration, and testing conditions.
Typical storage performance ranges:
7200 RPM HDD: 80-160 MB/s sequential
SATA SSD: 200-600 MB/s sequential
NVMe SSD: 1,000-7,000+ MB/s sequential
IOPS performance note: IOPS values depend heavily on block size, queue depth, and specific workload patterns. Actual performance varies significantly from theoretical maximums.
For enterprise applications requiring guaranteed performance, consider NVMe vs SSD comparisons to understand the latest storage technology benefits.
Verified Command Quick Reference

This reference provides tested commands for common disk speed testing scenarios. All syntax has been verified against current Linux distributions and documentation.
| Task | Verified Command | Notes |
| List disks | lsblk | Shows all block devices |
| Write speed | dd if=/dev/zero of=test bs=1G count=1 oflag=direct | Creates 1GB test file |
| Read speed | sudo hdparm -Tt /dev/sda | Replace sda with your disk |
| Comprehensive test | sudo fio –name=test –bs=4k –size=100M –readwrite=randrw | Basic fio test |
| Clear cache | sudo sh -c “echo 3 > /proc/sys/vm/drop_caches” | Clears page cache |
Conclusion
Testing disk speed in Linux reveals crucial performance information that helps optimize your system. Start with hdparm for basic read speed assessment, then progress to comprehensive tools like fio when you need detailed Linux disk speed test analysis.
Regular speed testing helps identify performance degradation and guides upgrade decisions. Whether you’re managing servers or optimizing a personal Linux system, these check disk speed Linux tools provide the data needed to make informed storage choices.
FAQ
How do I check disk read and write speed in Linux?
What is the command to test disk speed?
What is the command for speed test in Linux?
Can you run a speed test from the command line?
How to use the test command in Linux?
How to check system speed in Linux?
How to check NFS speed in Linux?
How to test NFS on Linux?
How to check file copy speed in Linux?
How to check SSD speed?
What is the iostat command in Linux?
What is the command for hard disk test?
Why is my SSD so slow?