Want to start coding in Python but not quite ready to abandon your Windows 10? Why not keep both and see where things go from there? While Python is most commonly associated with Linux distros and the open-source paradigm, nothing is preventing you from writing powerful Python apps in Windows. Of course, you should ask yourself if Python on Windows is a good choice for you. There is a lot of debate on that question, so I have devoted a section to whether it makes sense to install Python on Windows 10.
Now, if you have chosen to go ahead and install Python on Windows 10, you have to start with installing it, and that’s what this tutorial is about. The first section is a very short overview of Python and its two main versions — feel free to skip that if you know your way around. Now, without further ado, here’s how to install Python on Windows 10.
Overview
Python is one of the hottest programming languages these days and that can’t be just chalked up to luck. Python is high-level and modular, enabling coders to develop complicated software with ease and good readability. Python is also vastly versatile, being used for different tasks, from web apps to robotics and from Big Data analysis to video games.
Python is basically offered in two series of versions: the Python 2 series and the Python 3 series. While it may seem strange that an earlier version is still in use after years, there are reasons behind the ongoing existence of Python 2. Among the most important is that the code used in configuration management in DevOps has an older syntax and needs the older interpreters to run it. Python 3 has become increasingly popular over the last few years, however, and is now the industry standard. Unless you’re aiming to develop code for some older devices or specific DevOps tasks, we recommend installing and using the Python 3 series.
Step 1: Downloading Python
The very first step is downloading the Python installer from the official website. Since Python is open source and free, you won’t have to pay any fees. Click here to go to the download page for Python’s Windows releases.

As you can see in the screenshot, there are two types of installers for every version, a 32-bit (x86) installer and a 64-bit (x86-64) one. Choosing the correct executable depends on your system. If you’re using a 64-bit architecture and 64-bit Windows, a 64-bit or x86-64 executable installer is what you need to download. Otherwise, download the 32-bit or x86 executable. For this tutorial, we’re going to use Python 3.9.1 for 64-bit processors as an example. Like most installers, this setup file is only about 30 MBs, so it won’t take much time to download. Once done, run the setup file and move to the Installation part, below.
Installation
Step 2: Starting the Setup
Run the executable installer you just downloaded. Remember that to successfully install Python, you need to have admin privileges on your Windows. That’s because the installer will make changes to some system files that normal users don’t have permission to edit. Once the setup starts, you will be greeted by the following screen, giving you several choices: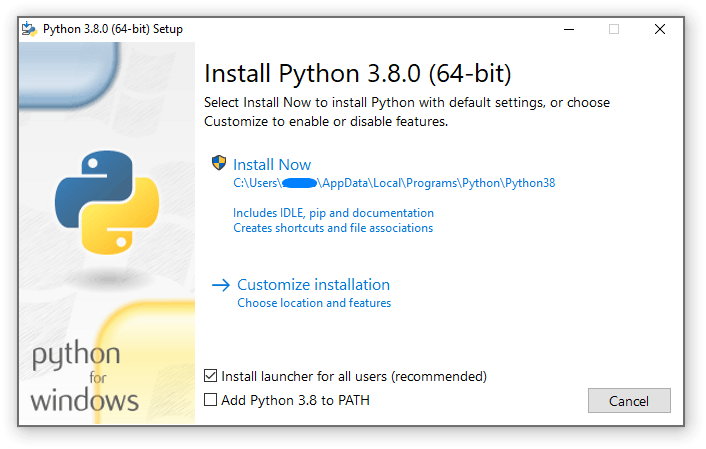
[IMPORTANT NOTE. USE IMAGE EDITOR TO BLOT OUT USERNAME “INDERJIT SINGH” BEFORE PUBLISHING]
There is the “Install Now” option, which is a quick and painless way to get the installation out of the way without confusing configurations. Your other option is to take the reins of the installation and get the precise features you want. There are also two checkboxes toward the bottom of the screen: one lets you install the Python launcher for all user accounts on your system and the other adds this Python version (3.9 in our example) to your PATH. Since this is going to be your first installation, you should probably leave both checked. Once you know what PATH means and what virtual environments are, you will have the know-how to make any necessary changes to these settings.
At this stage, you should probably opt for the express setup and get things done more quickly (in which case you can just skip the next section) but we are going to cover the custom installation in case you decide to have more control over the installation.
Want a better way to host your websites and web apps? Developing something new? Simply don’t like Windows? That’s why we have Linux VPS. Linux Hosting Simplified
Step 3: Custom Installation
Click on “Customize installation” to set up the advanced options; once you do, you’ll see something like this:
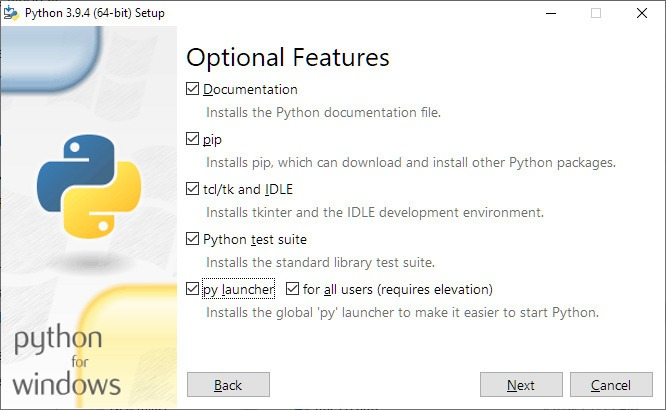
Basically, this screen is a list of checkboxes, each of them a feature you can add to or remove from your final Python installation. The “Documentation” contains some elementary documentation on the Python version of your choice as well as some help files. “pip” is Python’s package manager and a cornerstone of any coding you will do in the future, so make sure to select it for installation. Next on the list is tkinter and Python’s IDLE, which supposedly stands for Integrated Development and Learning Environment. IDLE is python’s native IDE and it’s a good enough tool for beginners, so it’s a good idea to install it as well. You can always get better, more advanced IDEs as you go along. The Python Test Suite is a set of test tools that are vital for testing your code for errors. Although you may not need to start automated testing for your early coding experiences, it’s much better to install it and learn from it step by step.
The final option is one that we saw before but, before that, there is an interesting feature to select: the “Py launcher.” Py Launcher is a great tool for quickly changing between different versions of Python, which will become necessary down the line. Some codes need to run on the Python 2 series, while some must run on the newer Python 3 series and there are always small differences between versions so being able to set different versions as the default Python interpreter will prove very useful. Back to the final feature, the one that lets you install Python for all user accounts: we already saw it on the main screen and, again, it’s recommended that you keep it marked for installation. Now, let’s click Next and proceed to the next stage.
Advanced Options
After choosing all the features you want and clicking Next, you’ll be directed to this screen:
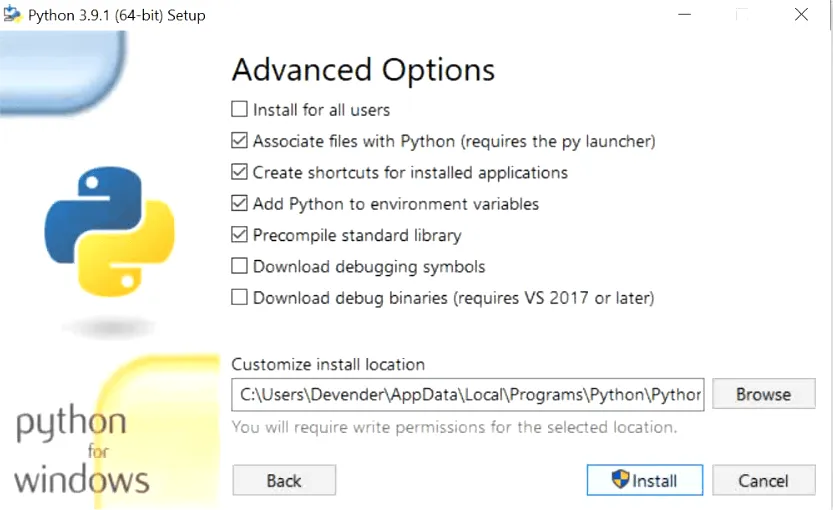
Here you can configure the advanced options of your Python installation. The first checkbox is pretty familiar by now, so let’s just select it and pretend we haven’t done that two times already. The next one on the list is “Associate files with Python,” which means your Windows will recognize files with .py extensions and try to open them using Python — pretty useful.
It’s better to select the next one about shortcuts as well because when you’re just starting out, keeping track of where the executables are can be a bit hard. Make sure you select the next one and add Python to environment variables right here and now, which will make things a lot easier later on. If you decide to precompile the standard library, the installation will take a little longer but your code will run much faster. You can leave the final two checkboxes unmarked as they won’t be important to you as a beginner. The Advanced Options screen also allows you to choose the installation location, so if you want to install it somewhere specific or more at hand, now’s your chance. A good idea would be to install everything in a directory just after C, for example, C:\Python 3.9.1\ for this version.
Step 4: Finalizing the Installation
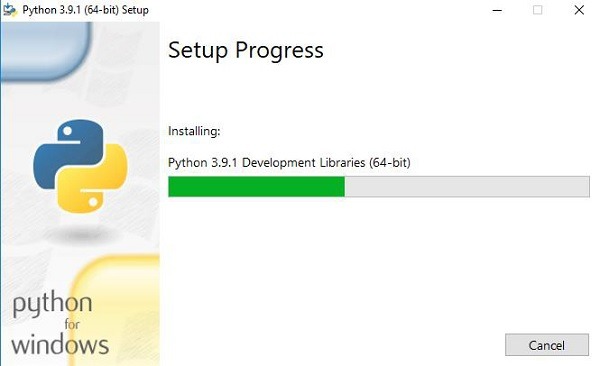
Whether you chose the express or custom installation, you’ve managed to take the setup to the next stage — copying the files. This won’t take long at all and, soon you’ll see the following screen, signaling the end of the installation:
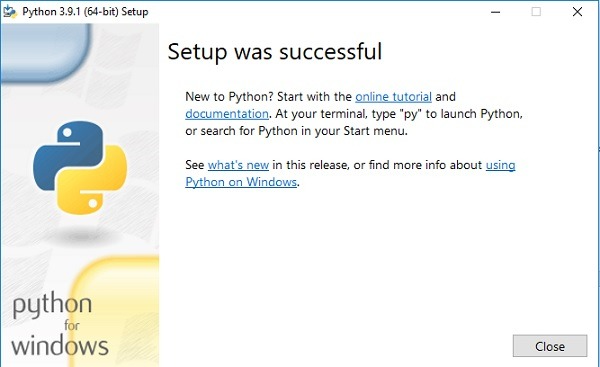
Well done, you’ve managed to install Python on Windows 10. Before getting too excited, however, let’s check if the installation has been actually successful.
Step 5: Verifying the Installation
To verify your installation, you need to run Microsoft’s Command Prompt either from the Start menu or by entering cmd into the “Run” box. Once at the command prompt, enter the following code:
python --version
This is a command asking the default Python to tell us what version it is. Since the Python you just installed should be the only one on your computer, this should return the number for the version you installed. If all goes well, you should see something like this:
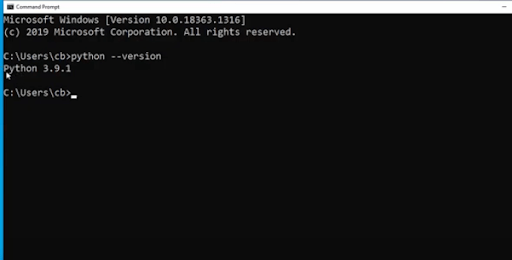
Okay, it seems your installation was a success after all. Good job! But how do you actually get started with Python? While you probably know this, we’re gonna show you how to open Python’s IDLE so you can feel like you’ve really accomplished something. If you already know how to do that and what you’re going to do, feel free to skip the rest of the tutorial and get coding.
Getting Started with Python on Linux
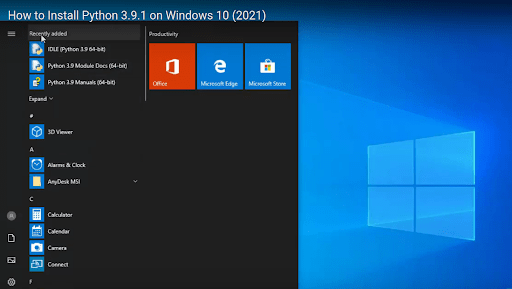
If you take a look at your Start menu, you’ll see the recently added Python shortcuts. Let’s click IDLE and see what we’re dealing with:
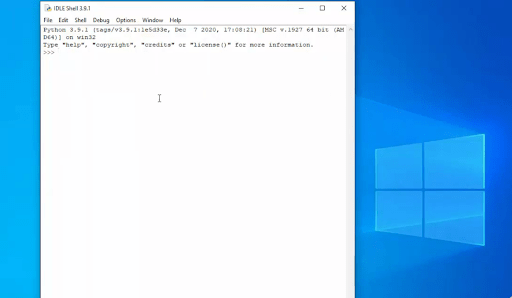
This is Python’s native Integrated Development Environment, an interactive coding platform together with the interpreter. You can enter Python commands and see the reaction immediately after pressing <Enter>. Let’s try printing something. Enter the following code snippet:
print(“Hello”)
That should get Python’s IDLE to print out Hello on the next line:
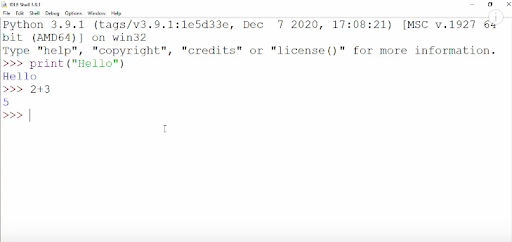
You can also enter an equation directly and have Python give you the answer. But IDLE’s shell may not be exactly the best place to code more than one-liners. You should create a new file and go from there.
Also Read: How To Install Python On A VPS Server?
Does it Make Sense to Install Python on Windows 10?
If you’ve spent some time Googled installing Python on Windows, you’ve probably seen the debates on whether Python performs as well on Windows as it does on Linux. Of course, part of the answers are due to the eternal Windows vs Linux wars. But what is actually at stake when we are talking about Python functionality? And should you install Python on Windows 10?
The fact is that Python is more naturally integrated with Linux. That means it comes pre-installed when you get Linux and it’s very easy to configure everything you need right from the Terminal. With Windows, however, Python is more of a jumble: there is a GUI that is not actually useful, some functionality is handled via the Command Prompt (the command-line interface in Windows), while most of the configurations need to be run using a compatibility layer software called WSL (Windows Subsystem for Linux).
Want a better way to host your websites and web apps? Developing something new? Simply don’t like Windows? That’s why we have Linux VPS. Linux Hosting Simplified
Aside from the development environment coming in pieces, Python in Windows is limited in the modules it can use, especially if you are going to use Python to develop web apps. Even Microsoft admits as much on their Docs website. Most web apps are hosted on Linux-based servers, and having a common development and testing environment is more straightforward.
The Microsoft Doc also mentions another important reason why Linux is the better foundation for Python: most of the tutorials, examples, and codes online are created assuming the reader is using Python in Linux. Some of the compatibility issues can be solved by using WSL but for some modules (like the popular PyGame), WSL is not the answer.
So, if you’re starting out with Python and are learning, Windows is not a good choice. It’s actually worse if you’ve learned enough to need to use virtual environments and version control. The only time it makes sense to install Python on Windows 10 is when you have to develop a Windows-based app. But what if you can’t just commit to installing a whole new OS and turning your computer into a dual-booting nightmare? Should you run a Linux distro in a Virtual Machine on your Windows?
Using a VM is actually a sound idea, but only if your system can actually handle it. Virtualization takes up a lot of resources and it’s not like every computer has those kinds of resources in the first place, let alone being able to part with them.
So, what to do if you need to install Python on Windows 10 but none of these options work for you? I recommend getting a Virtual Private Server (a VPS). A VPS is like a VM running on a remote server, only you don’t have to worry about your own computer slowing down or the hefty price tag that comes with dedicated servers.
At Cloudzy, we offer reliable, high-performance Linux VPS hosting at affordable prices, and with 15+ global servers and a 1 Gbps bandwidth, it won’t feel any different than a VM running on your own computer. Linux VPS also features a 1-click install option that lets you set up almost any Linux distro at the click of a button. You can try out different distros and find one that works for you — a great asset if you’re new to Linux.
Want a better way to host your websites and web apps? Developing something new? Simply don’t like Windows? That’s why we have Linux VPS. Linux Hosting Simplified
What Next?
So, let’s say you’ve installed Python on Windows — what now? You probably have some idea already. Maybe you are attending a class on Python programming or are teaching yourself with books and online resources. Here are some things we think may help improve your Python experience, however:
- Install pip
If you chose the express installation, you might have ended up without pip. You can check if it’s been installed by entering the following into the command prompt:
pip help
- Install Visual Studio Code
An exceptional tool for improving your productivity and creativity by providing valuable linting and debugging tools.
- Install Git
A great way of keeping track of your code and the changes you make is to use Git for version control. You can also use it to share your code on GitHub, GitLab or self-hosted DevOps tools and get feedback or support — maybe even a collaboration.
FAQ
Do I have to Install Python on Linux for full functionality?
Not really. Since Python is an OS-independent, high-level language, you can expect the same functionality across all platforms. When it comes to extra libraries and integrated functions, it’s a different story. Read on to see how you can maximize Python functionality on Windows.
Is it hard to set up virtual environments in Windows?
Yes, it’s harder than in Linux. There are some extra steps to go through and it’s not exactly as easy as entering a command into a terminal. Of course, there are ways to go about it.
