Most people think Windows and Linux are two separate worlds until they discover Windows Subsystem for Linux. I thought the same thing until I spent three years switching between virtual machines and dual-boot setups just to run basic Linux commands. Bash for Windows eliminates the complexity of traditional solutions by bringing Linux functionality directly to your Windows environment.
Bash, originally built for Linux, is an interpreter that processes shell commands. In simpler words, a shell takes your typed commands and tells your operating system what to do with them. This Linux Bash shell functionality becomes invaluable when you need access to Linux tools and workflows.
With PowerShell already built into Windows, you might wonder why anyone would want to install Linux Bash on Windows 10 or Windows 11. Here’s what I learned after years of development work: when you need Linux on Windows 10, the workarounds are more frustrating than helpful.
Developers used to rely on virtual machines, Cygwin, and PuTTY to get Linux functionality on Windows. These solutions worked, but they came with their own headaches.
 Windows 10 VPS Hosting
Get yourself an efficient Windows 10 VPS for remote desktop, at the cheapest price out there. FREE Windows 10 running on NVMe SSD storage and high-speed internet.
Check Out Windows 10 VPS PlansWhat Happens When You Install Bash on Windows 10?
Here’s the thing: when you install Linux on Windows 10, you’re essentially getting a real Linux environment running directly alongside your Windows system. In simpler words, all those emulator headaches disappear, and you can finally run Linux commands without the usual performance penalties.
However, this kernel difference does create some real limitations. WSL 1 (the original version) had to translate Linux system calls into Windows system calls, which caused noticeable performance overhead. WSL 2 solved most of these issues by including an actual Linux kernel in a lightweight virtual machine, but you’re still not getting bare metal Linux performance.
The most significant impacts I’ve encountered involve hardware access and kernel modules. You can’t load custom kernel modules without compiling your own WSL kernel, and direct hardware access through /dev devices is limited. Tools like mounting ISO files as block devices or using hardware-specific drivers won’t work because the kernel module system operates differently than native Linux.
What’s more, this Linux terminal for Windows setup eliminates the usual compromises I used to make when working with open-source tools on Windows. No more switching between systems mid-project or dealing with compatibility headaches.
Note: Bash is only installable on 64-bit systems, and it is incompatible with 32-bit versions of Windows. This limitation exists because WSL was architected specifically to run 64-bit Linux binaries (ELF64 format). The underlying Windows kernel components that enable WSL rely on x64-only instructions and mechanisms for performance and stability. Since modern hardware overwhelmingly supports 64-bit architecture, Microsoft focused their development efforts exclusively on this platform.
Windows version requirements:
- Windows 10: Version 2004 (build 19041) or higher required
- Windows 11: All versions supported
Check your version: Press Win+R, type winver, and press Enter.
Install Linux Bash on Windows 10 and Windows 11
Quick answer: Go with Ubuntu. Nearly one in four developers worldwide used Ubuntu in 2024, making it the most popular Linux distribution. It’s beginner-friendly, well-documented, and has the largest community support network.
System requirements: Windows 10 version 2004 (build 19041) or higher, or any version of Windows 11. The how-to-install-Linux-on-Windows-10 process follows the same steps across both systems using the modern installation method.
The process works identically for other distributions like SUSE or Debian, so these steps apply regardless of your choice. Here’s the breakdown:
- Enable Windows Subsystem for Linux
- Download and install your chosen Linux distribution
Step 1: Enable Windows Subsystem for Linux (WSL) feature
Before you can install Linux Bash on Windows, you need to enable Windows Subsystem for Linux. In simpler words, you’re telling Windows it’s okay to run Linux stuff alongside Windows programs.
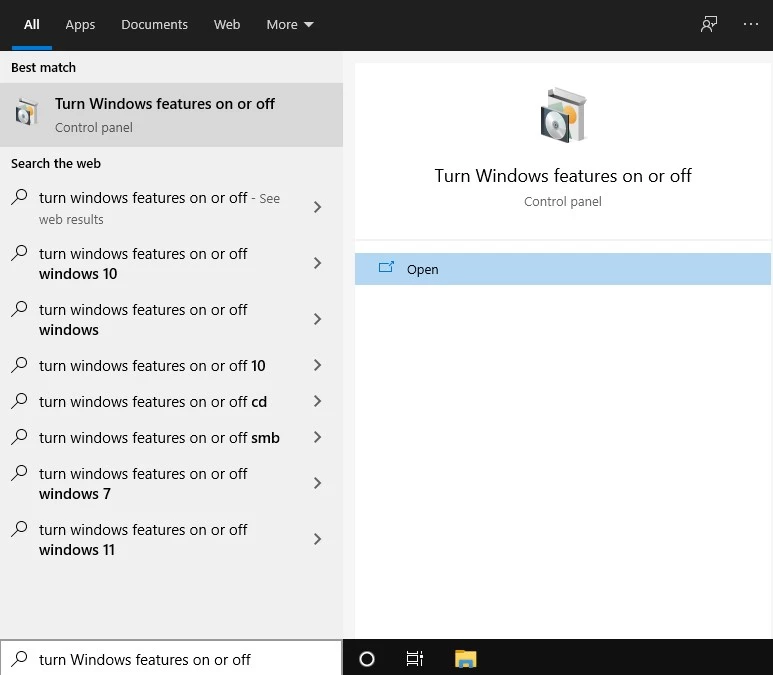
Type “Turn Windows features on or off” in your Windows search box, then click Open. This opens Windows’ optional features management interface, where you can add or remove system components.
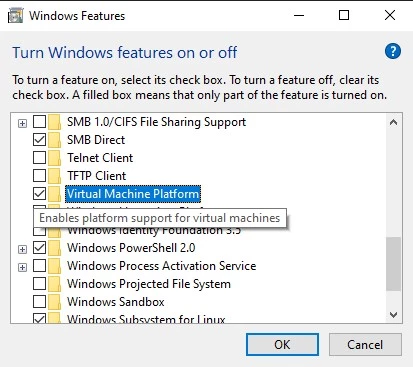
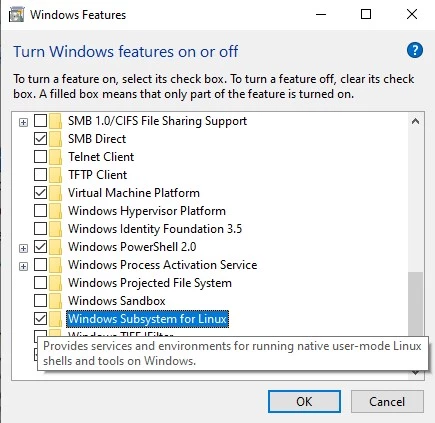
Now check both “Virtual Machine Platform” and “Windows Subsystem for Linux.” These features are essential for everything to work properly. Sometimes they’re unchecked by default, so double-check before moving forward.
If the Windows Features dialog won’t open or you can’t find WSL: You’re probably running an older Windows 10 build. Run winver to check your version—you need build 19041 or higher. For older versions, enable Developer Mode first under Settings > Update & Security > For Developers.
Alternatively, you can use PowerShell if you prefer command-line tools. Search for “Windows PowerShell” and select “Run as Administrator.”
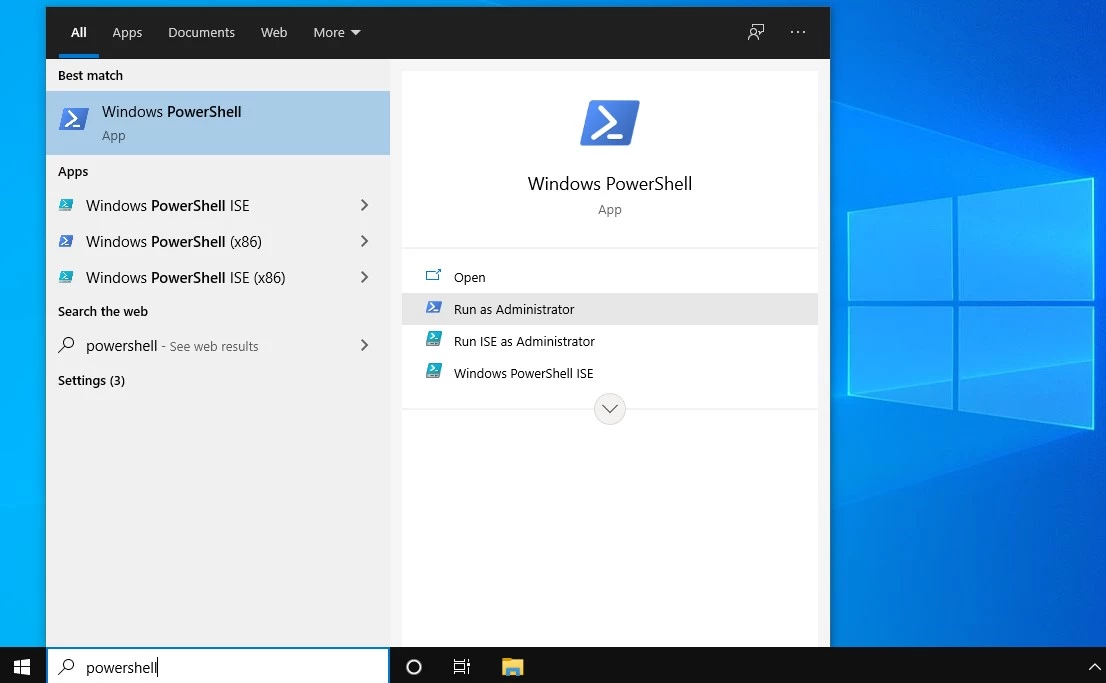
Then run this command:
Enable-WindowsOptionalFeature –Online –FeatureName Microsoft-windows-subsystem-linux


If you get “access denied” errors: Make sure you’re running PowerShell as Administrator. Right-click the PowerShell icon and select “Run as Administrator.”
Wait a few seconds until you see this confirmation window.

Windows will ask you to restart your computer. Type Y and press enter. Your system is now ready for the next step.
Step 2: Download a Linux Distro from Microsoft Store
After your computer restarts, open Microsoft Store and search for Ubuntu. This Linux download for Windows 10 process has been streamlined significantly compared to older methods.
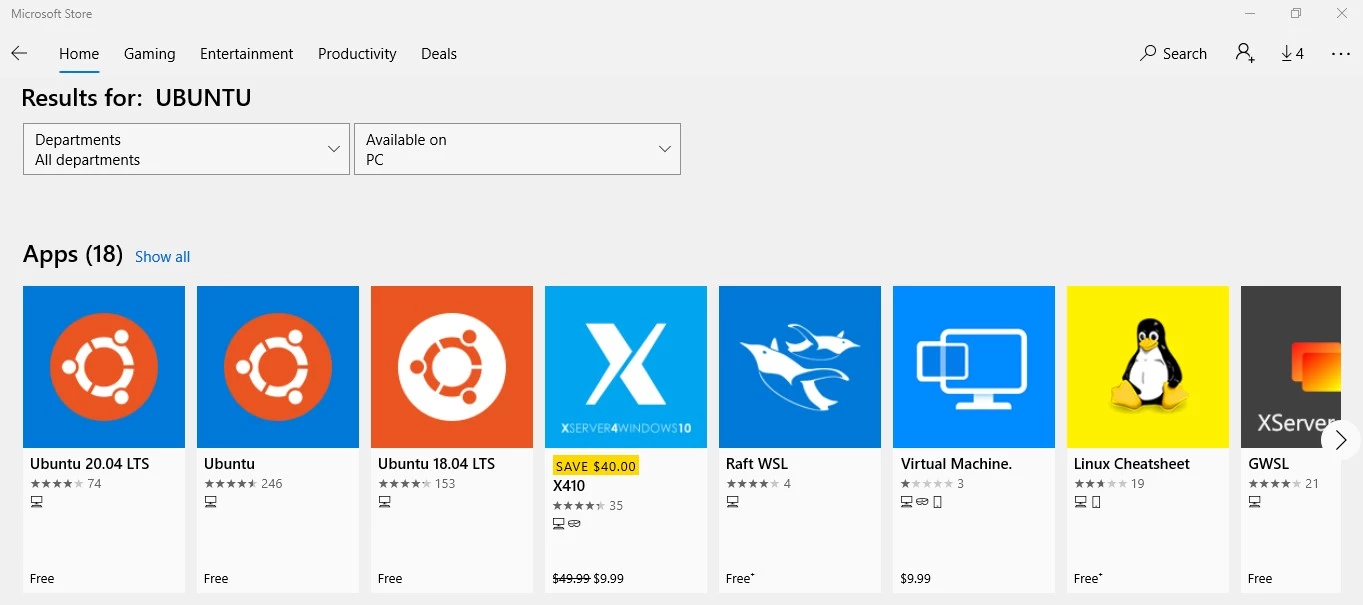
Choose Ubuntu 20.04 LTS (the latest long-term support version) and install it.
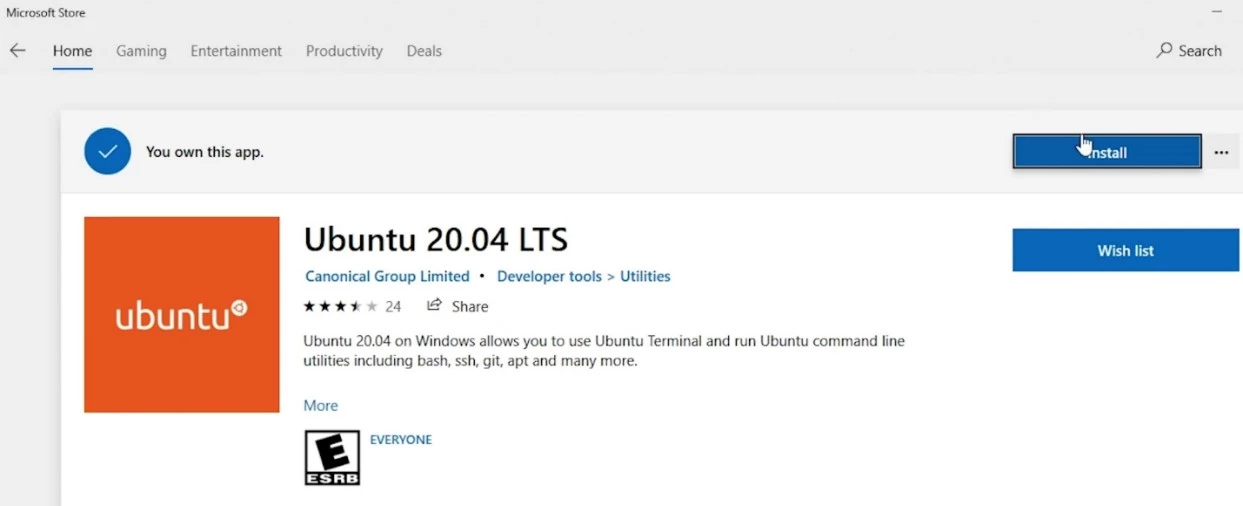
If installation gets stuck or fails: Clear your Microsoft Store cache by pressing Win+R, typing wsreset.exe, and pressing Enter. Wait for the blank window to close, then try installing Ubuntu again.
Here’s a quick tip: if you accidentally close the Microsoft Store page after installation, just search for Ubuntu in your Windows search box and launch it from there.
One important detail: make sure Ubuntu installs to your C drive (the system drive). WSL only runs from the system drive, so this prevents potential issues down the road.

The installation takes a few minutes. What’s happening behind the scenes? Windows is creating a real Linux subsystem that integrates with your existing setup. It’s not a virtual machine—it’s more like having two operating systems sharing the same computer.

Once the terminal opens, you’ll set up your Linux username and password. These don’t have to match your Windows credentials. At this point, you’ve successfully completed the Bash install process.
If you can’t find Ubuntu after installation:Try these options in order:
- Search “Ubuntu” in your Windows Start menu
- Open Command Prompt and type wsl to launch directly
If that doesn’t work, run wsl –install -d Ubuntu in PowerShell as administrator.
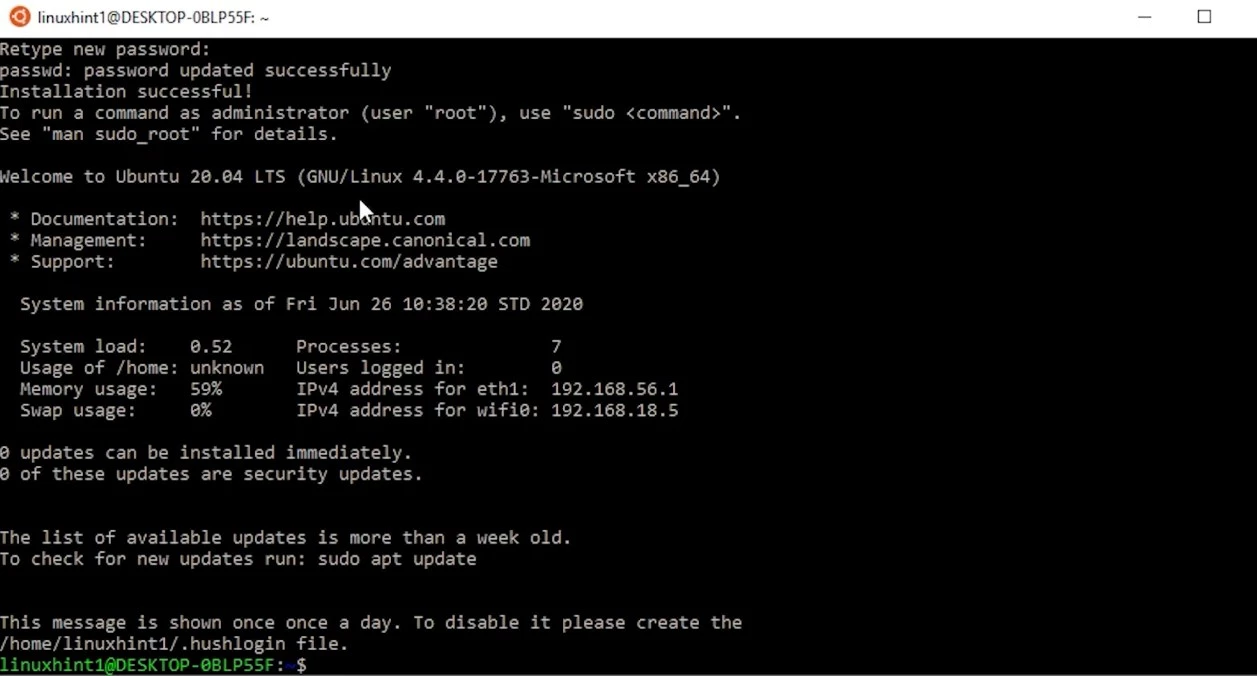
Type clear to clean up the screen, and you’re done. At this point, you have a functional Linux terminal for Windows environment running seamlessly alongside your Windows applications.
Note: As an alternative to opening Bash as a Windows 10 application, you may open Bash on Windows 10 by typing Bash in Windows Command Prompt. Also from there, you may quit Bash and return to Windows mode by typing in the exit. Thus, you know from where and how to run the Linux terminal on Windows.
Step 3: Upgrade to WSL2 and Latest Features
In previous sections, we enabled the Virtual Machine Platform feature. Make sure you completed that step since it’s required for WSL2.
Now open PowerShell as Administrator and run this command to upgrade from WSL1 to WSL2:
wsl –set-default-version 2
The upgrade typically takes 5 to 10 minutes. You can verify the upgrade worked by running:
wsl -l -v
 Need a Remote Desktop?
Reliable, high-performance RDP servers with 99.95 uptime. Take your desktop on the go to all the major cities in the US, Europe, and Asia.
Get an RDP ServerWhat makes WSL2 better: WSL2 uses a real Linux kernel instead of the translation layer from WSL1. This means faster file operations, full system call compatibility, and better performance for Linux command line for Windows integration. The Linux Bash Windows experience becomes significantly more responsive with WSL2.
Recent WSL2 improvements you should know about:
Microsoft has been actively updating WSL2 throughout 2024 and 2025. The Linux kernel jumped from version 5.15 to 6.6, bringing significant performance improvements and better hardware support. You can update to the latest version anytime by running:
wsl –update
Also Read: Introducing the Windows Subsystem for Linux!
New features include automatic memory reclaim (WSL now releases unused memory back to Windows), improved enterprise security integration, and a new GUI settings application that makes configuration much easier than editing config files manually.
For newer systems: Windows 11 users get additional benefits like better graphics support and seamless file system integration. If you’re running Windows 10, you’ll still get the core performance improvements, but some advanced features require Windows 11.
Conclusion
Conclusion
Linux and Windows are naturally different operating systems with their own strengths. PowerShell excels at Windows administration, while Bash gives you access to the broader open-source ecosystem. Having both available on the same machine? That’s genuinely useful.
Microsoft built Windows Subsystem for Linux specifically to bridge this gap. In simpler words, they created a way for Linux tools to run natively on Windows without the usual virtual machine headaches.
What you’ve accomplished by following this guide goes beyond just installing software. You now have access to the same command-line tools that power most web servers and development environments. The setup isn’t perfect—you’re still missing the Linux kernel—but for most development work, it’s close enough to the real thing.
 Windows 10 VPS Hosting
Get yourself an efficient Windows 10 VPS for remote desktop, at the cheapest price out there. FREE Windows 10 running on NVMe SSD storage and high-speed internet.
Check Out Windows 10 VPS PlansUnderstanding how to run Linux on Windows 10 opens up possibilities for cross-platform development that weren’t feasible with traditional virtual machines. Whether you’re building web applications, managing servers, or developing cross-platform software, this Bash terminal for Windows environment provides the tools you need.
If you’re running an older version of Windows 10, remember that you’ll need Developer Mode enabled. And while WSL2 offers better performance than WSL1, the upgrade process is straightforward.
Fair enough, this setup might seem complex if you’re new to command-line tools. But once you start using it, you’ll appreciate having both Windows applications and Linux utilities available simultaneously. If you ever decide you don’t need Linux access anymore, reversing these steps is just as straightforward as the installation.
