Once you access online hosting, you will probably want to know how to host multiple websites on one server. Even though this may seem complicated, as you get to know more about this subject, you will understand that you can do this with some help from technical guides.
Various web servers can provide you with free, open-source, and widely used services worldwide. However, before we explain how to host multiple websites on one server, we should know what a web server is and how it works.
What is a Web Server?
A web server stores and provides content such as text, images, video, and application data for a website. In other words, clients who request these contents can use them with the help of web servers. One of the most typical clients is a web browser program that requests data from your website when a user clicks on a link or downloads a file.
A web server communicates through the Hypertext Transfer Protocol (HTTP) with a web browser. Most web pages’ content is encoded in Hypertext Markup Language (HTML). Contents are static, like text and images, or dynamic, such as a list of items a customer has marked for purchase. Most web servers support server-side-scripting languages to encode business logic into the communication to provide dynamic content. Typically languages like Active Server Pages (ASP), JavaScript, PHP, Python, and Ruby are supported.
How Does a Web Server Work?
Web servers work based on a client-server model. In this standard structure, the client requests a resource or service from the server.
Web servers go through a few steps to process web clients’ requests:
- When a user wants to load content into the website, the web browser requests access (HTTP request) through the internet.
- The web browser searches for the requested website’s IP address. It translates the URL of the web pages using the Domain Name System (DNS) or searching through its cache. This process will help you locate the web server; that is where the site’s files are hosted.
- At this point, the web server receives the HTTP request and processes it through its HTTP server.
- Once its HTTP server accepts the request, it will search through server files to obtain the relevant data.
- The web server returns the site files to the browser that sent a request. After that, the user sees the website content.
However, note that if the HTTP server fails to find or process the requested files, you will see an error message in the web browser. Now that you are familiar with the main concepts of web servers, you can easily learn how to host multiple web servers on one server too.
Host multiple websites on one server: Apache
If you want to host more than one site on a server, you should use Apache’s virtual host files to mention which one of the domains must be used. One of the methods used for resolving site requests is called Name-based virtual hosts. When someone looks at your site, the request will go to the server, determining which site’s files to serve out based on the domain name. This technique will enable you to host multiple sites on one server with the same IP. This guide article will explain how to set up your virtual host file for each of your domains. Before we go to more details, remember that you should log in as a root account.
Also Read: “Linux vs Windows hosting: Which one is better for you?”
Step 1: Create a Directory for Each Site
First install apache2 using this command
For Debian based systems
apt install apache2 -y
For CentOS base system
yum install apache2 -y
You have to make a directory for each site that you will host (within the /var/www folder). Consider domain.com and domain2.com for your domain names.
mkdir -p /var/www/domain.com/public_html
mkdir -p /var/www/domain2.com/public_html
Step 2: Set Folder Permissions
chmod -R 755 /var/www
Step 3: Setting up an Index Page
To see a home page, you should ensure the index.html file is created for each domain. You can set something simple like testing for domain.com in this file.
vim /var/www/domain.com/public_html/index.html
testing for domain.com
Now you must save and quit using Escape button and typing: wq
You can use the command below to repeat all of these steps for your second domain.
vim /var/www/domain2.com/public_html/index.html
Step 4: Copying the Config File for Each Site
You must copy the default configuration file for each site, ensuring that you always have a default copy for future site creation.
cp /etc/apache2/sites-available/000-default.conf /etc/apache2/sites-available/domain.com.conf
cp /etc/apache2/sites-available/000-default.conf /etc/apache2/sites-available/domain2.com.conf
Step 5: Editing the Config File for Each Site
At least you will change and add the highlighted lines within the <VirtualHost *:80> and </VirtualHost> tags.
Note that ServerAlias is the alternative name for your domain; in this case and most, you put www in front of the domain name so others can see the site either by www or non-www (ServerName).
vim /etc/apache2/sites-available/domain.com.conf

Again Quit and Save by using wq. You have to repeat this process for your domain2.com.conf file; be sure to update the ServerName, ServerAlias, and DocumentRoot for your second domain.
Also Read: “Apache vs NGINX”
Step 6: Enable Your Config File
Your server is set to read 000-default.conf file by default. But, in the previous step, we created a new config file for each domain. So, we will need to disable the default file and use one suitable for the new config file.
a2dissite 000-default.conf
You can have your server mapped to your domains by enabling each of your newly made .conf files.
a2ensite domain.com.conf
a2ensite domain2.com.conf
Now, let’s restart Apache to register changes made to it.
systemctl restart apache2
Step 7: Verifying Apache Configurations
After starting Apache, you can see that the configurations are working by editing your /etc/host file on your computer or your domain’s DNS.
After each aspect is set, you can visit your website in a browser to see the index.html pages created in Step 3.
Also read: On-Premises vs. Cloud
Host multiple websites on one server: IIS
We can use an IIS (Internet Information Services) web server for dozens or even hundreds of websites. You can host multiple websites on it, listening and responding on the same TCP port. But, the interface of IIS Manager does display that you can host another website without binding it to some other port like 8080. This section will explain how you can host multiple websites on the same IIS server and bind them to the same port and IP address or even to different IP addresses.
How to install IIS on Windows server?
When you install IIS on Windows, an empty Default Website is created and listens on the standard web HTTP port – TCP 80. In technical terms, our site is bound to the port TCP/80. We must enter the name of the IIS server (“http://web-srv1”) or its IP address (“http://192.168.1.100”) in your browser so that we open this site.
Step 1: Binding IIS Website
A web IIS server running on Windows Server can help you to host multiple websites. But, IIS distributes HTTP requests correctly only if each website has to be identified with a unique value. The IIS website includes three attributes that make up a unique combination for each website. These attributes are listed here:
- a TCP port number
- an IP address
- a host header (hostname)
The info about the hosted websites is stored in the ServerBindings attribute of the IIS Metabase, and its format is like this: IP:Port:Hostname. So, if you want to host multiple websites on one server (same port and IP address), you have to use a unique Host header.
You may wonder, what is a host header? A host header is a part of an HTTP request to the server that specifies which website it is addressed to. Therefore, we must mention this host header on the webserver side. Note that the DNS has the correct record that matches the hostname and the IP address of the IIS web server.
Now let’s assume that you have a website running on the IIS server and listening on port 80. What to do when we want to bind the second website on the same port?
Step 2: Binding the second IIS website
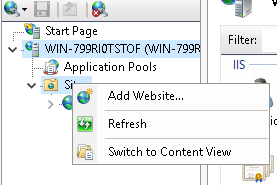
In the Internet Information Service (IIS) Manager, You have to make another website using the Add Website window and call it TestSite; This website will be located in C:\inetpub\TestSite. Pay attention not to specify the hostname yet.
After copy content of site in C:\inetpub\TestSite open Internet Information Service (IIS) Manager, and in hostname of server add site to open wizard for you.
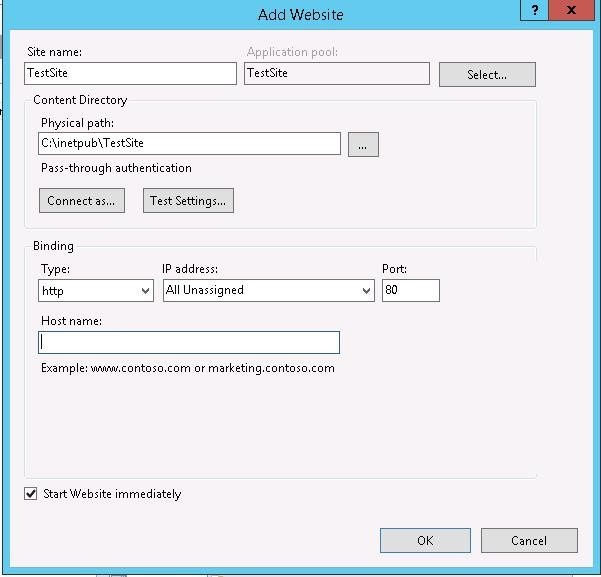
After clicking on Ok, you will see a warning message telling you that you cannot use binding *:80 for both of these websites.


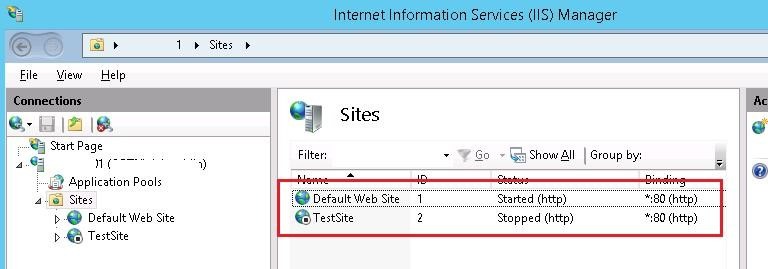
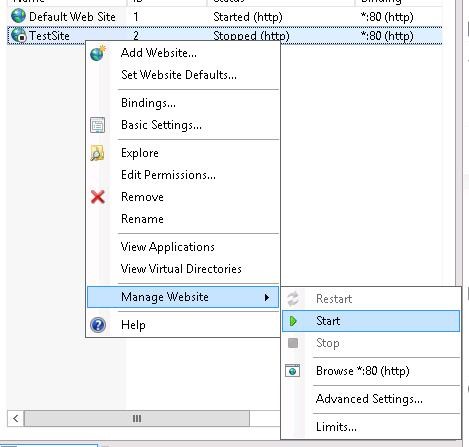
After you agree to this warning, you will have another site bound to port 80. So, you cannot start it without stopping the first website. You can understand this more by paying attention to the following image.
 Windows VPS Hosting
Check out our affordable Windows VPS plans, featuring powerful hardware, minimal latency, and a free Windows of your choice!
Claim your Free WindowsHosting Multiple Websites on IIS server by Host Headers
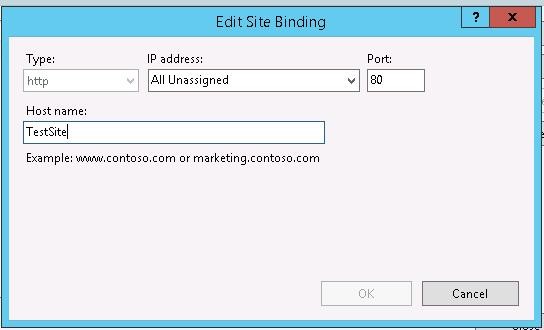
You must choose another name (Host Name) for the second IIS website to create a unique binding. To do this, Right-click TestSite and select Edit Bindings. Select the binding you need and click Edit.
As you can see in the following image, we should specify the unique hostname that the user address. In this tutorial, we use TestSite; so Let’s put it on the Hostname field.
You can use the command prompt to configure the IIS site binding. If you use IIS 7 or newer, you would see something like this after running the command to configure the IIS Site binding:
C:\Windows\System32\inetsrv\appcmd.exe set site /site.name:testsite /+bindings.[protocol='http',bindingInformation='*:80:testsite']
Similar to the first website, you can also start the second one.
At this point, you must add a DNS alias for the server (A or CNAME), referring to your IIS web server’s IP Address or hostname. If you use an Active Directory domain, you need to make DNS records on the domain controller. IIS enables you to create a CNAME record for the name TestSite in the DNS console (dnsmgmt.msc) and set the domain name of your IIS server as FQDN target host.
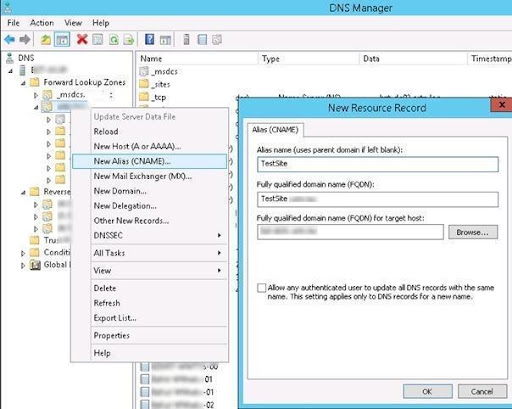
You can also create this DNS record via PowerShell and the following command:
Add-DnsServerResourceRecordCName -HostNameAlias web-srv1.woshub.com -Name testsite -ZoneName woshub.com
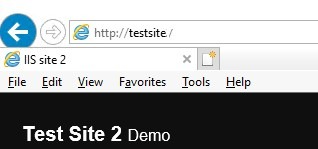
Let’s try to open http://TestSite in the browser. If everything is done correctly, It should open successfully.
 Linux Hosting Simplified
Want a better way to host your websites and web apps? Developing something new? Simply don’t like Windows? That’s why we have Linux VPS.
Get your Linux VPSRunning Multiple Sites with Different IP Addresses on IIS Server
Now let’s talk about running two sites on the IIS webserver with different IP addresses. First, you must add a separate VLAN interface on Windows Server or assign an additional IP address (alias) to the NIC.
In this tutorial, the server has the primary IP address 192.168.13.100, and we will add IP alias 192.168.13.101 to the same network adapter:
Get-NetIPAddress | ft IPAddress, InterfaceAlias, SkipAsSource
New-NetIPAddress –IPAddress 192.168.13.101 –PrefixLength 24 –InterfaceAlias “Ethernet” –SkipAsSource $True
Now you must create an A record for your new site on the DNS server:
Add-DnsServerResourceRecordA -Name NewSite3 -IPv4Address 192.168.13.101 -ZoneName woshub.com -TimeToLive 01:00:00 –CreatePtr
It stays to open the Site Binding settings, binding the site to the additional IP address of your host. You can handle the binding of sites on an IIS server using PowerShell. For this to work, the WebAdministration module is used:
Import-Module WebAdministration
You can see play info about all available IIS sites and their bindings:
Get-IISSite
Or just about a single site:
(Get-Website -Name NewSite).bindings.Collection

Use the following command to change the binding of this site; note that it enables you to change the IP addresses, port, or name:
Set-WebBinding -Name NewSite1 -BindingInformation "192.168.13.101:80:NewSite1" -PropertyName 'Port' -Value '8080'
Set-WebBinding -Name NewSite1 -BindingInformation "192.168.13.101:8080:NewSite1" -PropertyName 'IPAddress' -Value '192.168.13.100'
You can run this command to add a new binding to the particular IIS site:
New-IISSiteBinding -Name NewSite1 -BindingInformation "*:9090:" -Protocol http
Removing a binding is done by the following command:
Remove-IISSiteBinding -Name NewSite1 -BindingInformation "*:9090:"
So, as you have seen here, you can run multiple websites on the IIS web server both on different IP addresses and on the same IP address and TCP port number.
Final thought: Hosting multiple websites on one server
This article mainly focused on the primary concepts of servers, helping you learn how to host multiple websites on a single server. We also deliver multiple Linux VPS hosting solutions, which you can use to run different websites on one server. Cloudzy’s plans reduce the cost of having multiple servers, but we also allow you to use our services to your advantage. Moreover, you can easily upgrade your server’s resources, including RAM, storage, processor, and bandwidth.
FAQ
Can you have multiple websites on a single web server hosting?
If you have a big server with extensive resources like enough HDD space, RAM, and CPU power, you can host multiple websites using virtual hosting. You can host an unlimited number of websites on your webserver.
How can we run two websites on one server?
Hosting multiple websites on a single web server is called Virtual Server. Additionally, You should make sure your selected server has enough resources to deal with the traffic and disc space requirements.
What is a VPS server used for?
VPS is a hosting service that can provide you with dedicated (private) resources on a server. Pay attention to the fact that using VPS is a more secure and stable solution than shared hosting that does not give you a dedicated server space.
Why do people use VPS?
VPS hosting has become a widespread choice because it is generally lower in cost than dedicated hosting while providing better reliability, security, and performance than shared hosting.


