To connect to a Linux VPS, you need to work with SSH keys. This guide
will teach you how to connect to a Linux VPS using SSH keys and also,
how to use PuTTY. Note that in order to use SSH keys, you need OpenSSH
installed on your device and server. The OpenSSH server application is
already installed on all Cloudzy Linux virtual private servers.
How to
Connect to the Linux VPS Using SSH
Ensure you have OpenSSH client installed on your device. You can then
create a secure remote connection to your Linux VPS with the following
instructions:
Step 1: Open the SSH terminal on your computer and
launch the following command:
ssh your_username@host_ip_addressStep 2: Type your password and press
Enter. Note that you won’t get any feedback on the
screen when you type. If you paste your password, ensure it is stored
securely and not in a text file.
Step 3: When you connect to a VPS for the first
time, you’ll be asked if you want to continue connecting. Just type
yes and press Enter. This message
would only appear the first time because the remote server is not
identified on your local computer.
You are now connected to the remote server.
Creating and Using SSH
keys
SSH keys are the secure alternative to connect to a remote server
without a passphrase. It is highly recommended to use this method
instead of using passwords.
The standard procedure for creating a Secure Shell public/private key
pair is as follows.
Step 1: Start
the key generation program
ssh-keygenThe output would be as follows:

Step
2: Enter the path to the file that will hold the key
By default, the file name id_rsa, representing an RSA v2 key, appears
in parentheses. You can select this file by pressing
Enter or type an alternative filename.
Note that the public key ends with .pub, but the private key does not
have this at the end.
Step 3:
Enter a passphrase for using your key
This passphrase is used for encrypting your private key. A null entry
means no passphrase is used, but this entry is discouraged for more
security. However, you can leave it empty if you’re not doing something
significant on your server. Note that the passphrase is not displayed
when you type it in.
Enter passphrase (empty for no passphrase): <Type the passphrase>Step 4:
Re-enter the passphrase to confirm it
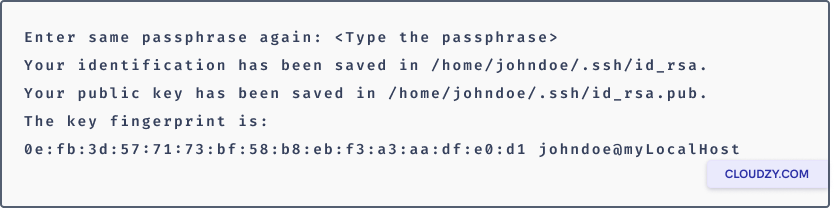
Step 5: Check the
results
The key fingerprint (a colon-separated series of 2-digit hexadecimal
values) is displayed. Check that the path to the key is correct. In the
example, the path is /home/johndoe/.ssh/id_rsa.pub. At this point, you
have created a public/private key pair.
Step 6: Append the
key
Copy the public key and append the key to the
/home/johndoe/.ssh/authorized_keys file in your home directory on the
remote host.
When you create the SSH key, you can add it to your virtual private
servers and connect via SSH without the need to enter the password every
time, and it is much more secure as it can not be cracked easily like
regular passwords.
Connecting to a
Linux VPS from Windows
PuTTY is a popular Windows terminal emulator, but not limited to the
Windows operating systems. Being free and open-source, it’s also popular
with Linux users. It offers a text user interface for remote computers
running any supported protocols, including SSH and Telnet.
Step 1: Download PuTTY
on Windows
If you don’t have PuTTY installed, please visit the Download PuTTY page and download the
Windows installer from the Package Files section of the page.
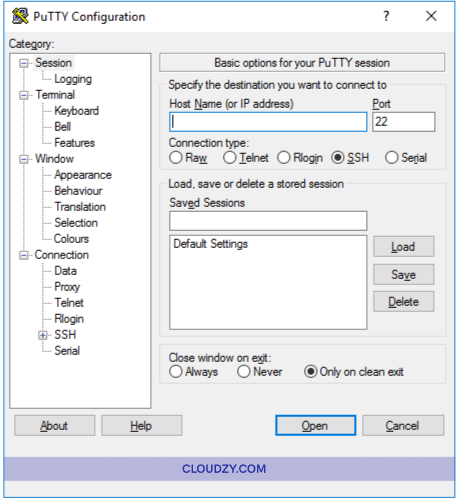
Step 2: Configure
PuTTY
The main session configuration screen will appear when you launch
PuTTY. Begin by entering the server’s IP address you’re
trying to connect to.
The port will be set to 22 by default, as this is the standard port
for SSH on most servers.
Suppose you do not use a private key to connect to your server and do
not want to save your configuration for later use. In that case, you can
click Open to enable an SSH immediate connection to your server that
authenticates it with your instance’s password.
If this is the first time you are connecting to your Linux VPS, PuTTY
will show a Security Warning to inform you that it does
not have a key in the registry for this server. It’s usual for your
first connection.
You will see a new window; if the connection is successful, you will
be asked to enter your password. If you entered it all correctly, you
would now be connected to a shell on your server.
Step 3: Authenticate SSH
Key
PuTTY may also be configured to use SSH keys. SSH keys are safer and
sometimes more convenient methods of authentication.
After generating an SSH key pair and uploading the public key to your
server, you need to click on Auth to display the
authentication options in the sidebar of the main configuration
panel.
Click on Browse at the bottom of the screen next to
the Private key for authentication and pick the saved
PPK SSH key file from your local device.

Click on the Open tab, type the password, and then
connect.
Step 4: Save the
PuTTY Configuration
PuTTY allows you to save the configuration you use to connect to a
server, so you don’t have to type all the information each time. After
filling in all the necessary fields and being ready to connect, ensure
you are on the main session configuration screen described above.
You can see the hostname and port number of your server. Enter the
name of your saved SSH session configuration in the text box under
Saved Sessions and click on Save.
You now have all the information to connect to a Linux VPS. If you
have any questions, feel free to contact us by submitting a
ticket.
Also in Linux / SSH
Related guides.
Need help with something else?
Median response time under 1 hour. Real humans, not bots.