Navigating the complexities of web hosting can often lead to the
underutilization of server resources, especially when managing multiple
websites. This article addresses this challenge by demonstrating how to
host multiple websites on a single server. By leveraging the
capabilities of Apache on Linux systems (Ubuntu and CentOS) and Internet
Information Services (IIS) on Windows, users can maximize their server’s
potential, streamline website management, and significantly reduce
overhead costs. This guide empowers server administrators with
step-by-step instructions to optimize their hosting environment,
ensuring each website operates seamlessly under a consolidated server
setup.
Apache
Configuration for Ubuntu and CentOS
This section guides you through the process of configuring Apache to
host multiple websites on a single server, specifically tailored for
Ubuntu and CentOS systems.
Prerequisites
Update your system’s package database:
Ubuntu/Debian:
sudo apt update
sudo apt upgrade -y
CentOS/RHEL:
sudo yum update -yEnsure you have sudo privileges to perform
administrative tasks.
Step 1: Install
Apache
Ubuntu/Debian:
sudo apt install apache2 -yCentOS/RHEL (The package is named httpd):
sudo yum install httpd -yStep 2: Create
Directories
Create a root directory for each website:
sudo mkdir -p /var/www/domain.com/public_html
sudo mkdir -p /var/www/domain2.com/public_html
Replace domain.com and domain2.com with
your actual domain names.

Step 3: Assign
Permissions
Set the permissions to allow the web server to access the
content:
sudo chown -R $USER:$USER /var/www/domain.com/public_html
sudo chown -R $USER:$USER /var/www/domain2.com/public_html
sudo chmod -R 755 /var/www
Step 4: Create Index
Pages
Create a simple index.html file for each domain:
echo "Welcome to domain.com" | sudo tee /var/www/domain.com/public_html/index.html
echo "Welcome to domain2.com" | sudo tee /var/www/domain2.com/public_html/index.html
Step 5: Configure
Virtual Hosts
Copy the default configuration file and edit it for each domain:
sudo cp /etc/apache2/sites-available/000-default.conf /etc/apache2/sites-available/domain.com.conf
sudo cp /etc/apache2/sites-available/000-default.conf /etc/apache2/sites-available/domain2.com.conf
Edit the virtual host file for domain.com:
sudo nano /etc/apache2/sites-available/domain.com.confInside the file, make the necessary changes:
<VirtualHost *:80>
    ServerAdmin [email protected]
    ServerName domain.com
    ServerAlias www.domain.com
    DocumentRoot /var/www/domain.com/public_html
    ErrorLog ${APACHE_LOG_DIR}/error.log
    CustomLog ${APACHE_LOG_DIR}/access.log combined
</VirtualHost>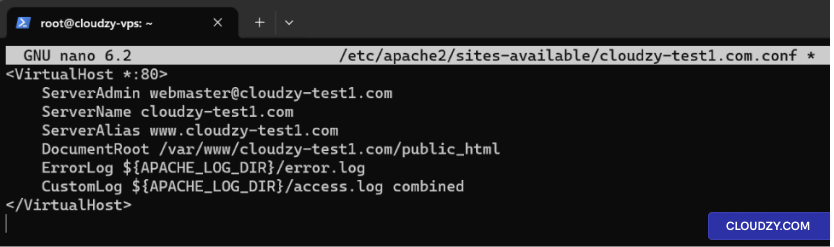
Repeat the process for domain2.com.
Step 6: Enable Sites
Enable the new sites and disable the default site:
sudo a2ensite domain.com.conf
sudo a2ensite domain2.com.conf
sudo a2dissite 000-default.conf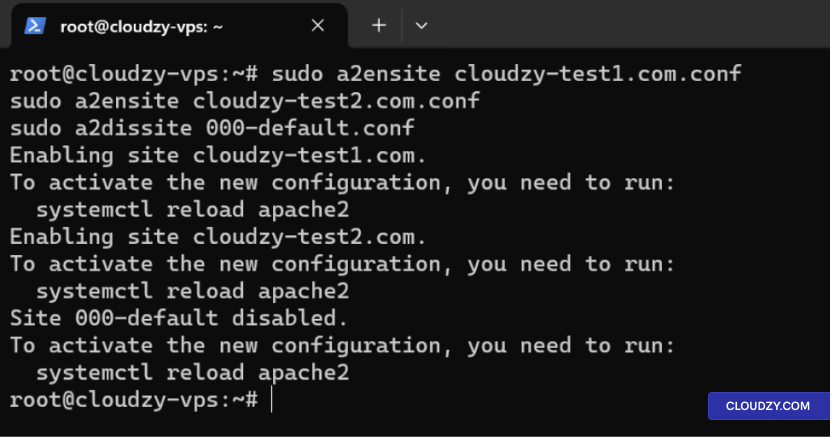
Step 7: Restart
Apache
Restart Apache to apply the changes:
Ubuntu/Debian:
sudo systemctl restart apache2CentOS/RHEL:
sudo systemctl restart httpdStep 8: Edit
Hosts File and Test Websites
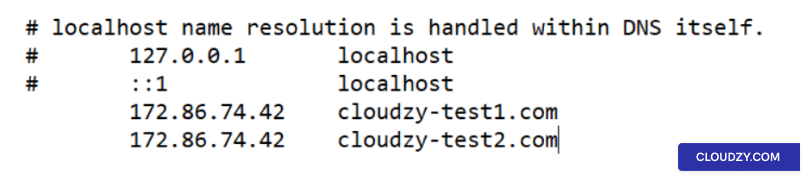
Edit Hosts File:
- Open the hosts file with a text editor:
sudo nano /etc/hosts- Add entries for your domains pointing to the server’s IP address,
for example:
192.168.1.10 domain.com
192.168.1.10 domain2.com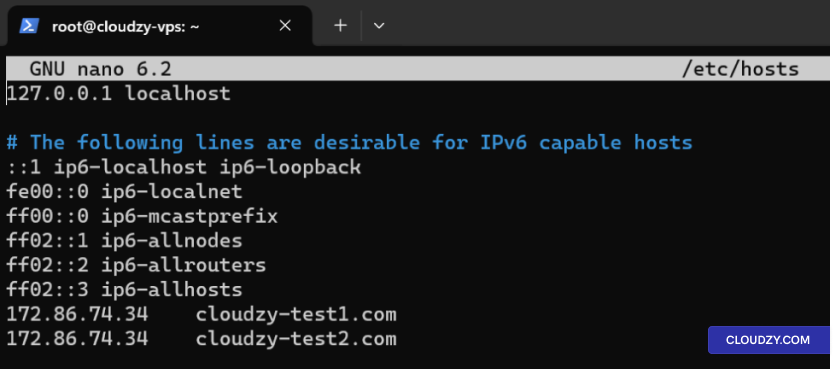
- Save and close the file.
Alternatively Update DNS A Records:
If you have registered domains, update the A records in your DNS
settings to point to your server’s IP address.
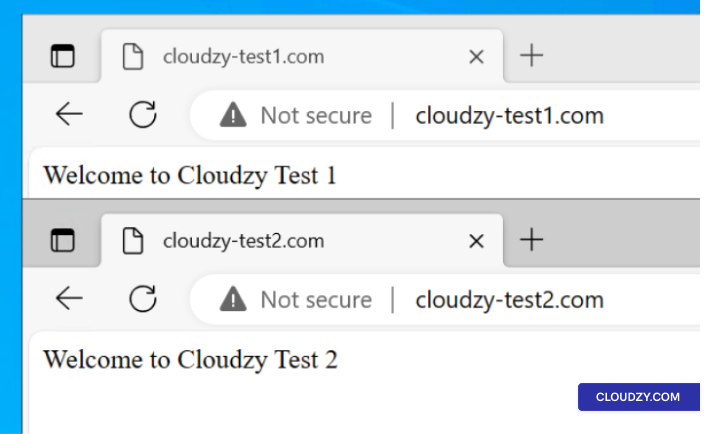
Test Websites with Curl:
Test your websites to ensure they are accessible:
curl http://domain.com
curl http://domain2.com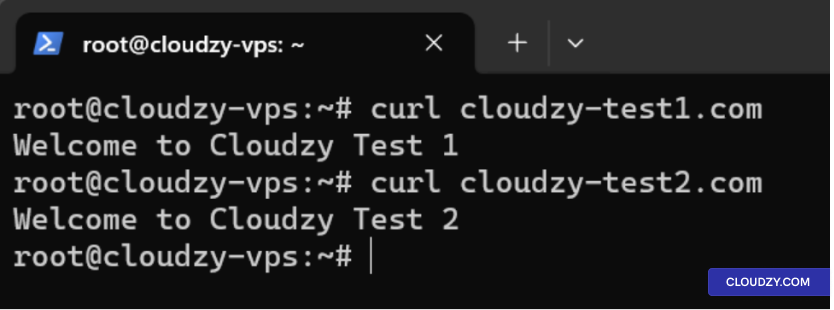
IIS Configuration
for Windows Server
This section provides a comprehensive walkthrough for setting up
multiple websites on a single server using Internet Information Services
(IIS) on Windows Server.
Step
1: Install IIS using Add Roles and Features Wizard
-
Open Server Manager: Click on the Server Manager
icon on the taskbar, or open it from the Start menu. -
Launch Add Roles and Features Wizard: In the
Server Manager dashboard, click on Manage and then
select Add Roles and Features. -
Role-Based or Feature-Based Installation: Choose
Role-based or feature-based installation and click on
Next.
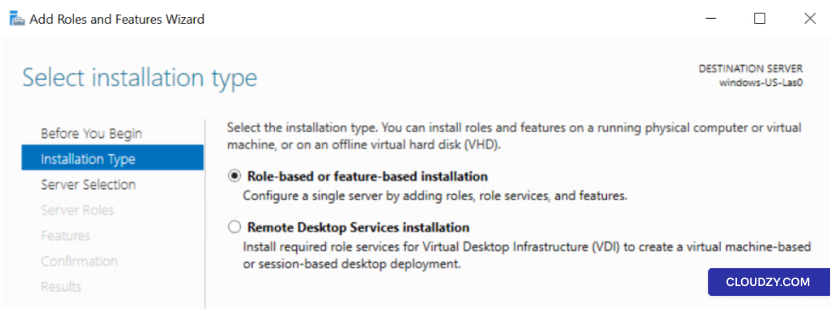
-
Select Server: Choose the server on which you
want to install IIS and click on Next. -
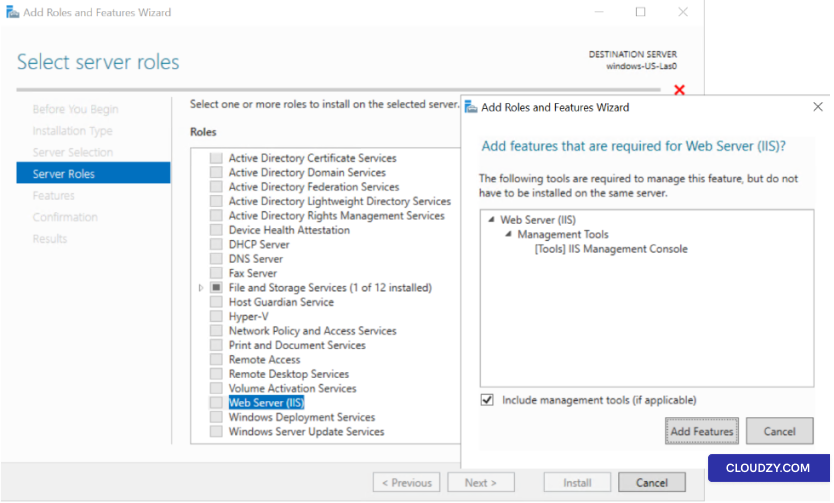
Add Roles: In the Roles section, check the box
forWeb Server (IIS). When prompted to add features that
are required for Web Server (IIS), click on Add
Features.
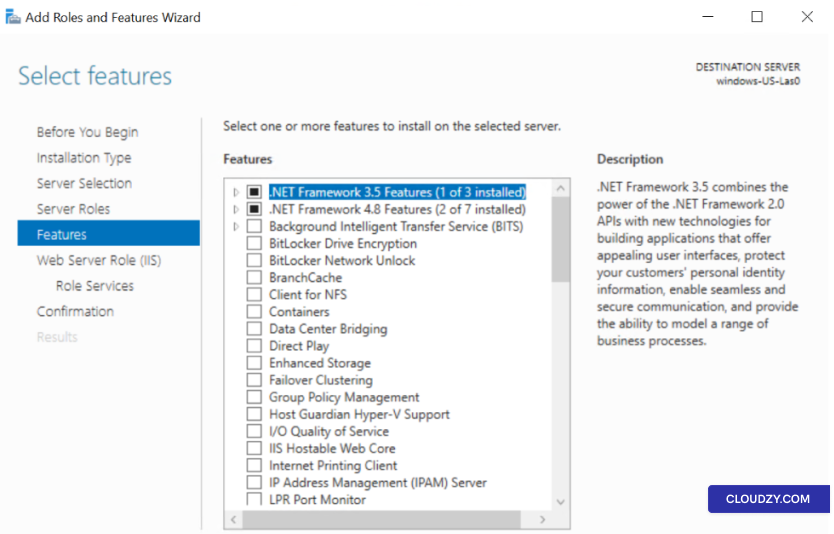
- Features: No additional features are required
unless you have specific needs. Click on Next.
-
Web Server Role (IIS): Review the information
and click on Next. -
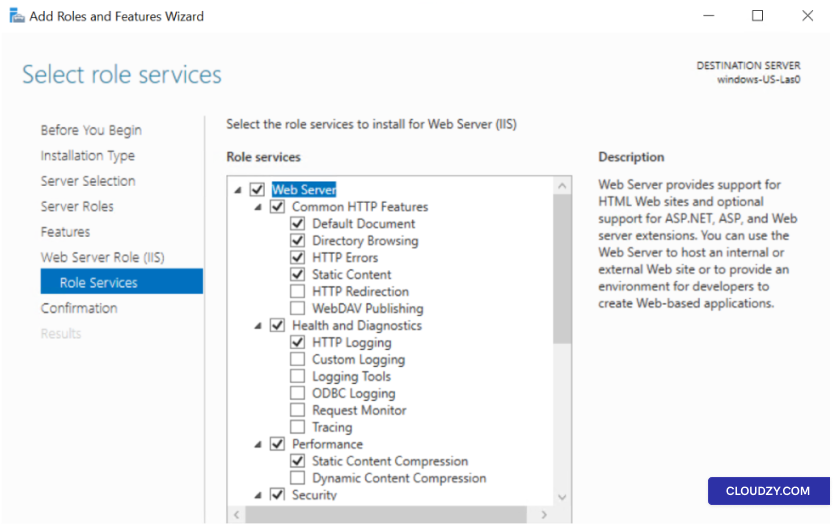
Role Services: Select the IIS role services to
install. For a basic web server, the default selections are typically
sufficient. Click on Next.
-
Confirmation: Review your selections and click
on Install. The installation process will
begin. -
Completion: Once the installation is complete,
click on Close.
Step 2: Add Websites
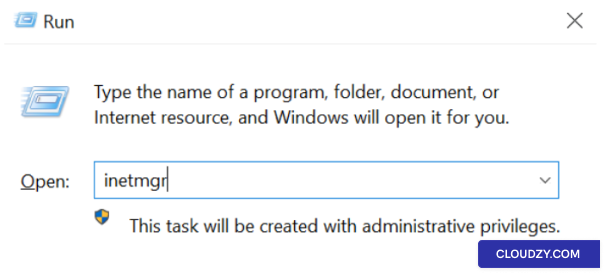
- Open IIS Manager: Press Windows key +
R, type inetmgr, and press
Enter.
-
Create a New Website: Right-click on the
Sites folder in the IIS Manager and select Add
Website. -
Website Details:
-
Site name: Enter a descriptive name.
-
Physical path: Select the folder containing your
website’s files. -
Type: Usually http.
-
IP address: Select an IP or leave as All
Unassigned. -
Port: Typically 80 for
HTTP. -
Host name: Enter the domain name.
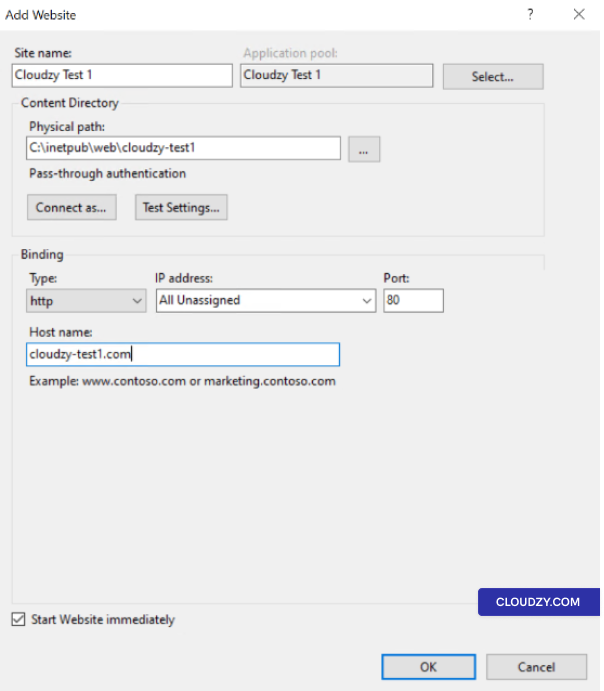
- Repeat for Additional Websites: Follow the same
steps for each website.
Step 3: Configure Host
Headers
-
Select a Website: Click on the website in IIS
Manager. -
Open Bindings: In the Actions
panel, click on Bindings.
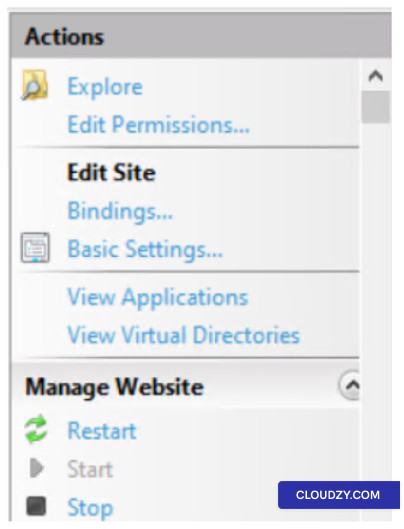
-
Edit or Add Binding: In Site
Bindings, edit an existing binding or click on
Add. -
Specify Host Name: Enter the hostname in the
Host name field.
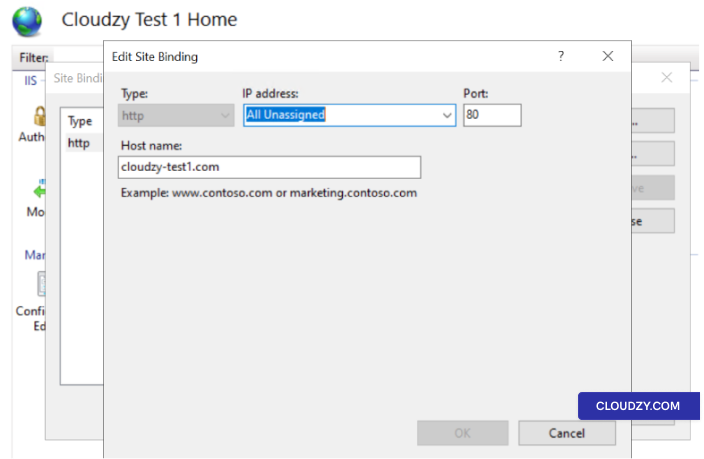
- Repeat for Additional Websites: Follow the same
steps for each website.
Step 4: Manage
DNS and Edit Hosts File
-
Update DNS Records: For your domain names to be
resolved to your IIS server, update the DNS A records to point to the
server’s public IP address. This is necessary if you are using
registered domain names. -
Edit the Hosts File (Optional): If you don’t
have a domain and want to test locally, you can edit the hosts file on
your local machine (not the server). This file is typically located at
**C:*. Add entries for each of your websites pointing to the IP address
of your IIS server. For example:
192.168.1.10 domain.com
192.168.1.10 domain2.com
Replace 192.168.1.10 with the IP address of your
Windows Server. Remember, this change will only make the websites
accessible on the machine where you edit the hosts file.
Step 5: Verify
Websites
Open a web browser and navigate to each domain to ensure that the
websites are being served correctly. If you edited the hosts file, do
this on the machine where you made the edits. You should see the content
of the website if everything is configured properly.
Step 6:
Additional Configurations (Optional)
-
SSL Certificates: If you plan to use HTTPS,
you’ll need to install and configure SSL certificates for each
site. -
Application Pools: Consider creating separate
application pools for each website for better management and
security. -
Security Settings: Review and configure security
settings as per your requirements.
Each website will be accessible via its own domain name, sharing the
same server resources.
In conclusion, hosting multiple websites on a single server using
Apache or IIS is efficient and cost-effective. By following the detailed
steps provided for Ubuntu, CentOS, and Windows Server, you can
streamline web management and optimize server resources, ensuring a
robust online presence. If you have any questions, feel free to contact
us by submitting
a ticket.
Also in Manual Installs
Related guides.
Need help with something else?
Median response time under 1 hour. Real humans, not bots.