Floating IPs are a key feature for Cloudzy VPS users, allowing you to move IP addresses between servers quickly. This helps you keep online services running without interruption. Each Cloudzy account can have up to five Floating IPs, with additional IPs costing $2.5/month each, which are non-refundable.
Important Notes:
-
Floating IPs are non-refundable. Once added to your account, the cost is permanent.
-
Up to five IPs can be assigned simultaneously per account. You can request a maximum of 30 IPs per month.
-
Region restriction: IPs assigned to a specific region cannot be used on VPS instances in other regions.
-
Manual setup required: Floating IPs must be manually configured on your VPS; they will not work automatically.
This guide will walk you through requesting, attaching, and configuring Floating IPs for your VPS on both Linux and Windows.
Prerequisites
Before adding Floating IPs:
-
Active Cloudzy Account: Ensure your account is registered and verified.
-
Running VPS: You must have a Cloudzy VPS to attach the Floating IP to.
-
IP Availability: Check that Floating IPs are available in your VPS region.
-
Networking Knowledge: Be prepared to manually configure network settings on your VPS.
-
No SMTP Traffic: Floating IPs do not support SMTP; use them for other internet services only.
Requesting Floating IPs
-
Log In: Sign in to your Cloudzy account and access the main dashboard.
-
Go to IP Management: Click IP Management from the left-hand menu.
-
Add New Floating IP: Click Add New Floating IP in the IP Management area.
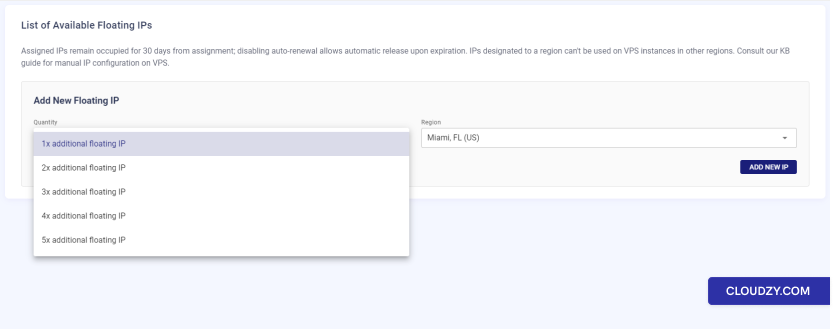
- Choose Quantity and Region: Select how many IPsyou need, from one to five, and pick the region that matches your VPS’s location.
- Click ‘ADD NEW IP’: After choosing, hit the ADD NEW IP button.
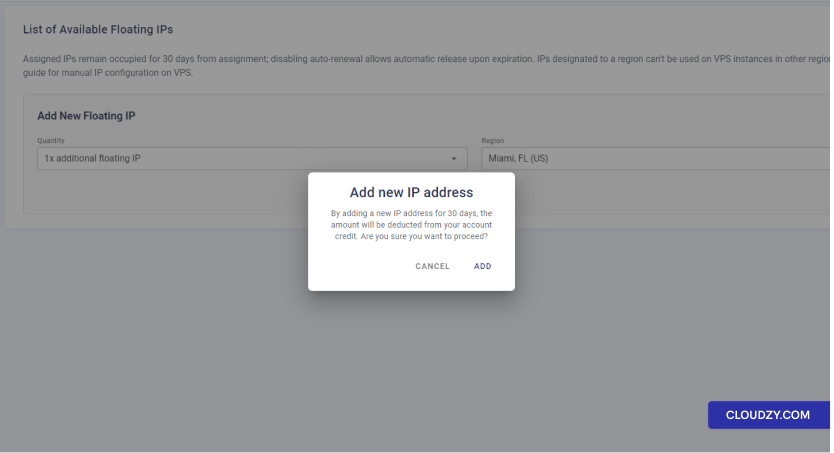
- Confirm Your Order: A box will pop up asking you to confirm. It will notify you about the cost and remind you that the IPs last for 30 days.
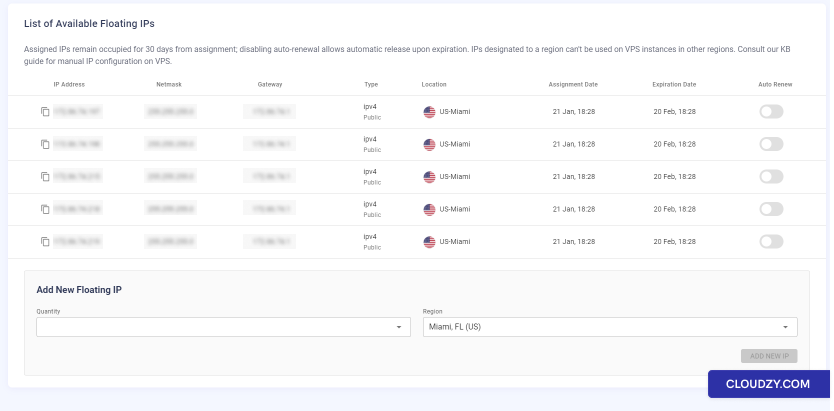
- Check Assigned IPs: Once confirmed, your new IPs will show up in the List of Available Floating IPs section. They’ll have all the details like address, netmask, and gateway.
Remember: Floating IPs are fixed to your account for 30 days, and you must manually configure them on your VPS.
Configuring Floating IPs on Ubuntu VPS
- Connect to your VPS:
- Use SSH in your terminal. Type: ssh
root@your_current_ip - Replace your_current_ip with the VPS’s present
IP.
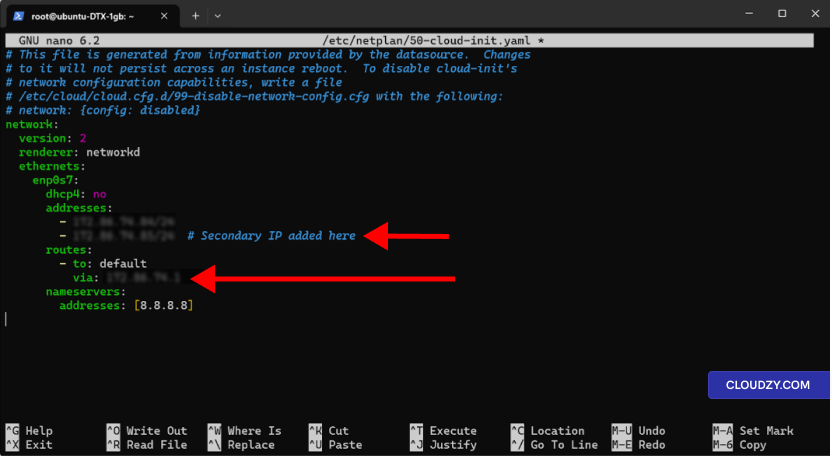
- Edit Netplan Config:
- Open the config file with: sudo nano
/etc/netplan/50-cloud-init.yaml
- Input Static IP (Optional DHCP):
- Using DHCP IP side by side with Floating IP:
Keeping DHCP on means you keep your primary IP.
You can then add Floating IPs manually.
Use this method if your server’s main IP and floating IPs are
in the same subnet with the same gateway. If they’re not, it’s better to
set your IPs manually as described in the next section.
- Making DHCP off and choose Floating IP Your Server’s Primary
Outgoing Address:
When you disable DHCP, you must manually set your IPs. You can make a
floating IP your server’s main outgoing address. Here’s a simple guide
to do that:
Change the Default Gateway:
In the routes part, set the gateway to the one for your floating IP.
It will look like this:
Doing this will make all the data leaving your server go through the
floating IP. It’s important because it decides how your server talks to
other systems on the internet. Make sure this is what you want for your
setup.
- Save the File:
- In nano, save by hitting Ctrl + X, then
Y, and Enter.
- File Permissions:
- Set file permissions with: sudo chmod 600
/etc/netplan/50-cloud-init.yaml
- Apply Changes:
- Update your network settings by typing: sudo netplan
apply - To troubleshoot problems, add –debug to the
command.
- Confirm the IP:
- SSH back to the VPS with the new IP.
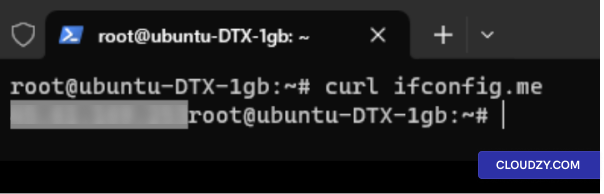
- Check the Outgoing IP:
Run curl ifconfig.me. It should show your floating
IP as the server’s public IP.
If you encounter any issues with network settings, Cloudzy’s VNC
feature allows direct access to your VPS console for
troubleshooting.
Changing the
IP Address for Other Distros
- Open Network Configuration File:
- Use sudo nano /etc/network/interfaces.
- Find Interface Section:
- Look for your interface, like eth0.
- The line might read iface eth0 inet.
- Set Static IP:
- Change to iface eth0 inet static.
- Replace eth0 with your interface.
- Add IP and Netmask:
- Write address 192.0.2.7.
- Then netmask 255.255.255.0.
- Replace with your IP and Netmask.
- Set Gateway (Optional):
- Add gateway 192.0.2.1.
- Replace with your gateway.
- Add Additional IPs:
- Use up ip addr add 203.0.113.5/24 dev
eth0. - To remove, down ip addr del 203.0.113.5/24 dev
eth0. - Change IP and subnet as needed.
- Restart Network:
- Use sudo systemctl restart networking.
- Or ifdown eth0 && ifup eth0 for one
interface.
Note:
- Adjust steps for your distro.
- Backup original file before changes.
Changing the
IP Address on a Windows VPS
- Use RDP:
- Connect to your VPS with Remote Desktop using your current IP.
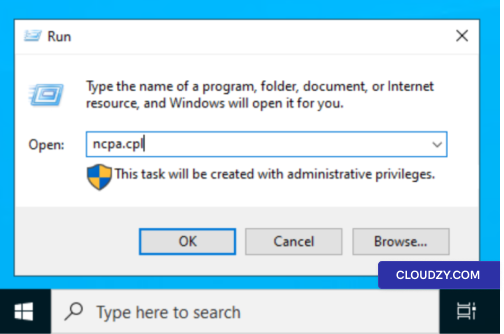
- Open Network Settings:
- On your VPS, open ‘Run’ with Windows Key + R. Type
ncpa.cpl.
- Adapter Properties:
- Right-click the network adapter, usually named
Ethernet. Choose Properties.
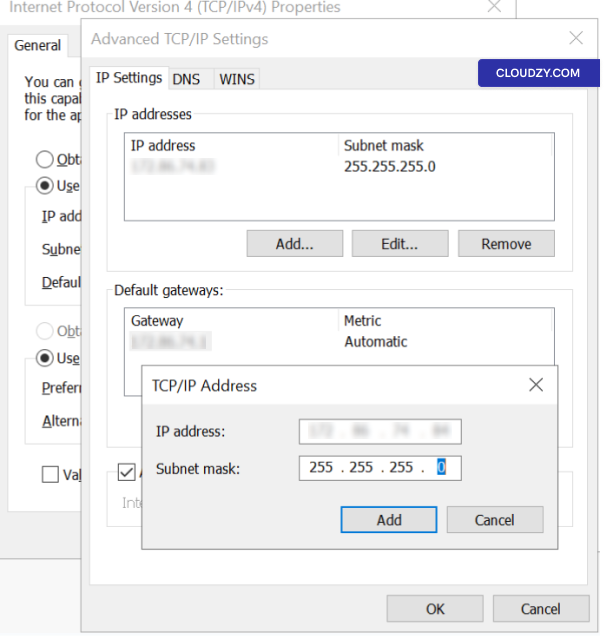
- IPv4 Settings:
- Find Internet Protocol Version 4 (TCP/IPv4).
Double-click it.
- Set New IP:
- Choose Use the following IP address. Enter the
primary or the new IP following with a subnet mask.

- DNS Servers:
- Enter DNS server addresses in their section.
- Add Additional IP (Optional):
- Click on Advanced.
- Under IP addresses, click on
Add. - Enter the additional IP and subnet.
- Click on Add to confirm.
- Reconnect with RDP:
- Hit OK, and the RDP will close. Open RDP again and
use the new IP.
If you lose your connection due to an error, Cloudzy’s VNC lets you
access the VPS console to fix it. You have now successfully assigned
your new Floating IP address to your VPS. If you need any more
information or further assistance, feel free to contact our support team
by submitting a
ticket.
Also in Networking & Firewall
Related guides.
Need help with something else?
Median response time under 1 hour. Real humans, not bots.