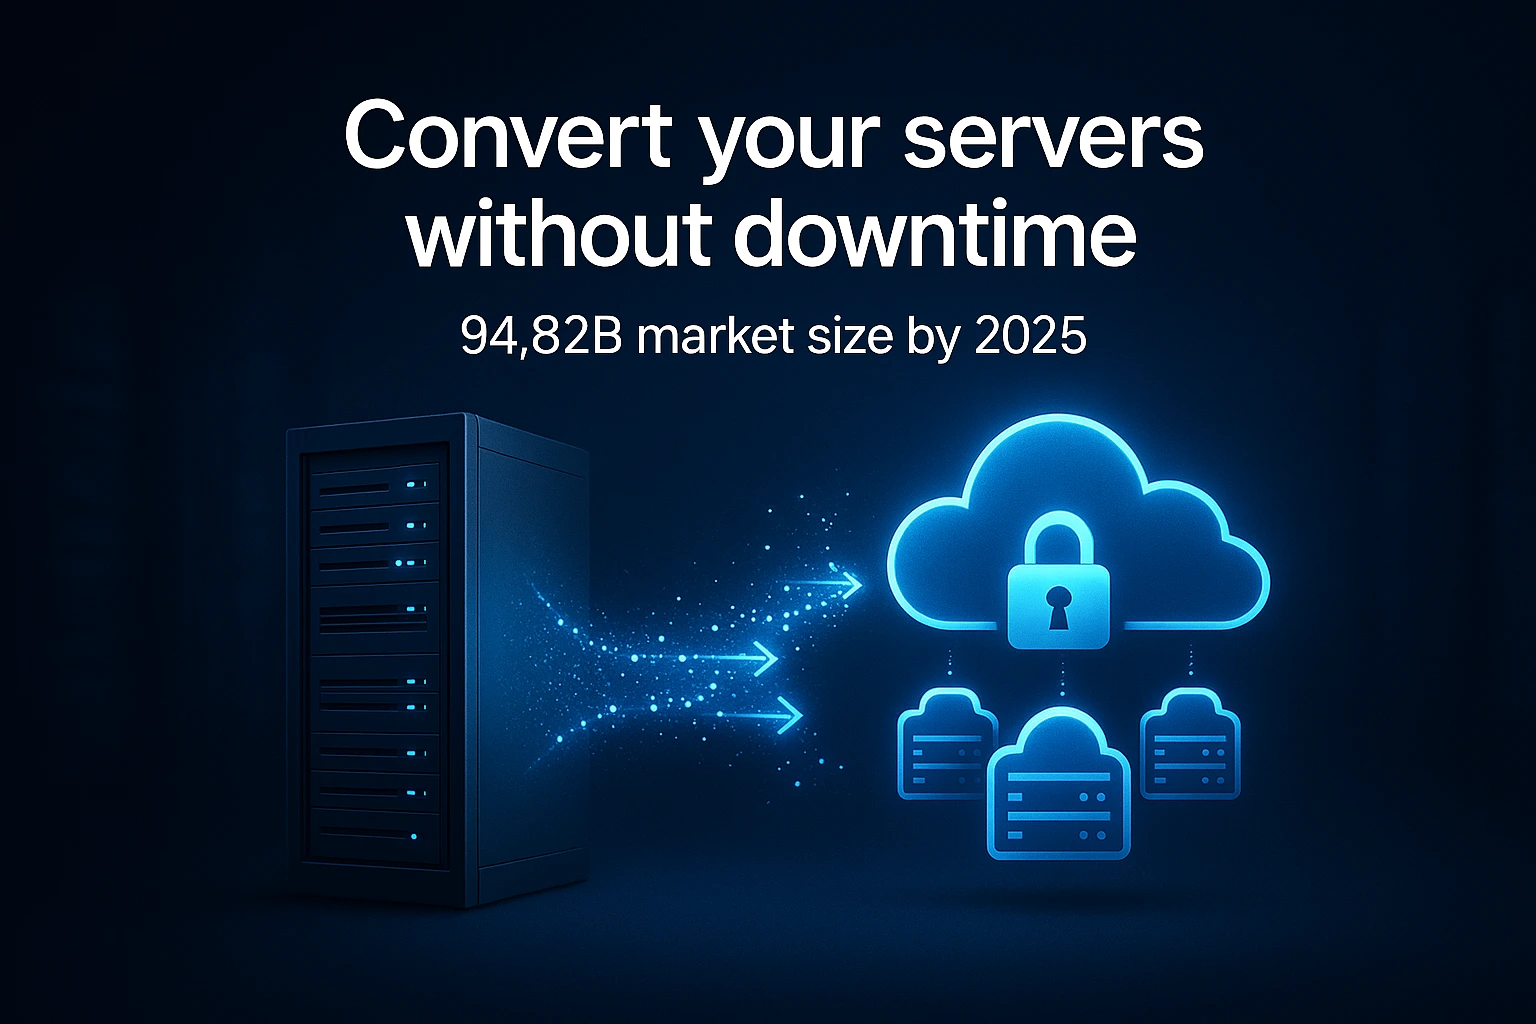
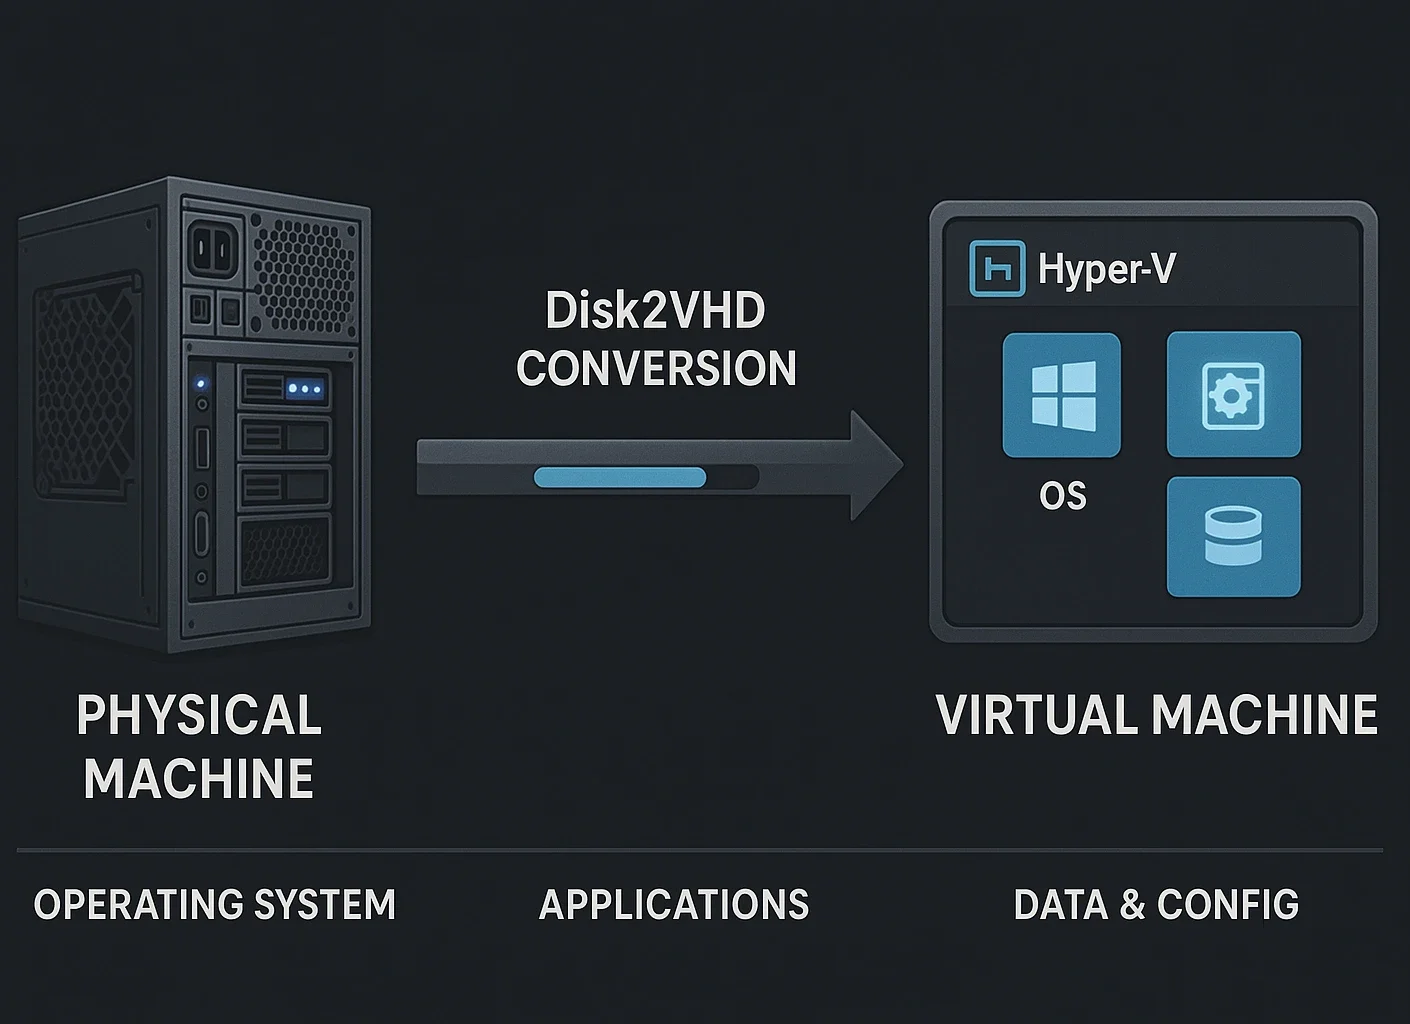
Converting physical machines to virtual machines has become necessary for modern IT infrastructure, and P2V conversion makes this transition possible by migrating your physical system to a virtual environment while preserving applications, configurations, and data. This transformation unlocks the scalability and flexibility that virtualized systems offer.
Disk2VHD, a free Microsoft utility, simplifies the entire process by creating virtual hard disk images from your running system without downtime. This guide walks you through each step, from preparing your system and configuring Disk2VHD to deploying your virtual machine and troubleshooting common issues along the way.
Be it you’re consolidating servers or testing virtualization strategies, this practical approach requires no financial investment or complex deployment procedures, making it accessible for organizations of any size.
Understanding Physical to Virtual (P2V) Conversion
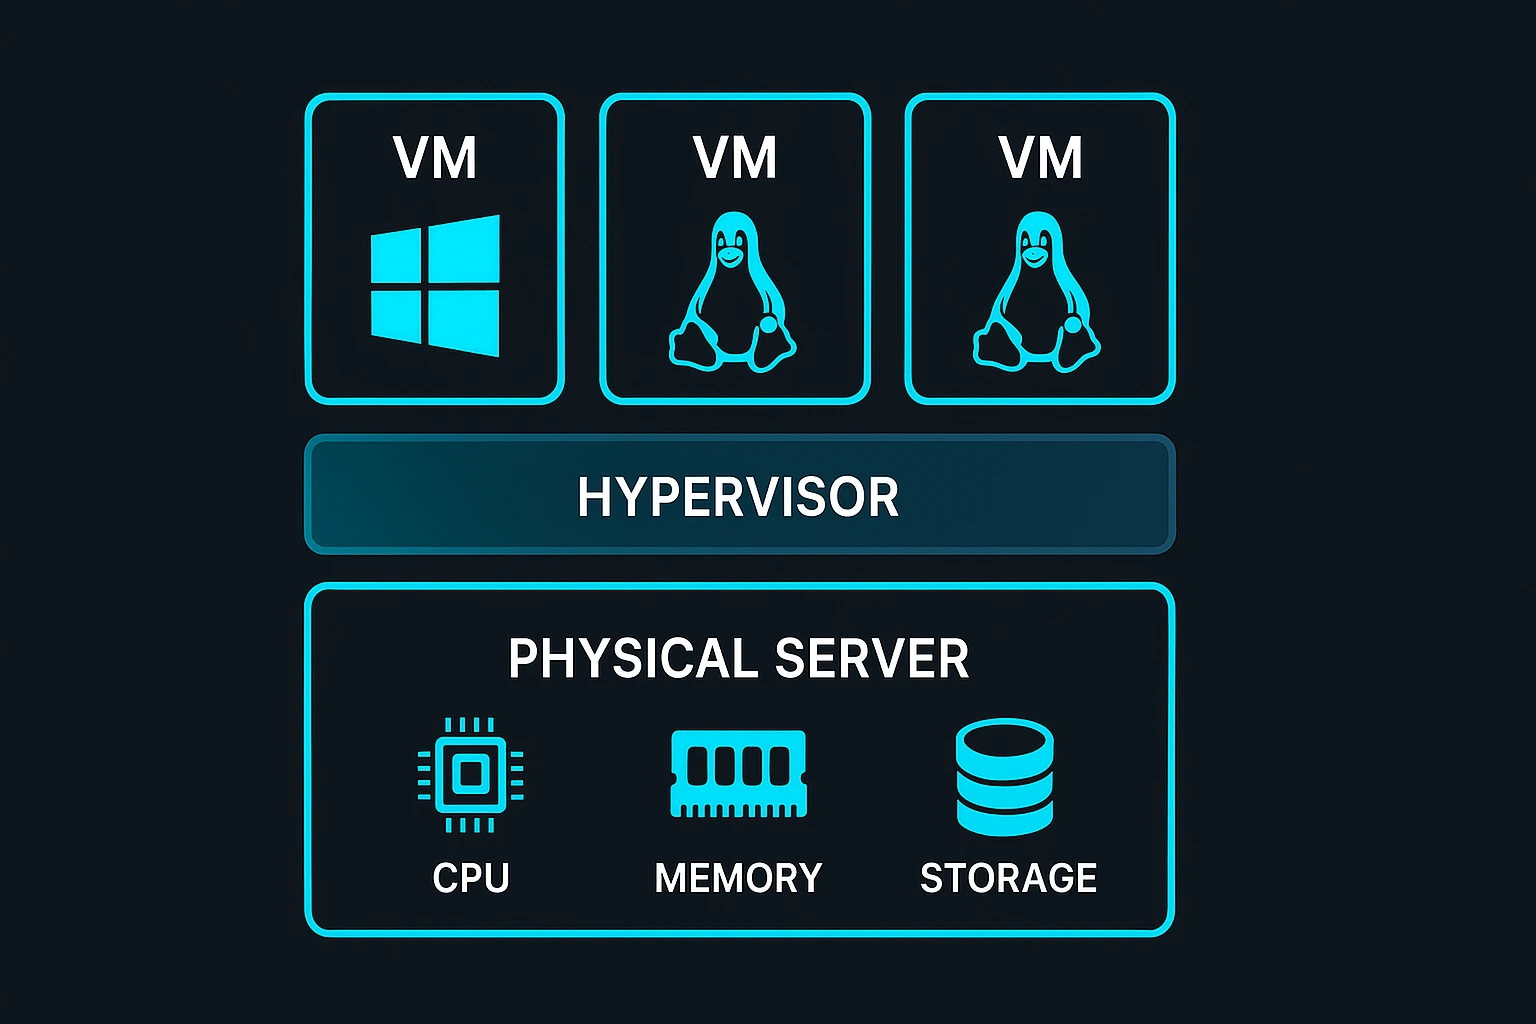
Physical to virtual conversion transforms a complete physical computer system into a virtual machine by capturing your entire disk structure, including the operating system, installed applications, user data, and system configurations.
The result is a virtual machine that functions identically to your original physical system but runs within a virtualized environment, giving you the flexibility to move workloads between different hardware platforms without reinstalling software or reconfiguring applications.
When Should You Virtualize a Physical Machine?
Organizations are increasingly adopting virtualization to modernize their IT infrastructure, driven by compelling cost savings and operational advantages. The virtualization software market generated $94.82 billion in 2025 and is forecast to reach $218.76 billion by 2030.
Key Benefits of Virtualization
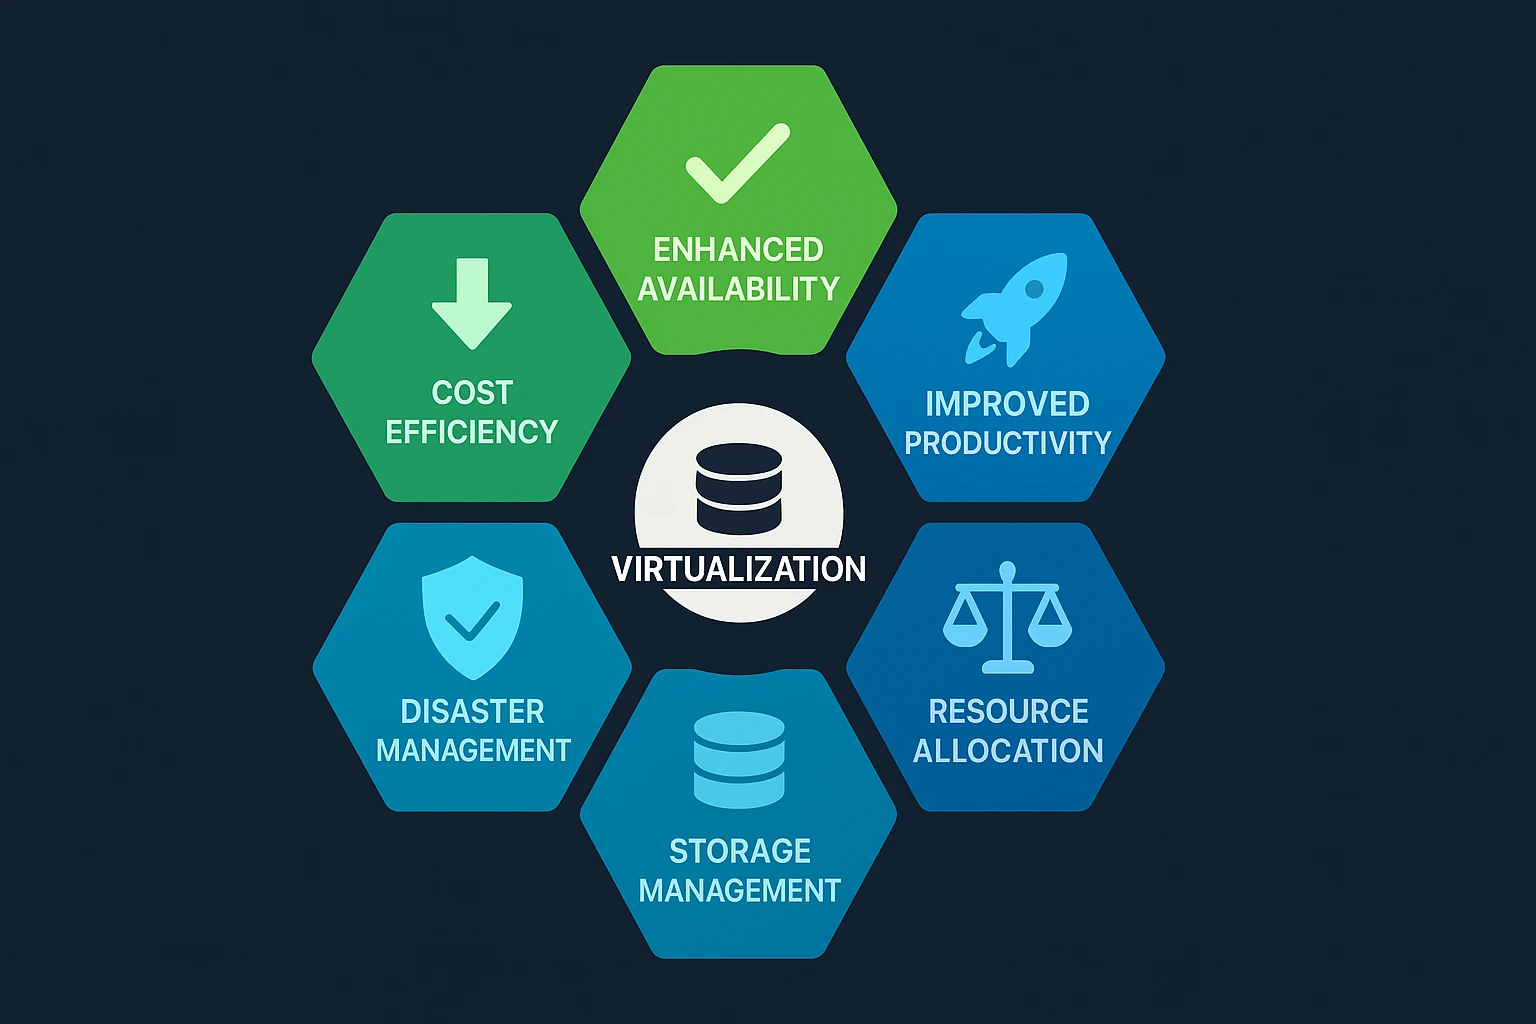
Cost Efficiency – Virtualization reduces expenses by eliminating the need for multiple physical servers, with organizations reporting server consolidation ratios exceeding 10:1.
Improved Availability – Virtual machines transfer to functioning servers during hardware failures with minimal downtime, while physical machines remain tied to specific hardware.
Better Productivity – Deploying new virtual servers takes minutes instead of days because you can provision, clone, or remove virtual machines instantly without hardware procurement.
Disaster Recovery Readiness – Survey data shows that 68% of organizations consider virtualization critical for their disaster recovery strategies because virtual machines allow rapid restoration after failures.
Centralized Storage Management – Virtualization provides centralized control over storage resources, giving administrators the ability to modify storage allocations dynamically. This centralization ensures shared storage operates at peak efficiency across all virtual servers while reducing the complexity of managing individual physical disk configurations.
What Is Disk2VHD?
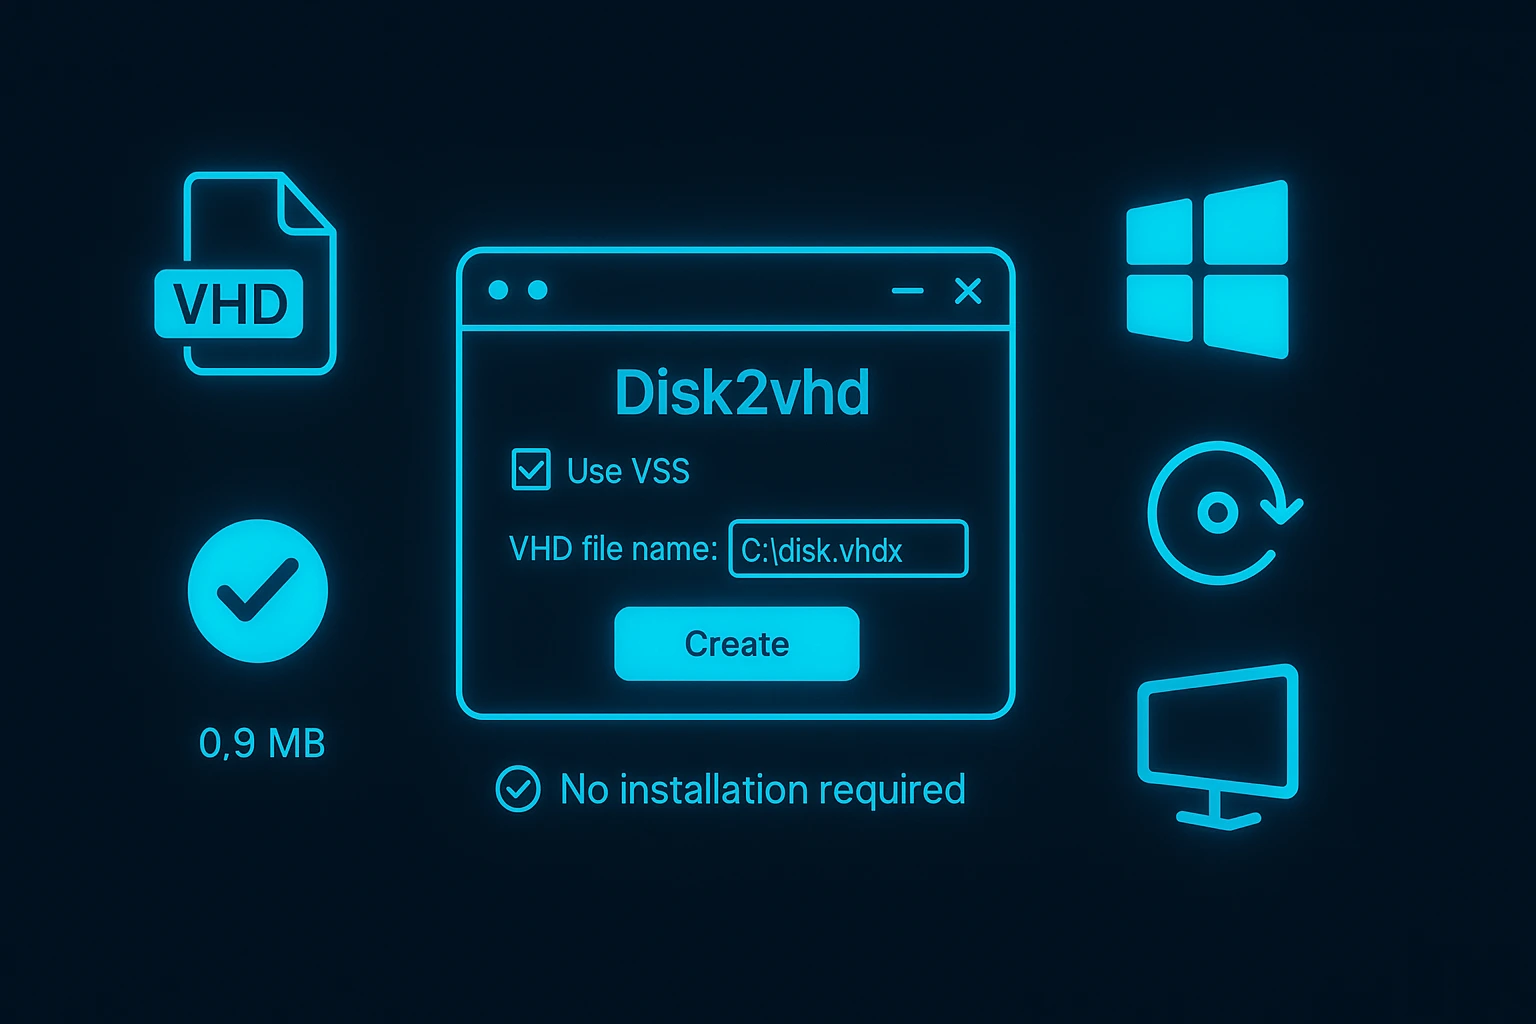
Disk2VHD is a free utility from Microsoft that creates Virtual Hard Disk (VHD or VHDX) files from physical disks while your system continues to run. Unlike many P2V conversion tools that require you to boot from special media or shut down your system, Disk2VHD operates on running systems without interruption.
The tool leverages Windows Volume Shadow Copy Service (VSS) to create consistent, point-in-time snapshots of selected volumes during active operation. This capability means you can convert your system while continuing to work, keeping applications available without scheduling downtime for the conversion process.
This tool provides the conversion layer that transforms physical infrastructure into portable virtual disk files compatible with modern virtualization platforms.
Why Use Disk2VHD for P2V Conversion?
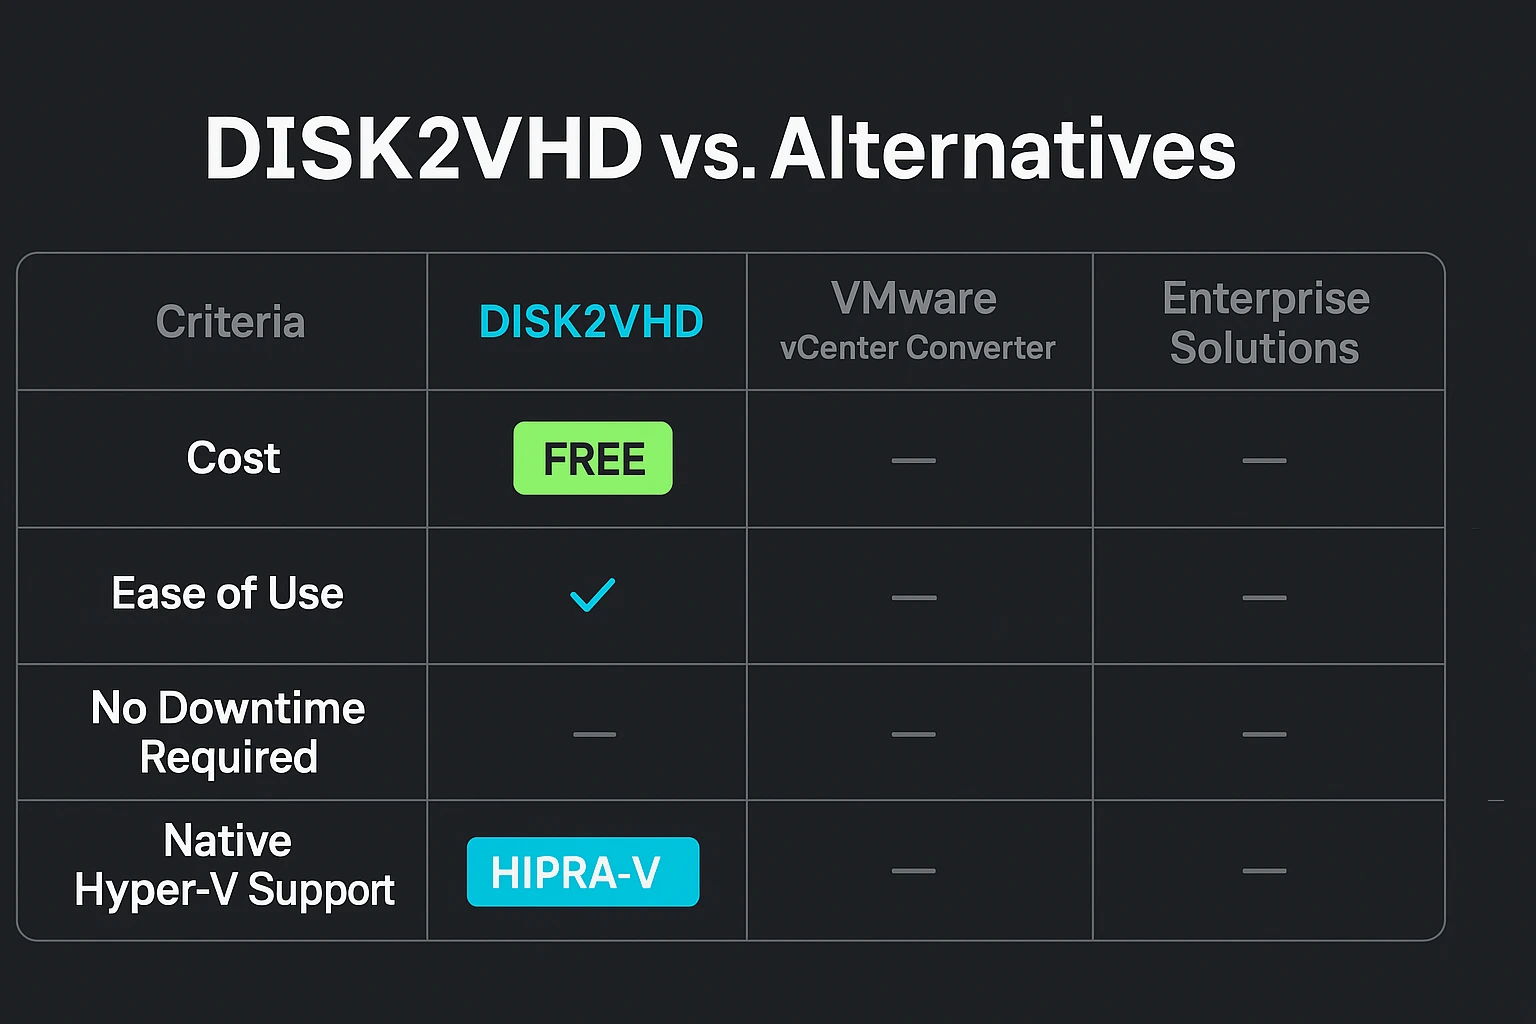
Disk2VHD stands out among P2V tools because it converts running systems without requiring system downtime or special boot media. While enterprise solutions like VMware vCenter Converter or Acronis offer more features, Disk2VHD provides a lightweight, free alternative that handles most standard conversion scenarios effectively.
The tool works directly with Windows Volume Shadow Copy Service to create consistent snapshots while applications continue running. This approach eliminates the need to schedule maintenance windows or interrupt business operations during conversion.
For organizations testing virtualization strategies or migrating individual servers, Disk2VHD offers a risk-free entry point that requires no financial investment or complex deployment procedures.
Disk2VHD creates native VHD and VHDX formats that integrate directly with Microsoft Hyper-V without requiring intermediate conversion steps. The resulting virtual disks work immediately with Windows Server 2012 and later Hyper-V implementations, streamlining the migration process from physical hardware to virtual infrastructure.
This direct compatibility reduces conversion time and eliminates potential compatibility issues that can arise when using third-party disk formats.
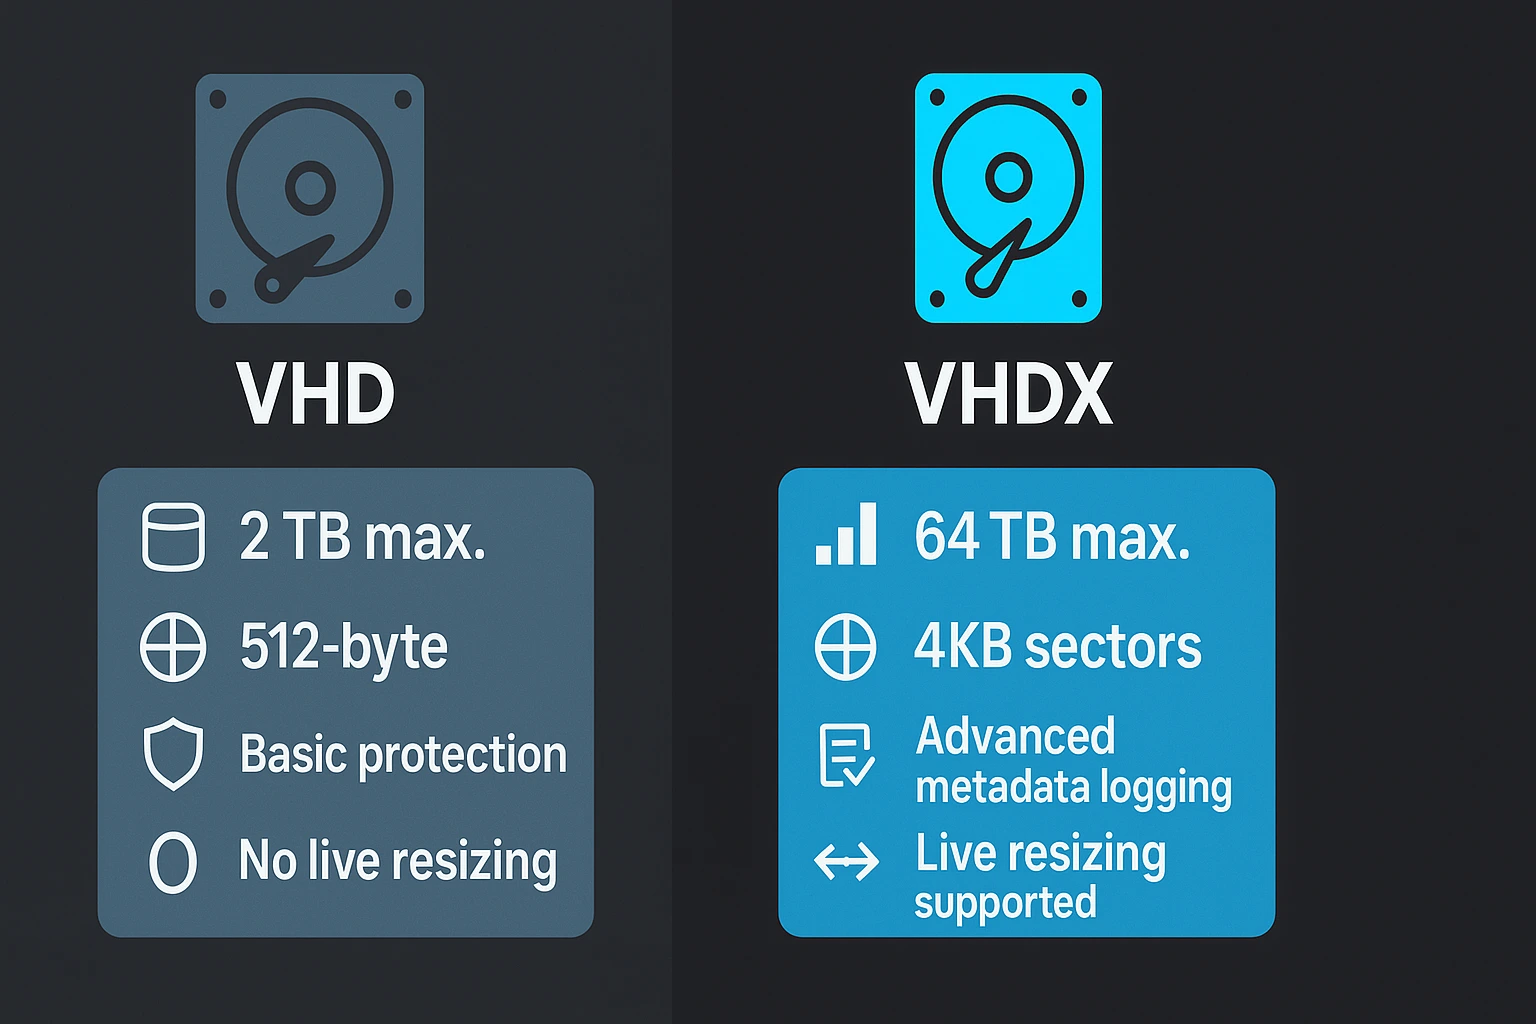
VHDX vs VHD: Understanding Virtual Disk Formats
When creating virtual disks with Disk2VHD, you must choose between VHD and VHDX formats, and this choice affects your virtual machine’s capacity, performance, and compatibility with different virtualization platforms. Understanding their differences helps you make the right decision for your specific environment and future needs.
| Feature | VHD | VHDX |
| Maximum Size | 2 TB | 64 TB |
| Logical Sector Size | 512 bytes | 4 KB (optimized for modern hardware) |
| Data Corruption Protection | Basic | Advanced with metadata logging |
| Live Resizing | Not supported | Supported while VM is running |
| Power Failure Protection | Limited | Enhanced with change tracking |
| Block Size Options | Fixed | Larger, optimized blocks for dynamic disks |
| Third-party Support | VirtualBox, VMware, others | Primarily Hyper-V (limited elsewhere) |
| Introduced | 2003 (Connectix/Microsoft) | 2012 (Windows 8/Server 2012) |
When to Use VHDX – Choose VHDX for all Hyper-V deployments on Windows Server 2012 and later because it provides superior performance, stronger security through corruption protection, and support for larger virtual disks up to 64TB.
The format aligns better with modern storage hardware using 4KB sectors, delivering improved I/O performance and better resilience against power failures or system crashes.
When to Use VHD – Select VHD only when you need compatibility with older virtualization platforms or legacy systems that don’t support the newer VHDX format. Some third-party hypervisors, like VirtualBox and VMware, require the VHD format or need conversion from VHDX to VHD before they can use the virtual disk.
For new deployments using Microsoft Hyper-V, VHDX is the recommended choice because it offers major advantages in capacity, reliability, and performance without meaningful drawbacks.
Prerequisites Before Starting P2V Conversion
Before beginning your physical-to-virtual conversion, verify that these requirements are met to avoid conversion failures or corrupted virtual disk files. Taking time to prepare for use in virtual pc migration creates smooth transitions and prevents problems that could force you to restart the entire conversion process.
Pre-Migration Checklist
Before beginning your physical-to-virtual conversion, verify these requirements to avoid conversion failures or corrupted virtual disk files. Taking time to prepare your system properly prevents problems that could force you to restart the entire conversion process.
Here’s your pre-migration checklist:
- Sufficient Disk Space: Verify your destination location has enough free space to store the VHDX file, which will approximately match your physical disk’s used capacity. Add an extra 10-20% buffer for overhead and potential expansion during the conversion process.
- Administrative Access: Run Disk2VHD with administrator privileges to access system volumes and create disk images, as standard user accounts lack permissions to read boot partitions and system files. Right-click the executable and select “Run as administrator” before starting.
- Volume Shadow Copy Service: Confirm VSS is running on your system because Disk2VHD requires it to create consistent snapshots of active volumes. Check Services (services.msc) to verify VSS status shows “Running” before beginning the conversion.
- Close Resource-Intensive Applications: While Disk2VHD can run on active systems, closing unnecessary applications reduces system load and speeds up the conversion process significantly. Database servers, video editing software, and backup programs should be stopped if possible.
- Network or Separate Disk for Output: Save your VHDX file to a different physical disk than the one being converted because saving to the same disk degrades performance severely and increases conversion time by hours. Network shares work well for this purpose if they have sufficient bandwidth and storage capacity.
- Review System Configuration: Document your current IP address, computer name, and critical configurations because you’ll need to verify these settings after migration. Virtual machines receive new MAC addresses, which can affect network configuration and software licensing.
How to Use Disk2VHD: Step-by-Step P2V Conversion
So, you need to migrate an old server or back up a critical system, but you’re not sure how to use Disk2vhd effectively? The process starts with downloading this versatile Microsoft utility and following a structured approach for successful conversion.
This section walks you through each configuration option and explains the critical decisions you’ll make during the conversion process.
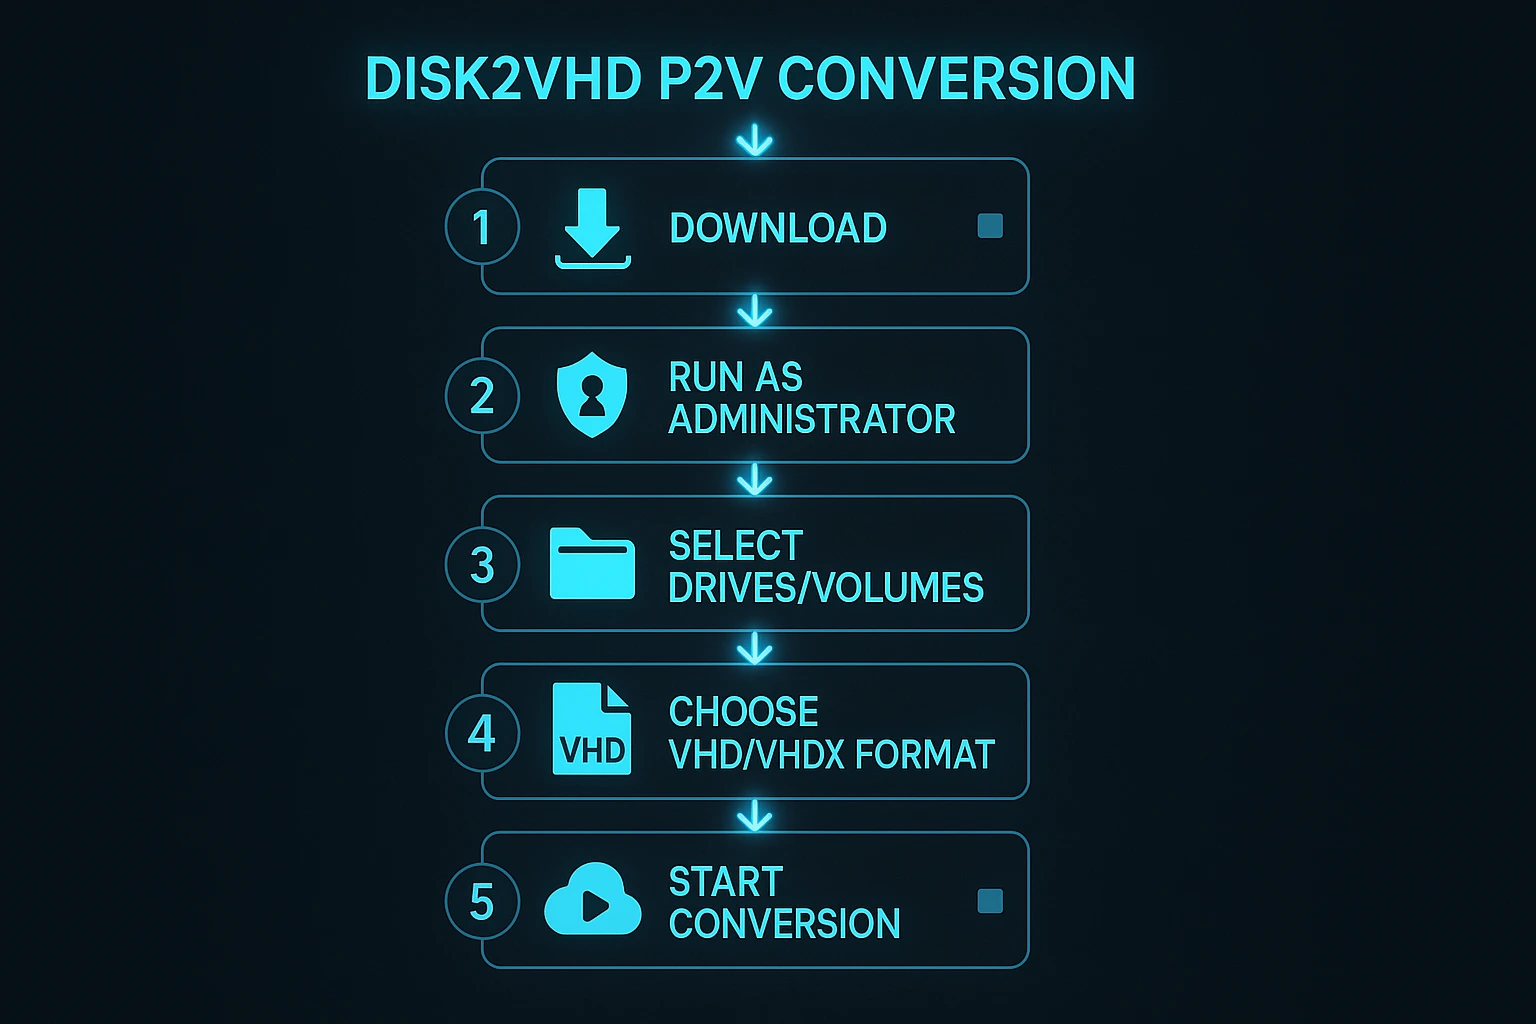
Step 1: Download and Run Disk2VHD
Download Disk2VHD from the official Windows Sysinternals page, where Microsoft provides the tool as a free download without registration requirements. The download comes as a ZIP archive containing both 32-bit and 64-bit versions of the utility, giving you compatibility with different Windows installations.
the ZIP file to a convenient location on your computer, such as your Desktop or Downloads folder. Right-click the appropriate version for your system (disk2vhd64.exe for 64-bit systems or disk2vhd.exe for 32-bit) and select “Run as administrator” to launch the tool with the necessary permissions.
Configure Disk2VHD Options
When the Disk2VHD window opens, you’ll see several configuration options that control how the conversion process works and what format the output file uses. Each option helps you create a virtual disk that meets your specific requirements. Here’s what they do and when to use them:
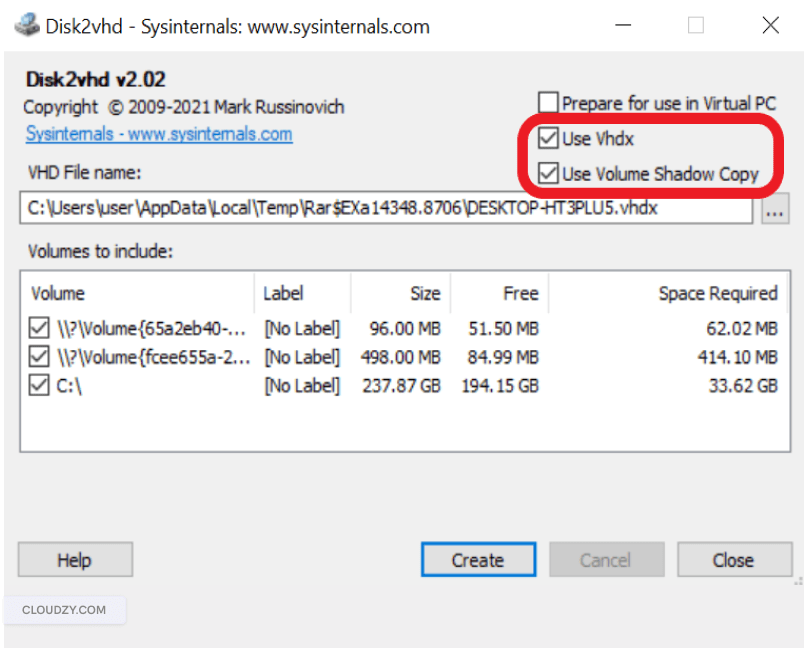
Use Vhdx – Check this option to create a VHDX file instead of the older VHD format, which gives you support for up to 64TB of storage, improved data corruption protection, and better performance with modern hardware. This should be checked for all new conversions to Hyper-V running on Windows Server 2012 or later.
Use Volume Shadow Copy – Turn on this option to create consistent backups of your running applications and data through Windows Volume Shadow Copy Service. VSS ensures data integrity by capturing point-in-time snapshots, which becomes especially important for production systems with active applications or databases that write to disk frequently.
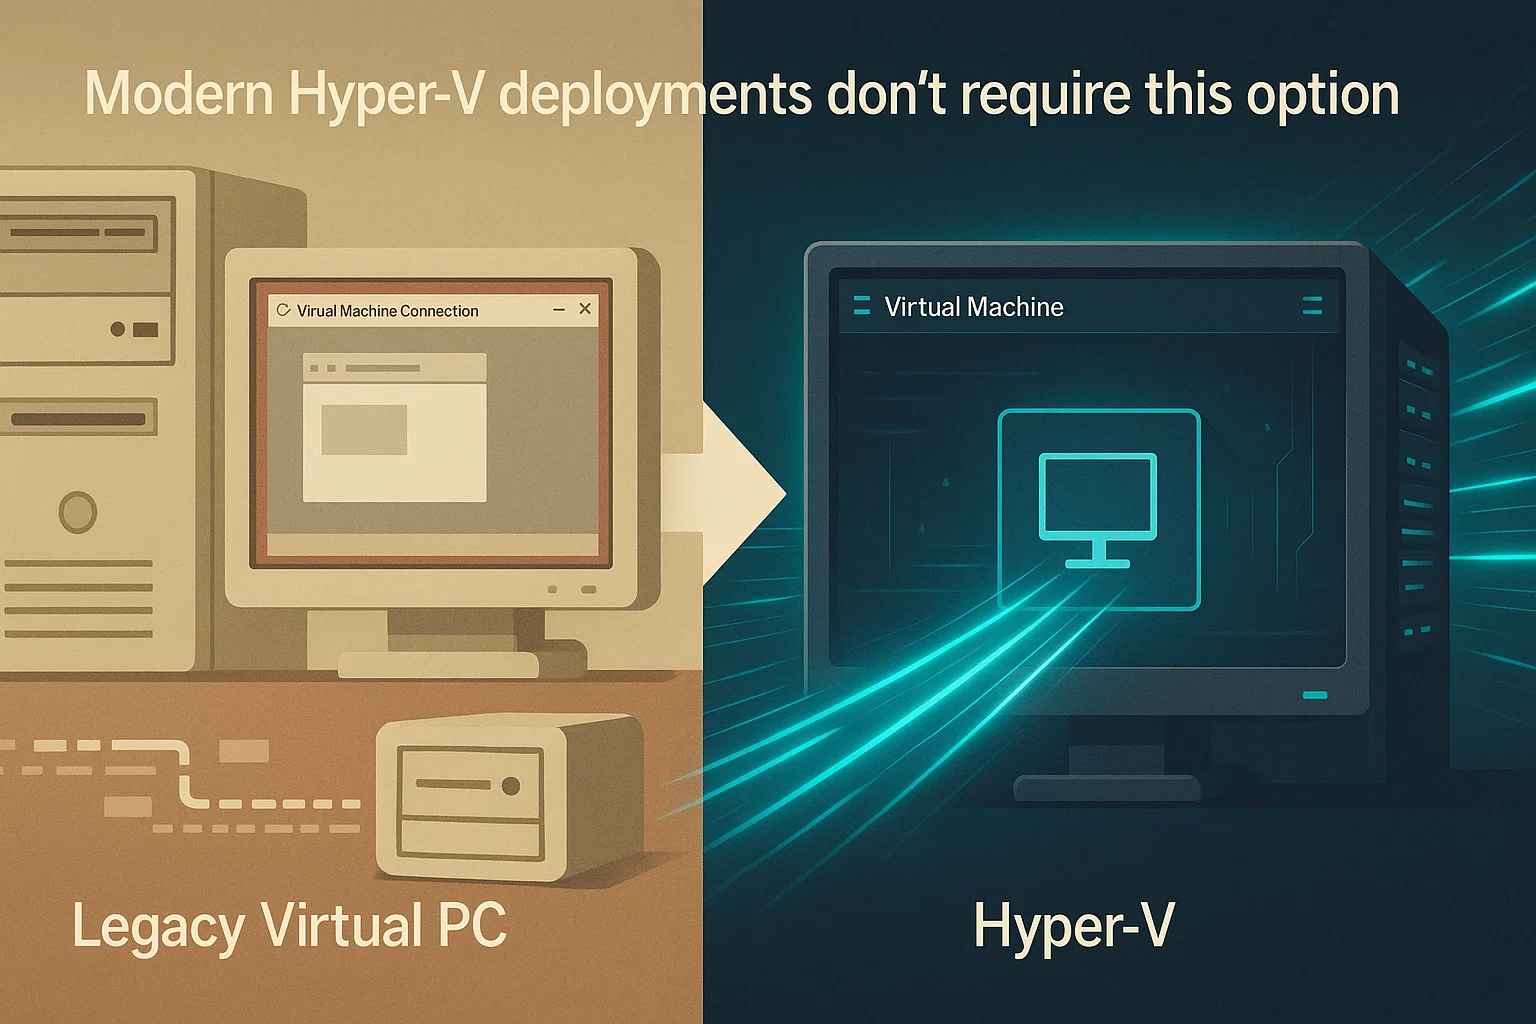
Disk2VHD “Prepare for Use in Virtual PC” – What Does It Do?
Prepare for Use in Virtual PC – This checkbox appears as the disk2vhd prepare for use in virtual pc option in the interface, and selecting it injects Virtual PC-specific drivers into your virtual hard disk. The feature was designed for the legacy Virtual PC platform that Microsoft discontinued in favor of Hyper-V.
Modern Hyper-V deployments don’t require this option because Hyper-V uses Integration Services to provide optimized drivers for virtual machines. Integration Services installs automatically when you first boot a Windows virtual machine in Hyper-V, delivering better performance and compatibility than the legacy Virtual PC drivers.
Leave this option unchecked unless you specifically need compatibility with older Microsoft Virtual PC versions that predate Windows 8. For all contemporary virtualization scenarios using Hyper-V on Windows Server 2012 or later, disabling this setting produces cleaner virtual disks that integrate more smoothly with modern hypervisor environments.
When system administrators search for prepare for use in virtual pc disk2vhd, they often discover this setting is rarely necessary for contemporary virtualization platforms that use more advanced driver integration methods.
Select Volumes to Include – The volume list shows all available drives on your system, including your main operating system partition and any hidden system partitions. Select the volumes you want to include in the virtual machine.
For a bootable VM, you must include both your system drive (typically C:) and the System Reserved partition (usually a small unlabeled volume around 100-500 MB). Without the System Reserved partition, your virtual machine won’t boot because it contains critical boot files.
Choose Destination Path – Specify where Disk2VHD should save the VHDX file by entering the full path, including the filename. Remember to save to a different physical disk than the one being converted for optimal performance. Network paths work well if you have reliable network connectivity and sufficient bandwidth.
After configuring these settings, click the “Create” button to begin the conversion process. Disk2VHD will start creating your VHDX file.
What to Expect During Conversion:
| Aspect | Details |
| Conversion Time | Depends on data volume and disk read/write speed |
| Progress Tracking | Real-time progress bar and estimated time remaining shown in the Disk2VHD window |
| System Usage | You can continue working, but expect slower performance due to disk I/O operations |
| Recommended Action | Save to a different physical disk for optimal speed |
The conversion process runs in the background using Volume Shadow Copy Service, so your system remains operational throughout.
Step 2: Copy VHDX File to Hyper-V Host
After Disk2VHD completes the conversion, locate your VHDX file at the destination path you specified during the configuration step. Copy this file to your Hyper-V server’s virtual hard disk directory, which is typically located in one of these standard locations depending on your server configuration:
-
C:\Users\Public\Documents\Hyper-V\Virtual Hard Disks\ -
D:\Hyper-V\Virtual Hard Disks\ (custom location)
Copying may take considerable time if you’re transferring large VHDX files over a network connection with limited bandwidth. Using a direct-attached USB drive or local storage can speed up this process significantly, especially for virtual disks larger than 100 GB.
Step 3: Create a Virtual Machine in Hyper-V Manager
Open Hyper-V Manager on your host server by searching for it in the Start menu or accessing it through Server Manager. In the Actions pane on the right side of the window, click “New” and then select “Virtual Machine” to launch the New Virtual Machine Wizard, which guides you through the configuration process step by step.
Specify Name and Location
Enter a descriptive name for your virtual machine that helps you identify it among other VMs you might be running. This name appears in Hyper-V Manager’s virtual machines list and in various management tools.
Optionally, you can change the default storage location for VM configuration files if you have a specific directory structure or storage arrangement for your virtual infrastructure.
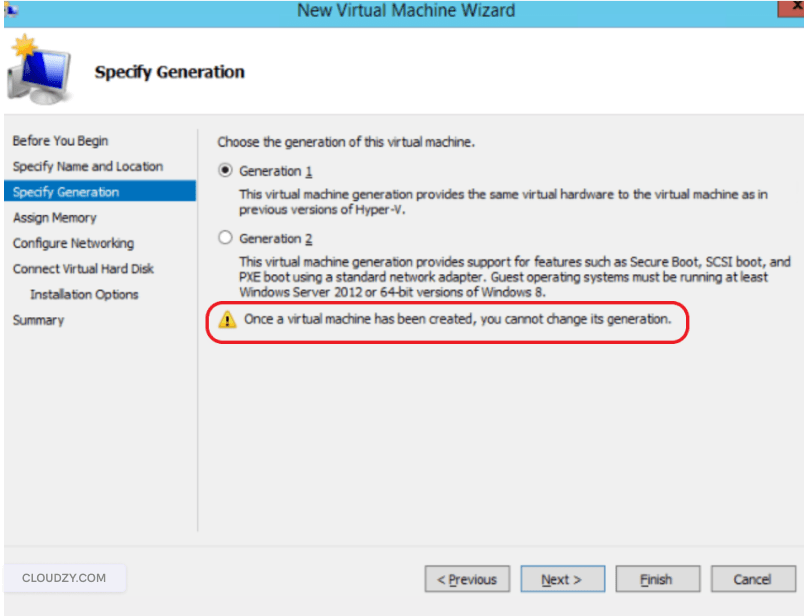
Specify Generation
This step is critical and cannot be changed after creating the VM, so choosing the correct generation from the start prevents the need to delete and recreate your virtual machine. Hyper-V offers two generations with distinct characteristics that affect compatibility, performance, and security capabilities.
| Feature | Generation 1 | Generation 2 |
| Firmware Type | BIOS | UEFI |
| Supported OS | Most guest operating systems, including older versions | Windows 8/Server 2012 and newer, modern Linux distributions |
| Boot Options | IDE, CD-ROM, network, floppy | SCSI, CD-ROM, network (no floppy or IDE) |
| Security Features | Standard | Secure Boot, TPM, shielded VMs |
| Performance | Good | Better (SCSI-based) |
| Maximum VRAM | 1 TB | 240TB |
Choose Generation 1 if your physical machine runs Windows 7, Windows Server 2008 R2, or older operating systems that don’t support UEFI firmware. Generation 1 provides broader compatibility with legacy systems and supports booting from IDE controllers, which some older operating systems require.
Choose Generation 2 for Windows 8/Server 2012 or newer systems that were installed with UEFI boot mode. Generation 2 delivers better security through Secure Boot and TPM support, superior performance with SCSI virtual storage controllers, and UEFI firmware advantages that provide faster boot times. For modern deployments, Generation 2 is the preferred choice because it aligns with current hardware and software standards.
Assign Memory
Allocate RAM for your virtual machine based on what your physical machine was using for your typical workloads. The amount should match or exceed your physical machine’s memory so applications run smoothly
Consider your host server’s total memory when allocating resources to avoid over-committing RAM across multiple virtual machines. You can use Dynamic Memory to allow Hyper-V to adjust memory allocation based on workload demands, which provides better resource utilization across your virtualization environment.
Configure Networking
Select a virtual switch to connect your VM to the network, allowing it to communicate with other systems and access network resources. If you haven’t created a virtual switch yet, you can set this to “Not Connected” and configure networking after creating the VM through Hyper-V Manager’s virtual switch settings.
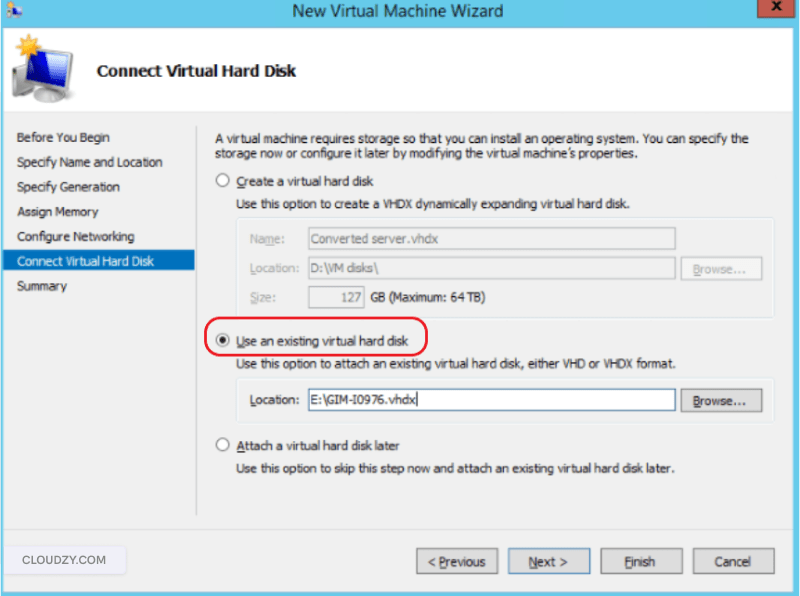
Connect Virtual Hard Disk
This is where you link the VHDX file you created with Disk2VHD to your new virtual machine, making it the VM’s primary storage device. Select “Use an existing virtual hard disk” and click “Browse” to open the file selection dialog.
Navigate to the location where you copied your VHDX file and select it. This tells Hyper-V to use your converted physical disk as the virtual machine’s storage, preserving all the data, applications, and configurations from your original system.
Complete the Wizard
Review your configuration summary to verify all settings are correct, including the generation, memory allocation, and virtual hard disk path. Click “Finish” to create the virtual machine, and Hyper-V adds the new VM to your virtual machines list, where you can manage it alongside your other virtual systems.
Step 4: Start and Connect to Your Virtual Machine
In Hyper-V Manager, locate your newly created virtual machine in the Virtual Machines list displayed in the center pane. Right-click the VM name and select “Start” from the context menu to power on the virtual machine.
Then right-click again and choose “Connect” to open a console window showing the VM’s display, giving you direct access to the virtual machine’s screen output and allowing you to interact with it as if it were a physical computer.
First Boot Considerations
The initial boot takes longer than subsequent startups because Windows detects hardware changes and must configure itself for the new virtual environment. The virtual environment presents completely different hardware than your original physical machine, including virtual network adapters, virtual SCSI controllers, and virtualized CPU features.
Windows automatically installs drivers for the virtual hardware during the first boot, and you may see device installation notifications or configuration dialogs as the system adapts to its new environment.
You may see Windows configuration screens or driver installation notifications pop up during the boot process. Allow these processes to complete without interrupting them, as they’re necessary for proper virtual machine operation.
After a few minutes, you should see the Windows login screen with your familiar desktop background and user accounts. Your virtual machine is now operational and contains all applications, data, and configurations from your physical machine.
Common First-Boot Issues
Black Screen with Cursor – If you see only a black screen with a blinking cursor and nothing else loads after several minutes, your VM may be set to the wrong generation for your operating system. Try recreating the VM with Generation 2 (if your OS is Windows 8/Server 2012 or newer) or Generation 1 (for older operating systems that don’t support UEFI boot).
Boot Failure – Verify that you selected both the system volume and the System Reserved partition during the Disk2VHD conversion process by checking your conversion settings. Without the boot partition containing the boot loader and boot configuration data, the VM cannot start properly and will display boot errors.
Driver Errors – For Windows 10/11 and Windows Server 2016 or later, Hyper-V Integration Services install automatically and update through Windows Update, providing optimized drivers and features like time synchronization, heartbeat monitoring, and improved mouse integration.
Older operating systems like Windows 7 or Windows Server 2012 require manual installation from the Hyper-V host’s Action menu using “Insert Integration Services Setup Disk” for proper virtual hardware recognition and performance.
Using Disk2VHD via Command Line
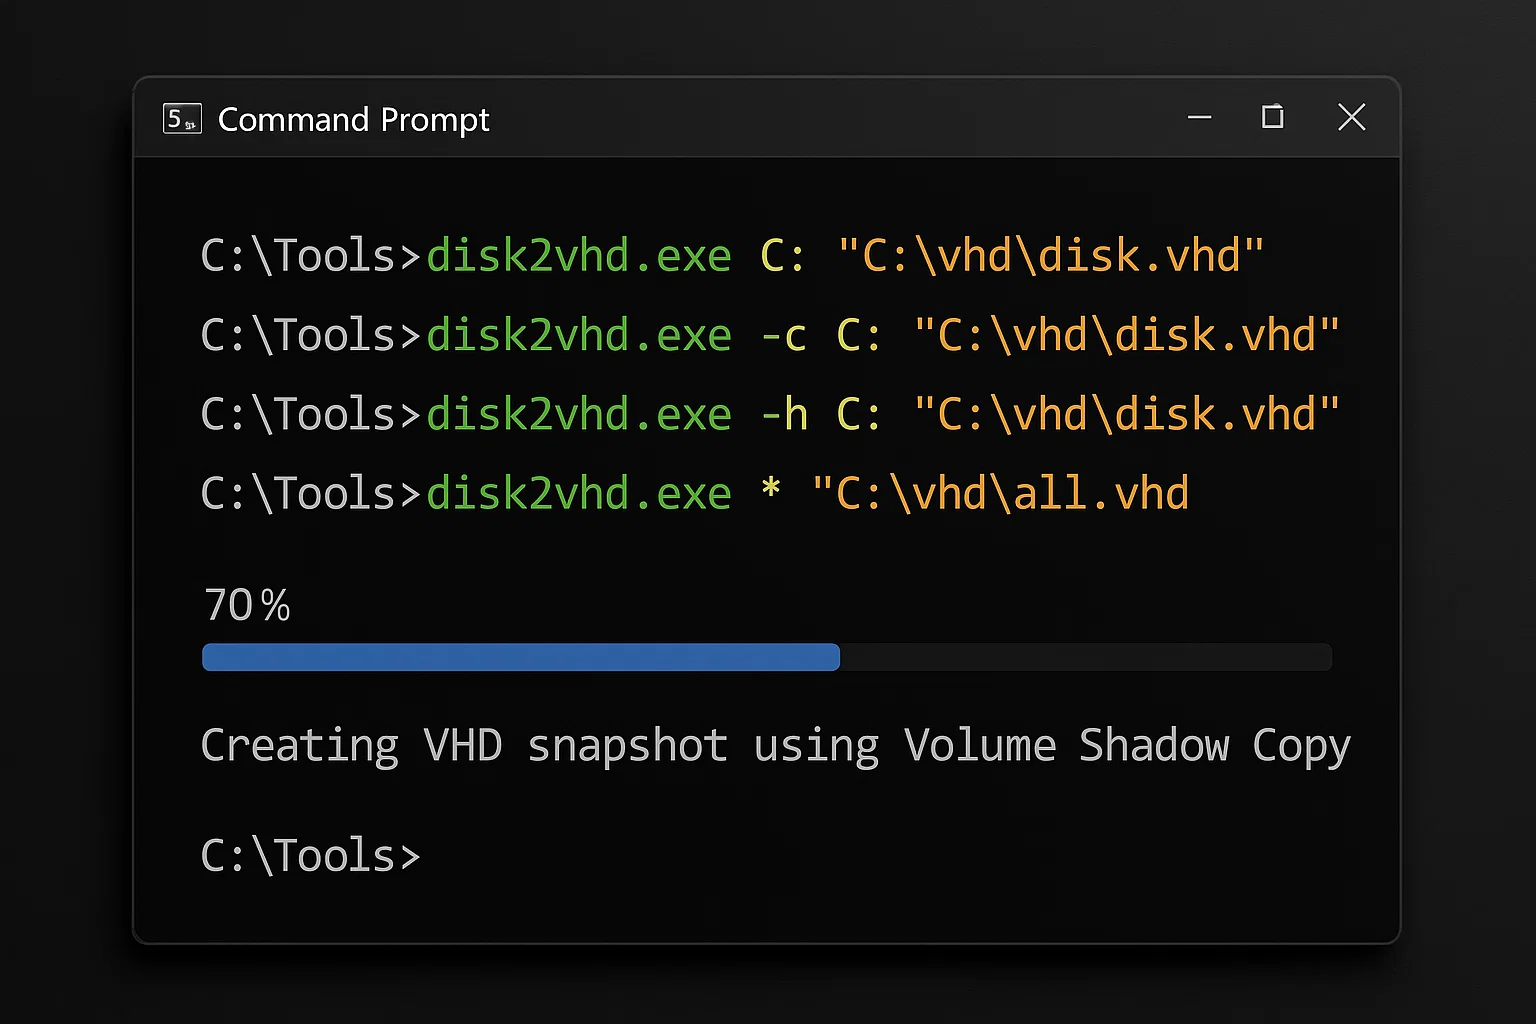 Disk2VHD supports command-line operation for automation, scripting, and remote management scenarios where you need to schedule conversions or integrate them into existing workflows. The command-line interface provides programmatic access to all Disk2VHD features without requiring GUI interaction, making it valuable for system administrators managing multiple servers.
When organizations need to disk2vhd prepare for use in virtual pc across multiple machines systematically, command-line scripting enables batch processing and automated conversion schedules.
Command Syntax
disk2vhd.exe <[drive:]> <vhd/vhdx filename>Command-Line Flags
-c flag – Creates a direct copy without using Volume Shadow Copy, which can be useful when VSS is unavailable or for non-critical data conversions where consistency isn’t as important. This mode runs faster but doesn’t guarantee application-consistent snapshots of running systems.
-h flag – Prepares the VHD for use with the legacy Virtual PC platform, adding specific metadata that Virtual PC expects. This option corresponds to the Disk2VHD prepare for use in virtual pc option you see in the graphical interface. Modern deployments using Hyper-V or other contemporary virtualization platforms rarely require this flag.
* wildcard – Includes all volumes in the conversion when used in place of specific drive letters, allowing you to capture your entire system with a single command. This ensures you don’t accidentally miss any partitions that might be needed for a successful boot.
Command-Line Examples
Convert a specific drive with VSS:
disk2vhd.exe C: "D:\VHDs\server-backup.vhdx"Convert all drives:
disk2vhd.exe * "\\network-share\backups\complete-system.vhdx"Direct copy without VSS:
disk2vhd.exe -c C: "E:\conversions\direct-copy.vhdx"Automated backup with date stamp (PowerShell):
disk2vhd.exe -c C: "\\file-server\Backups\snapshot-$(Get-Date -f yyyy-MM-dd).vhdx"You can integrate these commands with Windows Task Scheduler to create automated backup routines that run on specific schedules or triggers. This approach provides a lightweight automated backup system for physical machines without requiring expensive enterprise backup software or complex infrastructure.
Best Practices for Successful P2V Migration
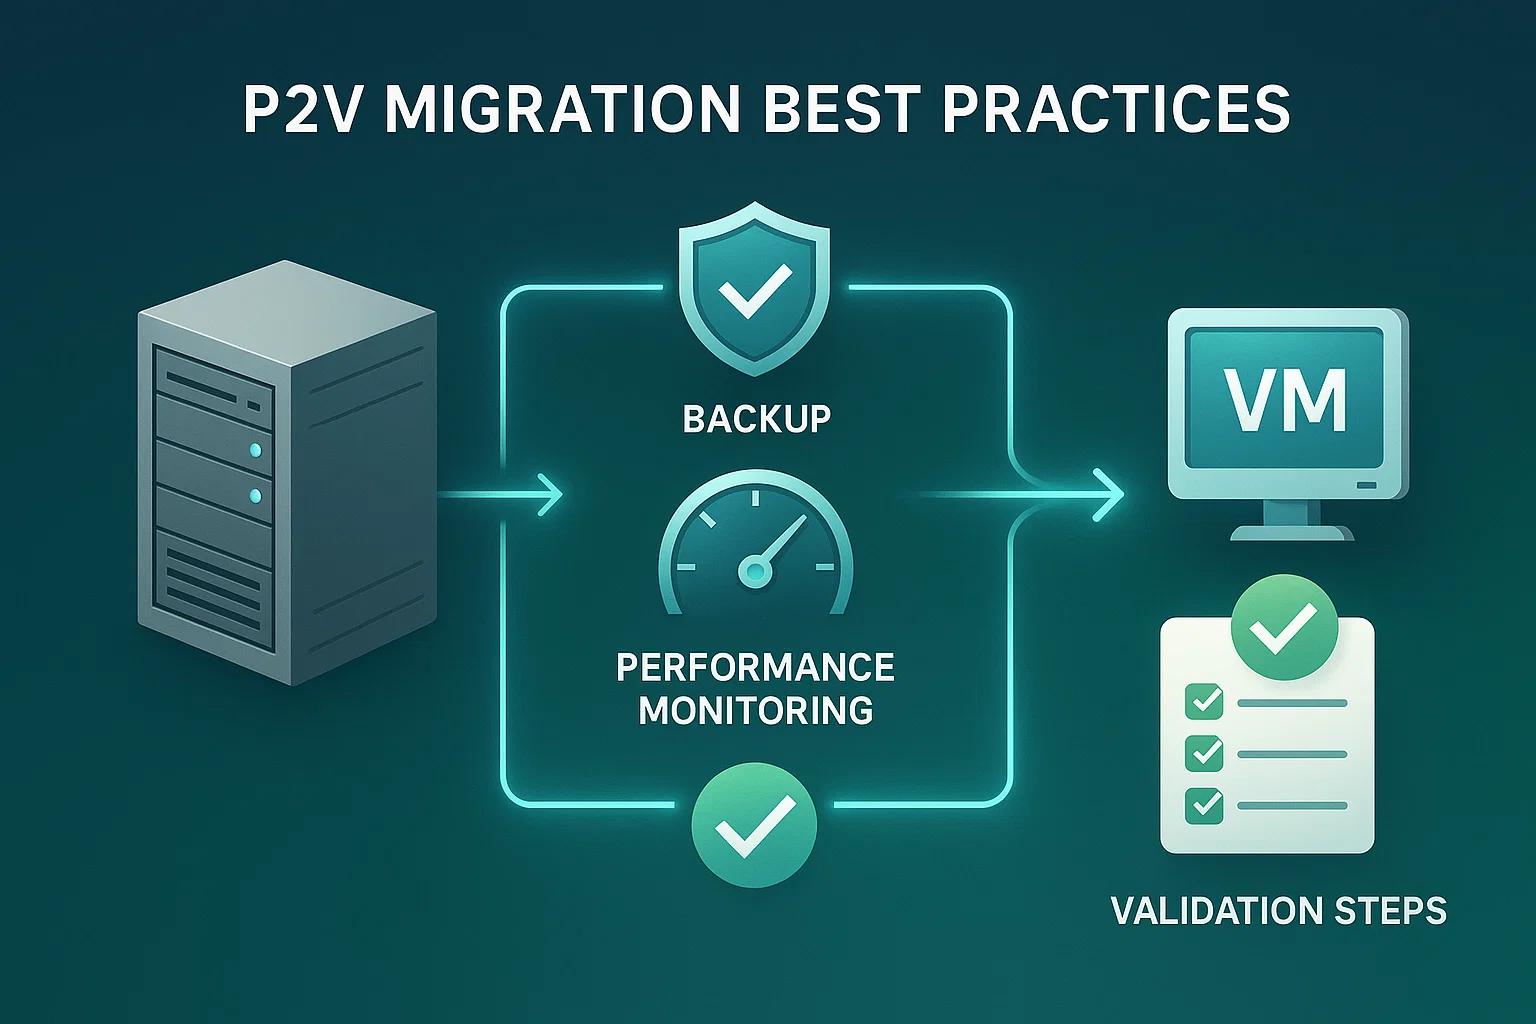
Following established best practices ensures smooth physical to virtual conversion and optimal VM performance after migration, helping you avoid common problems that can lead to failed conversions or poorly performing virtual machines. These guidelines come from years of real-world experience with P2V migrations across different environments.
Pre-Conversion Best Practices
Close Unnecessary Applications – Shut down active applications, especially databases and services that perform frequent disk writes, like SQL Server, Exchange, or file synchronization tools. This reduces the likelihood of inconsistent data in your converted image and speeds up the conversion process by reducing disk I/O competition.
Use Separate Storage – Never save the VHDX file to the same disk you’re converting because this causes severe performance degradation and can lead to file corruption due to circular read/write operations. Use network shares, external drives, or different physical disks to store your conversion output.
Verify VSS Functionality – Confirm Volume Shadow Copy Service is running before starting conversion to capture consistent snapshots of your data. Open Services (services.msc), locate “Volume Shadow Copy,” and verify its status is “Running” with automatic startup type configured.
Check Disk Space – make sure your destination has sufficient free space for the complete VHDX file, plus an additional 10-20% buffer for overhead and temporary files. Dynamic VHDX files initially consume less space but can grow up to the maximum size you specify during conversion, so plan accordingly.
Post-Conversion Best Practices
Install Integration Services – After your VM boots successfully, install Hyper-V Integration Services to get optimized drivers for virtual hardware components. These components provide optimized drivers for virtual hardware, improving performance and functionality significantly. Integration Services also enables time synchronization, heartbeat monitoring, and smooth mouse control between the host and guest systems.
Update Network Configuration – Virtual machines receive new MAC addresses and potentially new IP addresses when they boot in the virtual environment. Reconfigure network settings as needed to avoid conflicts with the original physical machine if both systems will run simultaneously on your network.
Verify Application Functionality – Test all critical applications to confirm they work correctly in the virtualized environment, paying special attention to applications that interact with hardware or depend on specific system configurations. Some applications with hardware-specific licensing may require reactivation or license updates after the migration.
Remove Old Hardware Drivers – Physical machine drivers for RAID controllers, specific network adapters, and other hardware may cause conflicts or performance issues in the virtual environment. Clean up unused drivers to optimize performance and reduce potential system instability.
Don’t Mount VHDX on Source Machine – Never attach or mount the converted VHDX file on the same physical machine you created it from because Windows assigns new disk signatures to prevent collisions. This signature reassignment can make the VHDX file unbootable or cause data corruption. Only open VHDX files on the destination Hyper-V host where they will be used.
Troubleshooting Common P2V Issues
Boot failures after P2V conversion typically stem from missing drivers or incorrect disk configuration in Hyper-V. Your physical server’s hardware differs from the virtual environment, so the operating system doesn’t recognize the storage controllers.
Verify that your VHDX file is attached as the primary boot device in the VM settings, then install Hyper-V Integration Services to provide the necessary drivers for virtual hardware recognition.
Issue: VM Won’t Boot After Conversion

Causes:
- Missing System Reserved partition in conversion
- Incorrect VM generation selected
- Boot configuration data corruption
Solutions:
- Recreate the VHDX, ensuring both the system volume and System Reserved partition are selected in Disk2VHD before starting the conversion
- Try the alternate VM generation (switch between Generation 1 and Generation 2) to match your operating system’s boot requirements
- Use Windows Recovery Environment to repair the boot configuration by booting from Windows installation media and running Startup Repair
Issue: Slow Conversion Performance
Causes:
- Saving VHDX to the same disk being converted
- Insufficient disk space is causing fragmentation
- High system load from running applications
Solutions:
- Always save to a different physical disk or network location with adequate bandwidth and low latency
- Free up disk space on the destination drive before starting conversion, removing at least 20% of the VHDX file size
- Close unnecessary applications before conversion to reduce disk I/O competition and CPU usage
Issue: Network Connectivity Problems
Causes:
- New MAC address assignment
- Static IP configuration from physical machine
- Missing virtual network adapter drivers
Solutions:
- Verify virtual switch configuration in Hyper-V Manager and be sure it’s connected to the correct physical network adapter
- Update or reconfigure network settings in the VM to match your network requirements, changing from static to DHCP if appropriate
- Install Hyper-V Integration Services for optimized network drivers that provide better performance and compatibility
Issue: “Access Denied” or Permission Errors
Causes:
- Disk2VHD not running with administrator privileges
- Security software blocking disk access
- Insufficient permissions on destination folder
Solutions:
- Right-click Disk2VHD and select “Run as administrator” so it has the necessary permissions to access system partitions
- Temporarily disable antivirus software during conversion because some security tools block low-level disk access operations
- Verify write permissions on the destination directory and ensure the account has full control over the target location
Take Your Virtual Machine to the Cloud with Cloudzy
While Disk2VHD successfully converts physical machines to local virtual machines, moving your virtualized workloads to the cloud amplifies the benefits. At Cloudzy, we remove hardware management responsibilities and provide enterprise-grade cloud infrastructure without the complexity.
Advantages of Cloud-Based Virtualization

Reduced Infrastructure Costs – Eliminate expenses for physical servers, cooling systems, backup hardware, and data center space. Pay only for the resources you consume rather than maintaining excess capacity for peak demands.
Automatic Disaster Recovery – Our multi-layer backup systems and geographically distributed data centers protect your data better than most on-premises solutions. Your virtual machines remain accessible even during local hardware failures because they’re replicated across multiple locations automatically.
Global Accessibility – Access your virtual machines from anywhere with an internet connection, using any device that has a web browser or remote desktop client. Cloud-based VMs support remote teams and flexible work arrangements without requiring VPN connections to physical office infrastructure.
Quick Scalability – Upgrade or downgrade VM resources instantly without physical hardware changes. Add CPU cores, memory, or storage based on current needs without purchasing new servers or waiting for hardware delivery.
Professional Management – We handle hardware maintenance, security updates, and infrastructure monitoring, freeing your IT team from routine maintenance tasks. Your team can focus on applications and business logic rather than patching hypervisors or replacing failed components.
At Cloudzy, our Cloud VPS services deliver high-performance virtualization with KVM technology, NVMe SSD storage for fast disk I/O, and DDR5 memory for improved application responsiveness. Our Linux and Windows VPS options provide flexible solutions for various workloads. Understanding different types of virtual machines helps you choose the right solution for your specific needs.
Recap: Virtualizing Physical Machines with Disk2VHD
P2V conversion using Disk2VHD provides a straightforward path to modernize your IT infrastructure without complex tools or expensive migration services. The tool converts running systems without downtime, while the VHDX format works seamlessly with modern Hyper-V deployments.
By following this guide, you can successfully migrate physical machines to virtual environments while preserving all your applications, data, and system configurations. Virtualization delivers measurable benefits, including reduced costs, improved disaster recovery capabilities, better resource utilization, and increased operational flexibility.
FAQ
How do I convert physical machines to virtual ones using Disk2VHD?
What are the main advantages of virtualization?
What is Disk2VHD?
Why convert a Physical to a Virtual Machine (P2V)?
When should I use VHDX instead of VHD format?
What is the difference between Generation 1 and Generation 2 VMs?