Have you ever wanted to transfer some files across a network of computers and faced security challenges? Well, you can’t just throw your files out in the network and wish for them to stay secure and safe, like The Red Riding Hood! You need security measures. You should use a file transfer protocol that ensures your data is protected against unauthorized access, network sniffing, data breaches, and other types of threats.
Secure Copy Protocol (SCP) is a powerful file transfer network protocol that transfers files between different machines on a network. In this blog post, we’ll become more familiar with this protocol and explore the potentials of using SCP from remote to local machines.
How Does SCP Work?
SCP uses SSH (Secure Shell) to transfer your files. But what does this even mean? SSH is a network protocol for safe and secure remote access to servers. It’s equipped with methods for authenticating, encrypting, and verifying the integrity of the transmitted data files. SCP relies on these security features and encryption methods provided by SSH to transfer files over a network securely. This way, you can utilize SCP from remote to local servers for secure connection and file transfer and be sure about the authenticity and confidentiality of your data.

Using SCP for File Transfers; Why and How?
Using SCP from remote to local and SCP local to remote is an efficient and flexible way to transfer files. SCP offers some major advantages for file transfer. For example, SCP offers more robust security measures than other file transfer methods like FTP. Another aspect in which SCP diverges from other protocols is speed. SCP is usually much faster than other protocols like SFTP, and it’s a great tool for file transfer between Linux machines.
You can relocate files with SCP:
- From a local machine to a remote machine
- From a remote machine to a local machine
- From a remote machine to another remote machine.
Now, let’s move on to actually using Linux SCP syntax for file transfer. The first thing you need to do is set up SSH on both of your computers. However, it’s important to note that SSH is typically installed on all Linux machines. So, if that’s the case for you, you can skip these steps.
1. Setting up SSH
Run the following command to install SSH:
sudo apt install openssh-client
2. Generating SSH keys
The client device must then establish an SSH connection. A secure connection between client and server machines needs a private key and a public key to be established. This command creates An SSH key pair for you:
ssh-keygen
while running this command, you’ll probably be asked to provide a name for the key pair and a passphrase (this is optional). Then when the key pair is created, you must copy the public key to the server machine.
Now, let’s take a look at the general form of the SCP command:
scp [options] [source username@IP]:/[directory/file name] [destination username@IP]:/[directory]
- [options] > This first bracket can be replaced with different options of the SCP command which we’ll get to later.
- [source username@IP] > This bracket should be replaced with the username and the IP address of the local machine. For example: [email protected]
- [directory/file name] > This bracket should be replaced with the location of the file you want to send.
- [destination username@IP] > This bracket should be replaced with the receiving machine’s username and IP address.
- [directory] > Replace this section with the desired location of your file on the remote machine.
So, now you know what the general command looks like. Let’s look at all the useful options of the SCP command:
| Option | Usecase |
| -C |
By using this option, SCP compresses your files when transferring them.
|
| -c <cipher> |
You can use this option to tell SCP to use a specific cipher. For example, scp -c <aes128-ctr>.
|
| -v |
This option gives you a step-by-step flow of the process.
|
| -l <limit in kilobytes> |
This option allows you to set a limit for the maximum bandwidth. For example, the following example sets the bandwidth usage to 100 kb per second: scp -l 100
|
| -P |
By using this option, you can change the ssh port of the remote server you want to connect to. SCP uses port 22 by default.
|
| -S <program name> |
You can use this option to choose a program for connection.
|
| -r |
Copy a whole file or directory recursively.
|
Transferring Files With SCP
So, you remember that we have three types of transfers with SCP, right? Now, we want to explore each type of transfer dependently. But let’s define the mission before getting started. I have this cat photo on the desktop of my Linux computer, and in the first step, I want to transfer it to a Linux remote server. Then I’ll transfer it back to my local computer. And lastly, the lucky cat will move between two remote machines.

SCP from Local to Remote
Using this command will transfer our file from a local computer to a remote server:
scp [path/to/the/file] [Username]@[IP address]:[path/to/the/location]
To use scp command with password you should enter the password of your remote server. And then you’re done.

SCP from Remote to Local
In order to reverse this process, you don’t need to access the terminal of your remote server. On your local computer’s terminal, type this command:
scp [username]@[IP address of the remote machine]:[path/to/the/file] [path/to/the/location]
As you can see, we have just reversed the two parts of this command.

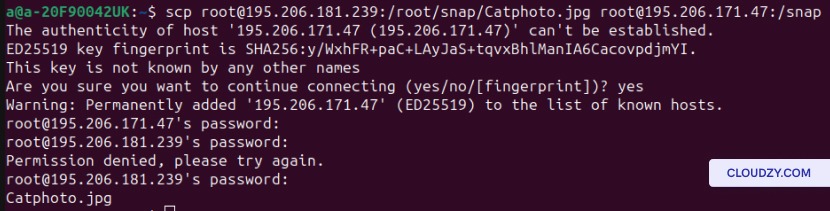
SCP between Two Remote Machines
Now, let’s transfer the cat between two remote machines. This step requires the password to both of the remote machines, so make sure you have them. Use this command to transfer a file between two remote computers:
scp [username of the 1st remote machine]@[IP address of the 1st remote machine]:[path/to/the/file] [username of the 2nd remote machine]@[IP address of the 2nd remote machine]:/[path/to/location]
Other Common SCP Commands
The most common SCP commands are scp from remote to local, scp from local to remote, and SCP between two remote hosts. But let’s not stop there and explore some other useful Linux scp example.
1. Copying an Entire Directory Recursively
Imagine you want to transfer a whole directory with all the files it contains. It would be really time-consuming to transfer those files one by one. Instead, you can use the scp multiple files command to copy a directory recursively:
scp -r [Path/to/directory] [username of the remote server]@[Ip address]:/[path/to/the/location]
This can be useful for many scenarios:
- Code Deployment: when you’re deploying code or web applications, you may need to transfer an entire directory with all of its components like files and scripts.
- Backup and Sync: IF you want to have a backup of an entire directory or if you want to synchronize two directories on the local machine and the remote server, you need to copy everything recursively.
- System Migration: A crucial task in system migration is to copy and transfer every piece of vital information. Using SCP command with -r option will make sure that you don’t miss anything in your moving process.
2. Limiting Bandwidth Usage
If you want to control the rate at which your data is being transferred, you can use the following command:
scp -l <limit> [path/to/the/file] [Username]@[IP address]:[path/to/the/location]
Why would you do that though?
In these two scenarios, you can use Linux scp syntax to set a limit on the bandwidth:
- Network Congestion: If your network is highly congested, limiting bandwidth with scp can help with the distribution of network resources. Limiting bandwidth with SCP ensures that other network-related tasks run without any problems. This is also important when transferring files over a shared network, and your process can hinder the network activities of other users.
- Background Transfers: During background SCP transfers like automated backups or synchronization processes, there’s a chance that these tasks will gobble up your network resources. In this case, you can limit the bandwidth on these transfer processes to manage the resources better.
3. Getting a Detailed Log
Using the -v Option with SCP will give you a detailed log of additional information about the transfer process. You can use the command below to get detailed feedback and information:
scp -v [path/to/the/file] [Username]@[IP address]:[path/to/the/location]
Here’s why you need to remember and use this command:
- Troubleshooting: using this option shows you the progress of the transfer in action. You can see information like file size and the percentage of completion. It also gives you error messages and warnings. Combining these data allows you to monitor and troubleshoot the transfer process when needed.
4. Specifying an SSH Port
Using Linux scp syntax with the -P option allows you to change the SSH port. Here’s the command that lets you do that:
scp -P [port number] [path/to/the/file] [Username]@[IP address]:[path/to/the/location]
This can be useful for:
- Firewall Configuration: If the default SSH port is restricted or if you want to hide the SSH service from potential threats, you can change the SSH port.

Are There Any Alternatives to SCP?
SCP is fast and secure, and by knowing the right Linux scp syntax and some troubleshooting knowledge, it can be the only tool you need. However, there’s no harm in reviewing its alternatives.
1. rsync
rsync is a versatile file transfer tool with advanced synchronization capabilities, incremental transfers, and remote and local copying. It can also reduce bandwidth usage by only transferring the differences between source and destination files. Another great advantage of using rsync is that it can pick up interrupted file transfers from where they left off and continue the process.
rsync Pros
- Efficient synchronization of files and directories.
- Supports delta-transfer algorithm, reducing data transfer.
- Can resume interrupted transfers.
rsync Cons
- Requires rsync to be installed on both the source and destination systems.
- Requires more setup and command options compared to scp.
2. SFTP (SSH File Transfer Protocol)
SFTP provides a secure way to transfer files over SSH. It offers similar functionality to FTP but operates over an encrypted SSH connection, just like SCP. But in some areas, SFTP’s advantages outweigh SCP’s advantages. SCP can’t generate directory listings, create or delete directories, Etc. SFTP, however, can perform all these tasks.
SFTP Pros
- Secure file transfer with encryption.
- Remote file management capabilities.
- Wide availability on most Linux and Unix systems.
SFTP Cons
- Command syntax and usage differ from traditional FTP.
- May have limited support on certain embedded systems or devices.
3. FTP (File Transfer Protocol)
FTP is a widely used standard protocol for file transfer. It operates in a client-server model and offers basic file transfer functionality.
FTP Pros
- Wide support across various platforms.
- Familiar command-line and graphical clients are available.
FTP Cons
- Lacks encryption/ less secure compared to scp and sftp.
- May require additional firewall configuration to establish connections.
- Plain text authentication.
Overall, while scp is a simple and reliable choice for secure file transfer over SSH, alternatives like rsync, sftp, and FTP may offer additional features and flexibility depending on specific requirements.
So how do you decide which one to choose? You should consider factors such as security, synchronization needs, ease of use, and compatibility with your systems and protocols. For example, if security and data confidentiality are the most important factors in your file transfer, then FTP is not a good choice.

Conclusion
SCP is a fast and secure tool for file transfer between computers. You can use scp from remote to local, from local to remote, and even between two remote systems to transfer files. And although there are alternatives to SCP that do an adequate job, like rsync, it transcends them in many ways, especially in security and speed. In this blog post, we talked about SCP, its use cases, and alternatives and also provided a cheat sheet for easy access to the frequently used syntax.
FAQ
Are there any security concerns I should be aware of when using SCP from Remote to Local?
SCP is a rather safe and secure tool, and you don’t need to worry about security threats while using it. However, it’s always recommended to take any extra security measures that you can.
What are some common errors that occur when using SCP remote to local?
When using SCP to transfer files from a remote server to a local machine, users may encounter several common errors. Here are two of the most common errors using SCP remote to local:
- No such file or directory: this error happens when you haven’t specified the right port number, file permission settings are incorrect, or when log-in information is incorrect.
- Host Key Verification Failed: This error message happens when the host key has changed due to server upgrades. The host key shows that you’ve connected to that server before, and when host key verification fails, it indicates that the server’s identity has changed. This error is trying to protect you from connecting to a fraud server.
How do I use SCP to transfer files between remote systems?
In order to successfully transfer files between systems using SCP, both of the computers should be accessible through SSH. you also need the IP address and the password of the remote machines. The rest is just using the right SCP command:
scp [username of the 1st remote machine]@[IP address of the 1st remote machine]:[path/to/the/file] [username of the 2nd remote machine]@[IP address of the 2nd remote machine]:/[path/to/location]
After typing this command, you’ll be asked to provide the password to the servers. After that, your file will be transferred.