If you are an online gamer, you definitely have heard of TeamSpeak or have heard of it before. TeamSpeak is one of the most commonly-used VoIP (Voice over Internet Protocol) solutions among online gamers. With TeamSpeak, you can voice chat with your team members, friends, and coworkers securely with low latency and across different platforms.
If you need to use TeamSpeak, you need to understand how to install it. The process might be a little confusing because you have to set up the TeamSpeak server. In this blog post, I will walk you through the guide on how to set up TeamSpeak server on Linux step-by-step. By the end of this blog post, you will learn how to set up the server on Debian 9, Ubuntu, and CentOS. So buckle up!
 Talk Freely
Set up your own private server with TeamSpeak for all your VoIP and conferencing needs — with NVMe storage and ultrafast 1Gbps connection.
Set up your TeamSpeak VPSHow to SetUp TeamSpeak Server on Linux?
There are four steps in setting up the protocol. Follow the following steps carefully, and you will be good to go:
1- Install the Necessary Utilities
First, you need to know that the TeamSpeak 3 server does not require additional libraries to run on Debian 9.
However, if you want to download and remove server software, you need to install Wget download manager and bzip2 to extract the server software. Use the following commands to install these necessary utilities:
sudo apt-get update
sudo apt-get install wget bzip2
Now that you have the necessary software let’s move forward and install the server software.
 Trusted for Stability
Go for a Cloudzy Debian VPS and get a reliable, high-performance server with a super-stabel operating system optimized for functionality.
Get your Debain VPS2- Download and Install the TeamSpeak 3 Server
First, you need to download the latest TeamSpeak 3 software. After the download is complete, extract the server program following this command:
tar xfvj teamspeak3-server_linux_amd64-3.0.13.8.tar.bz2
After this step, you can run the server.
 Linux Hosting Simplified
Want a better way to host your websites and web apps? Developing something new? Simply don’t like Windows? That’s why we have Linux VPS.
Get your Linux VPS3- Run the TeamSpeak Server
You need to change to the TeamSpeak server directory. This directory was created automatically when the server software was extracted. Follow this command to run the server:
$ cd teamspeak3-server_linux_amd64
/teamspeak3-server_linux_amd64$ ./ts3server_startscript.sh start
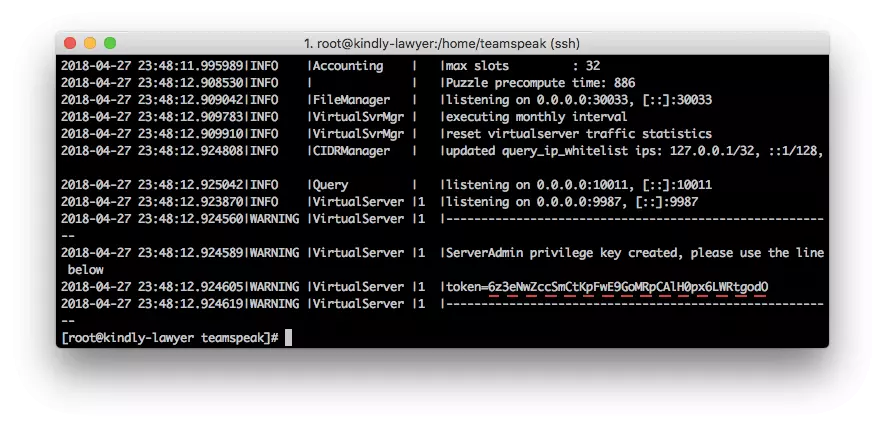
Running the server for the first time might take approximately one to three minutes. After the first start is finished, you will get the following output:
I M P O R T A N T
Server Query Admin Account created
loginname= “aloginname”, password= “aloginpassword”
I M P O R T A N T
ServerAdmin privilege key created, please use it to gain
serveradmin rights for your virtualserver. please
also check the doc/privilegekey_guide.txt for details.
token= a40characterstoken
The server query admin account is needed in emergencies. For example, if you lost your TeamSpeak user data or went through hacker attacks. Make sure to write the admin account loginname and password somewhere safe or in a password database.
Finally, to make sure that your server is running correctly, you can follow this command:
user@server:~/teamspeak3-server_linux_amd64$ ./ts3server_startscript.sh status
Your TeamSpeak server is now running.
4- Connect to a New Server
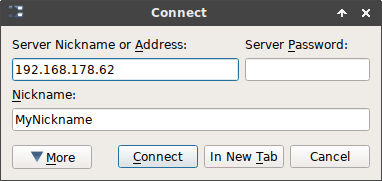
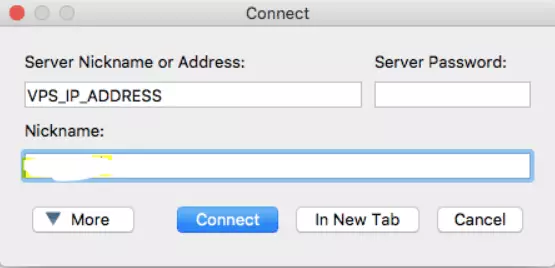
Run the TeamSpeak 3 client and click on Connections > Connect or use the CTRL+S hotkey to connect to the server. In the following dialog, enter your server’s IP address or name, choose the nickname you want to use on that server, and click on the Connect button.
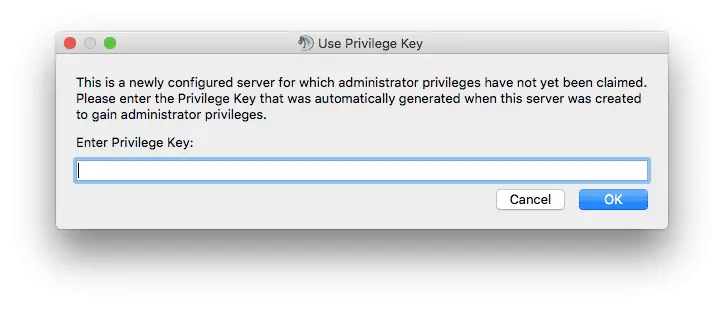
Insert the token in the dialog box as follows:
Now you should see a new symbol beside your nickname which means that you are now an admin. You should be able to build channels or server groups, edit server names, and so on. Your TeamSpeak 3 server is now completely set up. You can close your SSH connection to your server, start sharing your server address with your friends and start chatting.
TeamSpeak Update
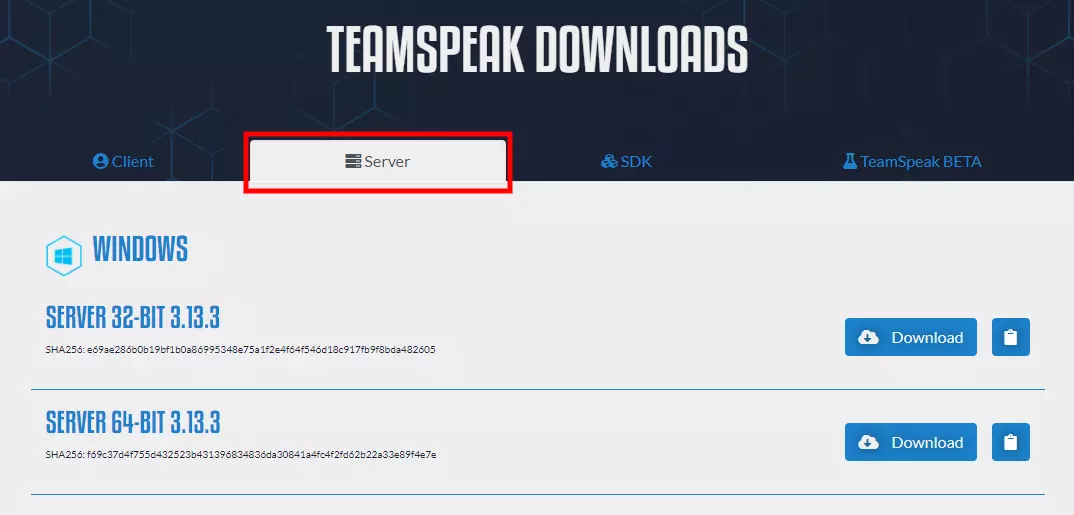
The TeamSpeak software is usually pretty stable, but you can always ensure that your server is up-to-date. To update the TeamSpeak server, simply go to the official TeamSpeak homepage, download the latest version, and extract it.
Remember, before extracting the update you have to stop the TeamSpeak 3 server. To do so, follow these commands:
user@server:~$ cd teamspeak3-server_linux_amd64
user@server:~/teamspeak3-server_linux_amd64$ ./ts3server_startscript.sh stop
Now, you can extract the update and run the server again using this command:
user@server:~/teamspeak3-server_linux_amd64$ ./ts3server_startscript.sh start
Also Read: How to set up a Teamspeak server on Windows?
How to Set up a TeamSpeak 3 Server on Ubuntu
Below are the steps you need to follow to run a Teamspeak 3 server on Ubuntu. First of all, log in to your virtual server via an SSH connection.
1- Update your system
Follow the commands below to make sure your system is updated:
apt-get update && apt-get upgrade
2- Create a user
Create a user by typing in this command:
adduser --disabled-login teamspeak
After creating your user, you can skip the user’s personal questions by Entering.
Next, to go to the home route, run this command:
cd /home/teamspeak
3- Download and Install TeamSpeak 3 server
You can download the latest version of TeamSpeak 3 software from their website or by running the Wget below:
https://files.teamspeak-services.com/releases/server/3.9.0/teamspeak3-server_linux_amd64-3.9.0.tar.bz2
4- Extract TeamSpeak 3 server and install
After downloading the file, unzip the installer file with this command:
tar xvf teamspeak3-server_linux_amd64-3.9.0.tar.bz2
Note: if you need to remove the downloaded file, use this command:
rm teamspeak3-server_linux_amd64-3.12.1.tar.bz2
The unzipped folder includes all the essential TeamSpeak server content. Move this folder to home “cd teamspeak3-server_linux_amd64 && mv * /home/teamspeak”
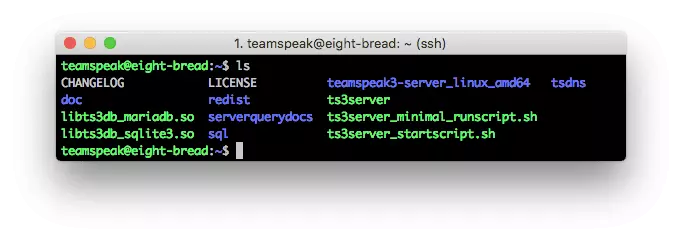
Enter the “ls” command, and then a similar screen appears, which means the process went well.
5- Accept TeamSpeak 3 terms and conditions
To run the server, you have to first accept the TeamSpeak 3 terms and conditions. The command below will accept the terms and conditions for you and create a new empty file:
touch /home/teamspeak/.ts3server_license_accepted
6- Start TeamSpeak 3 server
For starting the server on boot, you need to configure the TeamSpeak 3 server by creating a file called “TeamSpeak.service” in this directory “/lib/systemd/system.”
Type:
sudo nano /lib/systemd/system/teamspeak.service
This file should include:
[Unit]
Description=TeamSpeak 3 Server
After=network.target
[Service]
WorkingDirectory=/home/teamspeak/
User=teamspeak
Group=teamspeak
Type=forking
ExecStart=/home/teamspeak/ts3server_startscript.sh start inifile=ts3server.ini
ExecStop=/home/teamspeak/ts3server_startscript.sh stop
PIDFile=/home/teamspeak/ts3server.pid
RestartSec=15
Restart=always
[Install]
WantedBy=multi-user.target
Copy this script into an empty file and save it without an extension.
Next, activate the script on the server boot:
systemctl enable teamspeak.service
systemctl start teamspeak.service
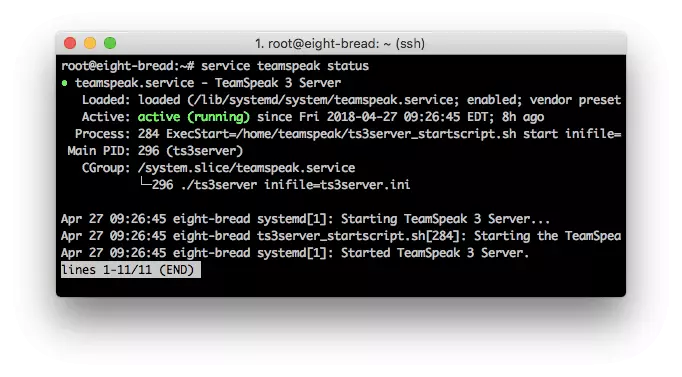
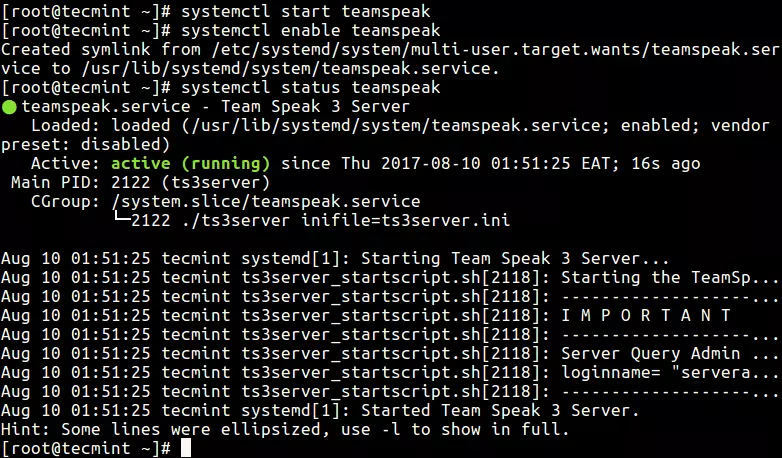
This screen will appear when the TeamSpeak 3 server is proceeding correctly.
Now, to check if everything is up and running correctly type:
systemctl | grep teamspeak.service
This command,
service teamspeak status
will check the server’s status in the final step.
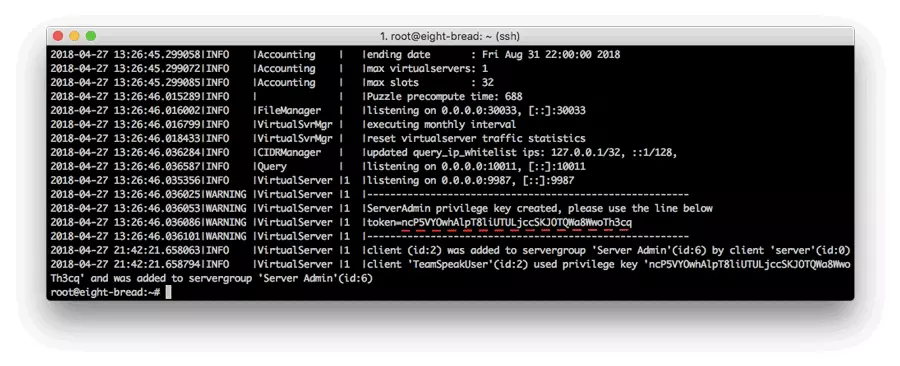
7- Retrieve the privilege key
After the TS3server on Ubuntu runs successfully, execute the privilege key:
cat /home/teamspeak/logs/ts3server_*
Once you want to connect to the server.
8- Connect using TeamSpeak 3 client
Enter your VPS IP address, server password, and choose a nickname (Display name) to connect to the server.
Then type in your privilege key and click on Enter.
How to setup TeamSpeak server on centos
Installing the TeamSpeak server on CentOS is similar to installing it on Ubuntu. Like the previous guide, you should first connect to your VPS through an SSH protocol to start with the installation process.
 The Ultimate Minimal Server
Get CentOS 7 or CentOS 8 on your Cloudzy CentOS VPS and run an efficient Linux-based server with minimal resource consumption.
Get a CentOS VPS1- Update the centos
First, you need to make sure your operating system is up-to-date. Update your CentOS 7 server packages and then install needed dependencies for the installation process by typing this command:
yum -y update
2- Add a new user
Then, create a user for the TeamSpeak server to run in user mode separately:
adduser teamspeak
Next, go to the new user’s home directory through this command:
cd / home / teamspeak
3- Download and unzip TeamSpeak 3 server program
There are two ways to download the updated TeamSpeak 3 server for CentOS. Either download TeamSpeak 3 server from TeamSpeak’s website or run the Wget command below:
wget http://dl.4players.de/ts/releases/3.12.1/teamspeak3-server_linux_amd64-3.12.1.tar.bz2
Then extract the update and move all of the files to the home directory:
tar xvf teamspeak3-server_linux_amd64-3.12.1.tar.bz2
cd teamspeak3-server_linux_amd64 && mv * /home/teamspeak && cd .. && rm -rf teamspeak3-server_linux_amd64-3.12.1.tar.bz2
Once the download completes, type IS in the screen below:
4- Accept the TeamSpeak 3 terms and conditions
Just like the previous guide, you need to accept Teamspeak’s license agreement. To do so, create this empty file:
touch /home/teamspeak/.ts3server_license_accepted.
You can now turn on the TeamSpeak 3 server and add it to startup.
5- Turn on the TeamSpeak 3 server
Start your TeamsSpeak3server on boot by following this script:
[Unit]
Description=TeamSpeak 3 Server
After=network.target
[Service]
WorkingDirectory=/home/teamspeak/
User=teamspeak
Group=teamspeak
Type=forking
ExecStart=/home/teamspeak/ts3server_startscript.sh start inifile=ts3server.ini
ExecStop=/home/teamspeak/ts3server_startscript.sh stop
PIDFile=/home/teamspeak/ts3server.pid
RestartSec=15
Restart=always
[Install]
WantedBy=multi-user.target
Save and close the file. Then start the TeamSpeak server and enable it to start automatically at system boot with these commands:
systemctl enable teamspeak.service
systemctl start teamspeak.service
To get the TeamSpeak 3 server report type:
service teamspeak status
Checks if everything is done successfully by this command:
systemctl | grep teamspeak.service
6- Retrieve the privileged key
An administrator key will be generated the first time you run the TeamSpeak server. Use this key to connect to the server via a TeamSpeak client. Run this command to copy the TeamSpeak 3 server token:
cat /home/teamspeak/logs/ts3server_*
7- Establish a new connection by TeamSpeak 3 client
The last step is to connect to your server via the TeamSpeak client. Put in your VPS IP address in the server Nickname or address field.
Next, paste in the copied privilege key.
You are all set up and ready to go!
How do I Build a TeamSpeak Server?
The entire process begins by accessing your VPS via SSH and can be broken down into 6 easy steps.
- Build a new system user
- Download and extract TeamSpeak 3 server
- Accept the TeamSpeak license agreement
- Start TeamSpeak server
- Retrieve the privileged key
- Connect via TeamSpeak client
 Talk Freely
Set up your own private server with TeamSpeak for all your VoIP and conferencing needs — with NVMe storage and ultrafast 1Gbps connection.
Set up your TeamSpeak VPSTo Recap
You now know everything about setting up a TeamSpeak server on Linux, whether you are working with Debian, CentOS, or Ubuntu. TeamSpeak is a convenient live chat solution. You can use it to connect with your team members, friends, and other contestants on any gaming platform. Setting up a TeamSpeak server on Linux is actually easy once you learn the installation process. Follow this guide step-by-step, and you’re good to go.
If you come across any difficulties in the setup process, contact our support technicians. We will be happy to help!





It’s like you read my mind! You appear to know so much about the TeamSpeak server, like
you wrote the book in it or something.
Thanks for your thorough article. I am not using teamspeak server right now but when I do I will definitely use your article to set it up on my OS
Can you tell us more about this? I’d love to find out more
details.
We sincerely appreciate your interest in this topic 💛 The subject of how to Setup TeamSpeak Server on Linux is quite wide; would you please tell us more specifically which section needs more explanation? Thanks 🍃
Hey there would you mind letting me know which
web host you’re using? I’ve loaded your blog in 3 completely different web browsers
and I must say this blog loads a lot quicker then most.
Can you suggest a good internet hosting provider at a honest price?
Cheers, I appreciate it!
Hi, Thanks a million for your incredible comment; it really made our day🤩 We at RouterHosting use our own dedicated servers for web hosting, and if you buy cheap VPS from us, we guarantee you’ll have the same user experience and performance in the palm of your hand. ✅💯
This is a topic that’s near to my heart… Best wishes!
Exactly where are your contact details though?
Thank you so much for taking your precious time to read our blog and the intoxicating comment. Cheers! 🤩💛
An outstanding share! I have just forwarded this onto a colleague who has been doing a
little research on this. And he in fact ordered me lunch because
I found it for him… lol. So let me reword this….
Thank YOU for the meal!! But yeah, thanx for spending time to talk about this matter here on your
site.
Wonderful blog! Do you have any tips and hints for
aspiring writers? I’m planning to start my own website soon but I’m a little lost on everything.
Would you propose starting with a free platform like
Wordpress or go for a paid option? There are so many options
out there that I’m completely overwhelmed .. Any suggestions?
Many thanks!
Hi, Thank you so much for your incredible words about our blog 🌻💛
We truly appreciate your passion for writing. If you have plans to become a novelist, Wattpad is perfect to start with! For writing blogs, WordPress and Medium are very powerful publishing tools.
At this time it looks like BlogEngine is the best
blogging platform out there right now. (from what I’ve read) Is that what
you’re using on your blog?
Thanks for finally writing about >How to Setup
TeamSpeak Server on Linux ❓ <Loved it!
We sincerely appreciate your amazing comment and positive energy 💛🤩
We’re so delighted to hear that you’ve found our blog interesting. Please visit our blogs more often to make our day with your comments. 🍃
How to configure teamspeak servers for shared hosting?
You can enable and setup Teamspeak server using my guide .
Hi there, just became aware of your blog through Google, and found
that it’s really informative. How do I choose the best teamspeak server for my small business?
For the simplest performance, you must seek for a server that’s nearest to your small business.
Alternatively, if you’re trying to host your own server, please visit teamspeak website to download teamspeak server software system .
I know this web page provides quality depending content and extra material. Are there any software like TeamSpeak for group calls ?
There are variable group call software that can be select. you can choose the best option after reading this useful blogpost.
I was examining some of your blog posts on this website and I believe this site is real
informative! Keep on posting. Does teamspeak have its own server? Is it safe for daily meetings?
Teamspeak is extremely well trusted, therefore in recent years it has taken quite an few users away. I’ve not detected of any security problems with either program, however that doesn’t mean they don’t exist.
I interested in security topics. How do I DDoS my own Minecraft server?
If the server’ on your own network, feel free. however if it’ hosted somewhere, then your DDOS could impact people exploitation an equivalent network path or alternative infrastructure. you’ll raise permission, but they’ll nearly actually say no – SPs are typically comfy with pentesting but no one fools around with DDOS testing
Can you tell us more about this? I’d care to find out more details. Is hosting a Minecraft server safe?
The likelihood of being hacked is doubtful. although we have a tendency to assume that there are easy tools that enable you to easily “hack the server” and compromise everything on the server itself, the probability of turning into a target is not zero.
An interesting discussion is definitely worth comment.
I believe that you should write more about this subject, it might not be a taboo matter but generally people don’t talk about such issues.
To the next! All the best!!
Thank you for taking the time to leave us your feedback.